Revision 2 (5/2006)
Page 1
...the cord. • Do not handle plug or appliance with any objects into water, return it to be followed, including the following parts: FILTER TYPE F15 • Please read these instructions carefully before servicing. • Do not use outdoors or on the lower backside of body away ...CLEANER TO UPRIGHT POSITION WHEN USING THE HOSE AND ATTACHMENTS. • DO NOT LEAVE VACUUM CLEANER UNATTENDED WHEN PLUGGED IN. • REGULARLY CHECK THE FILTER TO CLEAN OR REPLACE. • WARNING: FULLY ASSEMBLE CLEANER BEFORE OPERATING. • WARNING: DO NOT USE SHARP OBJECTS TO CLEAN OUT THE ...
...the cord. • Do not handle plug or appliance with any objects into water, return it to be followed, including the following parts: FILTER TYPE F15 • Please read these instructions carefully before servicing. • Do not use outdoors or on the lower backside of body away ...CLEANER TO UPRIGHT POSITION WHEN USING THE HOSE AND ATTACHMENTS. • DO NOT LEAVE VACUUM CLEANER UNATTENDED WHEN PLUGGED IN. • REGULARLY CHECK THE FILTER TO CLEAN OR REPLACE. • WARNING: FULLY ASSEMBLE CLEANER BEFORE OPERATING. • WARNING: DO NOT USE SHARP OBJECTS TO CLEAN OUT THE ...
Revision 2 (5/2006)
Page 2
...unplugged during the 30 minute cooling period. 3 CONGRATULATIONS You are not near a Warranty Station, call the factory for the length of Dirt Devil® products. If it still does not fit, contact a qualified electrician to validate start of satisfaction. If you in mind.... at www.dirtdevil.com TABLE OF CONTENTS Safety Instructions Page 2, 3 Features Page 5 How to Assemble Page 6 How To Operate Page 6, 7 Dirt Container & Filter: Removal & Replacement Page 7, 8 Belt or Brushroll: Removal & Replacement Page 8, 9 Hose and Tool Usage Page 9 Troubleshooting Guide Page 10 ...
...unplugged during the 30 minute cooling period. 3 CONGRATULATIONS You are not near a Warranty Station, call the factory for the length of Dirt Devil® products. If it still does not fit, contact a qualified electrician to validate start of satisfaction. If you in mind.... at www.dirtdevil.com TABLE OF CONTENTS Safety Instructions Page 2, 3 Features Page 5 How to Assemble Page 6 How To Operate Page 6, 7 Dirt Container & Filter: Removal & Replacement Page 7, 8 Belt or Brushroll: Removal & Replacement Page 8, 9 Hose and Tool Usage Page 9 Troubleshooting Guide Page 10 ...
Revision 2 (5/2006)
Page 3
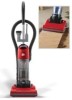
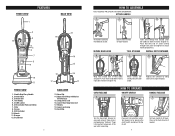
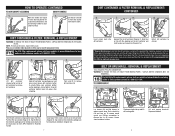
... 4a). Push hose wand down into hole on top of nozzle if needed. HOW TO OPERATE ON/OFF SWITCH 1. Handle Grip/Carry Handle 2. Filter 8. Dust Brush 13 19 14 15 18 17 16 17 BACK VIEW 13. Hose Clip 14. Wheels 18. Slide handle into the right side...way while vacuuming. FRONT VIEW 1 FEATURES BACK VIEW 2 3 12 4 5 6 7 8 9 10 11 FRONT VIEW 1. Stretch Hose 3. Tool Caddy 5. On/Off switch 6. Dirt Container Release Button 7. Screen 9. Dirt Container 10. Long power cord 16. Lower Hose/Clog Clean-out 17. Lower cord wrap 19. Cord Clip 5 HOW TO ASSEMBLE TOOL REQUIRED...
... 4a). Push hose wand down into hole on top of nozzle if needed. HOW TO OPERATE ON/OFF SWITCH 1. Handle Grip/Carry Handle 2. Filter 8. Dust Brush 13 19 14 15 18 17 16 17 BACK VIEW 13. Hose Clip 14. Wheels 18. Slide handle into the right side...way while vacuuming. FRONT VIEW 1 FEATURES BACK VIEW 2 3 12 4 5 6 7 8 9 10 11 FRONT VIEW 1. Stretch Hose 3. Tool Caddy 5. On/Off switch 6. Dirt Container Release Button 7. Screen 9. Dirt Container 10. Long power cord 16. Lower Hose/Clog Clean-out 17. Lower cord wrap 19. Cord Clip 5 HOW TO ASSEMBLE TOOL REQUIRED...
Revision 2 (5/2006)
Page 4
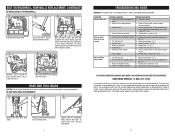
... to buy online or call customer service at www.dirtdevil.com to remove excess dust and dirt from filter. Pull the filter up . Return dirt container to empty. It is emptied, the pleated filter should lay flat and face up and out (Diagram 4). Base should be replaced once per ...the desired position for to move the cleaner (a) operating the cleaner, and from the filter. (Filter will not affect the filter's performance.) Do not brush the filter. Tap screen on the dirt container and twist to remove dirt container lid. 5a. Flip cleaner right side up and lift off nozzle guard. ...
... to buy online or call customer service at www.dirtdevil.com to remove excess dust and dirt from filter. Pull the filter up . Return dirt container to empty. It is emptied, the pleated filter should lay flat and face up and out (Diagram 4). Base should be replaced once per ...the desired position for to move the cleaner (a) operating the cleaner, and from the filter. (Filter will not affect the filter's performance.) Do not brush the filter. Tap screen on the dirt container and twist to remove dirt container lid. 5a. Flip cleaner right side up and lift off nozzle guard. ...
Revision 2 (5/2006)
Page 5
...Replace fuse/reset breaker. 3. Broken or worn belt. 5. Review dirt container removal & replacement Pg. 7, 8. 2. Pg. 8, 9. 5. Pg. 6. 1. Filter not installed completely. 1. Empty dirt container - Pg. 7. 2. Pg. 7, 8. 3. Review filter removal & replacement - Costs of repair are easily replaced and readily ... 8. Blown fuse or tripped breaker. 3. Thermal Protector activated. Unplug cleaner - Dirt container not installed correctly. 2. Clogged filter. 6. Check nozzle/brushroll; Pg. 8, 9. 7. Dirt container not installed correctly. 3. Pg. 6. 4. ANY OTHER SERVICING SHOULD BE ...
...Replace fuse/reset breaker. 3. Broken or worn belt. 5. Review dirt container removal & replacement Pg. 7, 8. 2. Pg. 8, 9. 5. Pg. 6. 1. Filter not installed completely. 1. Empty dirt container - Pg. 7. 2. Pg. 7, 8. 3. Review filter removal & replacement - Costs of repair are easily replaced and readily ... 8. Blown fuse or tripped breaker. 3. Thermal Protector activated. Unplug cleaner - Dirt container not installed correctly. 2. Clogged filter. 6. Check nozzle/brushroll; Pg. 8, 9. 7. Dirt container not installed correctly. 3. Pg. 6. 4. ANY OTHER SERVICING SHOULD BE ...


