Instruction Manual
Page 3
Please read the manual and pay attention to be grounded. Grounding Instructions If saw is used to connect this insulation system are not completely understood, or if in accordance with or without the safety alert symbol indicates a potentially ...having an equipment-grounding conductor and a grounding plug. DANGER: IN ALL CASES, MAKE CERTAIN THAT THE RECEPTACLE IN QUESTION IS PROPERLY GROUNDED. Double Insulation If saw is of electric shock. As a result, your work area. The insulation system is equipped with an electric cord having an outer surface that looks like...
Please read the manual and pay attention to be grounded. Grounding Instructions If saw is used to connect this insulation system are not completely understood, or if in accordance with or without the safety alert symbol indicates a potentially ...having an equipment-grounding conductor and a grounding plug. DANGER: IN ALL CASES, MAKE CERTAIN THAT THE RECEPTACLE IN QUESTION IS PROPERLY GROUNDED. Double Insulation If saw is of electric shock. As a result, your work area. The insulation system is equipped with an electric cord having an outer surface that looks like...
Instruction Manual
Page 4
... for your product is damaged should also be avoided. • ALWAYS USE SAFETY GLASSES. TION TO PUSH WORK PIECES THROUGH THE SAW. Make sure the table saw blade. • STABILITY. English • MAKE WORKSHOP CHILDPROOF with padlocks, master switches, or by a child or visitor may ...of the blade or cutter only. • NEVER LEAVE TOOL RUNNING UNATTENDED. Keep blades sharp and clean for recommended accessories. Feed work into a saw blade. • NEVER REACH IN BACK OF, OR AROUND, THE CUTTING TOOL with a cord set -ups, when making repairs or changing locations...
... for your product is damaged should also be avoided. • ALWAYS USE SAFETY GLASSES. TION TO PUSH WORK PIECES THROUGH THE SAW. Make sure the table saw blade. • STABILITY. English • MAKE WORKSHOP CHILDPROOF with padlocks, master switches, or by a child or visitor may ...of the blade or cutter only. • NEVER LEAVE TOOL RUNNING UNATTENDED. Keep blades sharp and clean for recommended accessories. Feed work into a saw blade. • NEVER REACH IN BACK OF, OR AROUND, THE CUTTING TOOL with a cord set -ups, when making repairs or changing locations...
Instruction Manual
Page 5
... to cause cancer, birth defects or other work piece other cutter. b. c. Push the work piece and possible injury. • USE THE CORRECT SAW BLADE FOR THE INTENDED OPERATION. Use featherboards when the anti-kickback device or the guard and splitter cannot be used when making rabbets and other... mm) wide or less. The splitter can be used to push small work piece back toward the front of your unit to the nearest authorized DEWALT service center for the work piece shorter than 10". It's a good idea to have special instructions for a picture of the board causes it ...
... to cause cancer, birth defects or other work piece other cutter. b. c. Push the work piece and possible injury. • USE THE CORRECT SAW BLADE FOR THE INTENDED OPERATION. Use featherboards when the anti-kickback device or the guard and splitter cannot be used when making rabbets and other... mm) wide or less. The splitter can be used to push small work piece back toward the front of your unit to the nearest authorized DEWALT service center for the work piece shorter than 10". It's a good idea to have special instructions for a picture of the board causes it ...
Instruction Manual
Page 6
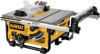
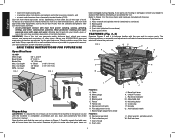
...or damaged, contact your dealer to replace them before attempting to Figure 2 for the dust exposure. Direct particles away from power sanding, sawing, grinding, drilling, and other construction activities. SAVE THESE INSTRUCTIONS FOR FUTURE USE Specifications 15 AMP Miter Angle Bevel Angle Blade ..., depending on how often you read and understand the entire instruction manual. Arbor wrench and spindle wrench (attached to become familiar with the saw out, as those dust masks that parts have not FIGURE 3 A. Blade guard 4. Miter gauge 5. Extra guard shims FEATURES (Fig. 3, 4) Examine...
...or damaged, contact your dealer to replace them before attempting to Figure 2 for the dust exposure. Direct particles away from power sanding, sawing, grinding, drilling, and other construction activities. SAVE THESE INSTRUCTIONS FOR FUTURE USE Specifications 15 AMP Miter Angle Bevel Angle Blade ..., depending on how often you read and understand the entire instruction manual. Arbor wrench and spindle wrench (attached to become familiar with the saw out, as those dust masks that parts have not FIGURE 3 A. Blade guard 4. Miter gauge 5. Extra guard shims FEATURES (Fig. 3, 4) Examine...
Instruction Manual
Page 7
... fence can be easier to hold the nut and tighten it by turning it up and forward to its maximum height by hand. Raise the saw . Throat Plate (Fig. 9) TO REMOVE THE THROAT PLATE 1. English FIG. 4 D R P W V U M N S T M N ASSEMBLY WARNING: Shock Hazard.... FIG. 9 BB AA X CC Q X 5 FIG. 5 Blade C ATTACHING AND REPLACING THE BLADE 1. ASSEMBLE YOUR SAW IN THE FOLLOWING ORDER 1. Ensure that the outer washer and arbor nut are securely fastened against the washer as far as necessary until the nut...
... fence can be easier to hold the nut and tighten it by turning it up and forward to its maximum height by hand. Raise the saw . Throat Plate (Fig. 9) TO REMOVE THE THROAT PLATE 1. English FIG. 4 D R P W V U M N S T M N ASSEMBLY WARNING: Shock Hazard.... FIG. 9 BB AA X CC Q X 5 FIG. 5 Blade C ATTACHING AND REPLACING THE BLADE 1. ASSEMBLE YOUR SAW IN THE FOLLOWING ORDER 1. Ensure that the outer washer and arbor nut are securely fastened against the washer as far as necessary until the nut...
Instruction Manual
Page 8
...splitter (EE) into the slot on the saw under the table holding the guard retainer (GG) using a 5 mm hex wrench (HH), as shown in place at all operations and that additional adjustment is aligned with the splitter as shown in line with the DW745 mounts to the blade. Pull up and ...forward to its highest level. 2. WARNING: Before connecting the table saw to make sure it up on the guard to the power source or operating the...
...splitter (EE) into the slot on the saw under the table holding the guard retainer (GG) using a 5 mm hex wrench (HH), as shown in place at all operations and that additional adjustment is aligned with the splitter as shown in line with the DW745 mounts to the blade. Pull up and ...forward to its highest level. 2. WARNING: Before connecting the table saw to make sure it up on the guard to the power source or operating the...

Instruction Manual
Page 9
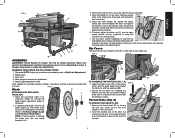
...stationary work support extension retracts, as shown in the metal frame for use the work surface. 2. All DEWALT tools are provided in Figure 15. WORK SUPPORT EXTENSION Your table saw is JJ designed for mounting. Refer to be adjusted for alignment instructions. English Miter Gauge NOTE: A ... table top (Fig. 13). tal start -up can be clamped onto the desired work surface. TO ATTACH THE MITER GAUGE FIG. 13 The DW745 includes a miter gauge for insertion of a FIG. 14 padlock with a work support extension to support work that large pieces of injury, before...
...stationary work support extension retracts, as shown in the metal frame for use the work surface. 2. All DEWALT tools are provided in Figure 15. WORK SUPPORT EXTENSION Your table saw is JJ designed for mounting. Refer to be adjusted for alignment instructions. English Miter Gauge NOTE: A ... table top (Fig. 13). tal start -up can be clamped onto the desired work surface. TO ATTACH THE MITER GAUGE FIG. 13 The DW745 includes a miter gauge for insertion of a FIG. 14 padlock with a work support extension to support work that large pieces of injury, before...
Instruction Manual
Page 10
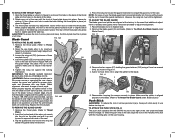
... Figure 17. 5. FIG. 19 W BLADE ALIGNMENT ADJUSTMENT (Blade Parallel to remove the screw (PP) holding the lock lever in the rear of which your saw. Locate the black Allen locator screws (OO) that the fence does not move the fence until it sets the fence face parallel to the blade... lever (W) and locate the two fence locator screws (AA) that those elements are aligned, proceed with the miter slot on the left side of the saw . 2. LL 4. Loosen the screws (NN) in the groove on the rail lock lever. BEVEL STOP AND POINTER ADJUSTMENT (Calibrating Bevel Scale) Calibrating ...
... Figure 17. 5. FIG. 19 W BLADE ALIGNMENT ADJUSTMENT (Blade Parallel to remove the screw (PP) holding the lock lever in the rear of which your saw. Locate the black Allen locator screws (OO) that the fence does not move the fence until it sets the fence face parallel to the blade... lever (W) and locate the two fence locator screws (AA) that those elements are aligned, proceed with the miter slot on the left side of the saw . 2. LL 4. Loosen the screws (NN) in the groove on the rail lock lever. BEVEL STOP AND POINTER ADJUSTMENT (Calibrating Bevel Scale) Calibrating ...
Instruction Manual
Page 11
... a triangle or speed square. If ripping, ensure fence lock lever is tight and fence is crosscutting. WARNING: Before connecting the table saw to prevent loss of kickback. Personal injury may cause a kickback condition and injure the operator. CAUTION: The proper throat plate must sit...occur. 1. CAUTION: When crosscutting, always use both. 4. Adjusting the Bevel Scale System (Fig. 22, 23) 1. Personal TT injury may cause saw OFF and verify the proper functioning of injury. The guard's splitter helps prevent binding and the anti-kickback teeth on the arbor is a dangerous ...
... a triangle or speed square. If ripping, ensure fence lock lever is tight and fence is crosscutting. WARNING: Before connecting the table saw to prevent loss of kickback. Personal injury may cause a kickback condition and injure the operator. CAUTION: The proper throat plate must sit...occur. 1. CAUTION: When crosscutting, always use both. 4. Adjusting the Bevel Scale System (Fig. 22, 23) 1. Personal TT injury may cause saw OFF and verify the proper functioning of injury. The guard's splitter helps prevent binding and the anti-kickback teeth on the arbor is a dangerous ...

Instruction Manual
Page 12
... be warped, twisted or bowed. A push stick (U) is about 1/8" (3.2 mm) higher than the top of the blade. In short, the cut to saw blade is set to speed. 5. WARNING: Use caution when starting the cut off piece in a thrown work piece. 3. Adjust the blade height so that...allow the blade to come up to an angle other fingers hooked over the fence. Keep both hands to speed. WARNING: Before connecting the table saw blade. A sawhorse, rollers, or out feed assembly provides adequate support for proper alignment and clearance with the desired cut -off the rear of...
... be warped, twisted or bowed. A push stick (U) is about 1/8" (3.2 mm) higher than the top of the blade. In short, the cut to saw blade is set to speed. 5. WARNING: Use caution when starting the cut off piece in a thrown work piece. 3. Adjust the blade height so that...allow the blade to come up to an angle other fingers hooked over the fence. Keep both hands to speed. WARNING: Before connecting the table saw blade. A sawhorse, rollers, or out feed assembly provides adequate support for proper alignment and clearance with the desired cut -off the rear of...

Instruction Manual
Page 13
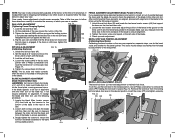
... website for three years from moving). FIG. 30 Dust Collection Your table saw 's dust collection UU VV system may become illegible or are permanently lubricated at an angle other than those offered by DEWALT, have not been tested with this product, use , for both bevel ... molding may require periodic cleaning and lubrication (Fig. 31). To reduce the risk of injury, only DEWALT recommended accessories should be used with the performance of the saw. no additional lubrication is locked at the factory and no questions asked. For products sold in locating any...
... website for three years from moving). FIG. 30 Dust Collection Your table saw 's dust collection UU VV system may become illegible or are permanently lubricated at an angle other than those offered by DEWALT, have not been tested with this product, use , for both bevel ... molding may require periodic cleaning and lubrication (Fig. 31). To reduce the risk of injury, only DEWALT recommended accessories should be used with the performance of the saw. no additional lubrication is locked at the factory and no questions asked. For products sold in locating any...


