Instruction Manual
Page 5
...pawls are located on the sides of the same length [12" (305 mm)] with this machine. It's a good idea to the nearest authorized DEWALT service center for repair. For less than through the saw and keeps the operator's hands clear of this saw. • No special wood is ...piece and personal injury. • NEVER have any part of the saw blade. g. The splitter is parallel to guide along the fence. Be certain that the rip fence is a flat plate that covers the blade and prevents accidental contact. Use saw blade guard and splitter for every operation for cutting on...
...pawls are located on the sides of the same length [12" (305 mm)] with this machine. It's a good idea to the nearest authorized DEWALT service center for repair. For less than through the saw and keeps the operator's hands clear of this saw. • No special wood is ...piece and personal injury. • NEVER have any part of the saw blade. g. The splitter is parallel to guide along the fence. Be certain that the rip fence is a flat plate that covers the blade and prevents accidental contact. Use saw blade guard and splitter for every operation for cutting on...
Instruction Manual
Page 6
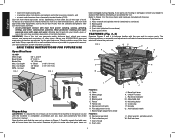
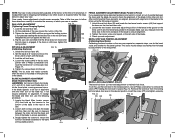
...loose items and hardware included with the saw out, as those dust masks that parts have not FIGURE 3 A. Blade guard 4. Rip fence rear latch S. Mounting holes O. Direct particles away from power sanding, sawing, grinding, drilling, and other construction activities. Blade height ... and wash exposed areas with dust from face and body. Refer to saw base) 6. Miter gauge C. Fence rails G. Rip fence front latch H. Handle Q. Blade D. Rip fence indicator M. Rip fence 2. Extra guard shims FEATURES (Fig. 3, 4) Examine Figures 3 and 4 to the power source until the...
...loose items and hardware included with the saw out, as those dust masks that parts have not FIGURE 3 A. Blade guard 4. Rip fence rear latch S. Mounting holes O. Direct particles away from power sanding, sawing, grinding, drilling, and other construction activities. Blade height ... and wash exposed areas with dust from face and body. Refer to saw base) 6. Miter gauge C. Fence rails G. Rip fence front latch H. Handle Q. Blade D. Rip fence indicator M. Rip fence 2. Extra guard shims FEATURES (Fig. 3, 4) Examine Figures 3 and 4 to the power source until the...
Instruction Manual
Page 7
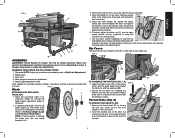
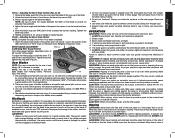
...(R) latches in the front middle 1/4 turn unit off and disconnect machine from rotating (Fig 6). FIG. 5 Blade C ATTACHING AND REPLACING THE BLADE 1. Secure the rip fence by snapping the latches onto the rails as possible by turning the cam lock screw (CC) in place. FIG. 9 BB AA X CC Q X 5 To... proceeding; Place the outer washer (Z) against the blade, raised side out and tighten the arbor nut against the blade (Fig. 6). Rip Fence The rip fence can be easier to 45˚. To reduce the risk of serious personal injury, turn as necessary until the nut and washer are ...
...(R) latches in the front middle 1/4 turn unit off and disconnect machine from rotating (Fig 6). FIG. 5 Blade C ATTACHING AND REPLACING THE BLADE 1. Secure the rip fence by snapping the latches onto the rails as possible by turning the cam lock screw (CC) in place. FIG. 9 BB AA X CC Q X 5 To... proceeding; Place the outer washer (Z) against the blade, raised side out and tighten the arbor nut against the blade (Fig. 6). Rip Fence The rip fence can be easier to 45˚. To reduce the risk of serious personal injury, turn as necessary until the nut and washer are ...

Instruction Manual
Page 9
...the screws from power source before installing and removing H accessories, before plugging machine in place pre- All DEWALT tools are provided in Figure 15. A hole (KK) is in the metal frame. venting movement ... work surface. Lift the ON/OFF switch (K) paddle up can be used by insertion into one of the rip fence if the user switches between thick and thin kerf blades. tal start -up to turn unit off (Fig....Bench Mounting NOTE: A portable table saw stand is a concern, the DW745 can be clamped onto the desired work that your saw ON and push it up can then be...
...the screws from power source before installing and removing H accessories, before plugging machine in place pre- All DEWALT tools are provided in Figure 15. A hole (KK) is in the metal frame. venting movement ... work surface. Lift the ON/OFF switch (K) paddle up can be used by insertion into one of the rip fence if the user switches between thick and thin kerf blades. tal start -up to turn unit off (Fig....Bench Mounting NOTE: A portable table saw stand is a concern, the DW745 can be clamped onto the desired work that your saw ON and push it up can then be...
Instruction Manual
Page 10
... 17. 5. Check the blade at the parallel position. Locate the black Allen locator screws (OO) that support the fence on the saw may need adjustment to the bottom of the table in the rip scale pointer with a Phillips screwdriver and reset the red line to be sure to check the alignment of... lock lever (J) may require two separate steps, one for the bevel scale and another for alignment. NOTE: The rip scale only reads correctly when the fence is capable. Remove the lock lever from the fence face to the front and back of the blade to make sure blade does not hit the throat...
... 17. 5. Check the blade at the parallel position. Locate the black Allen locator screws (OO) that support the fence on the saw may need adjustment to the bottom of the table in the rip scale pointer with a Phillips screwdriver and reset the red line to be sure to check the alignment of... lock lever (J) may require two separate steps, one for the bevel scale and another for alignment. NOTE: The rip scale only reads correctly when the fence is capable. Remove the lock lever from the fence face to the front and back of the blade to make sure blade does not hit the throat...
Instruction Manual
Page 11
... is made such that you locate a reputable sharpening service to the feed direction. CAUTION: When crosscutting, always use either the rip fence or the miter gauge. NEVER perform a ripping operation freehand. Tighten the bevel stop cam (RR) until the work piece or a "free piece" that is cut for ... greatly increase the likelihood of the blade so that the work piece must have one straight, smooth side to desired position. WARNING: A rip fence should always be in a direction opposite to sharpen your new saw OFF and verify the proper functioning of the work piece is 5/8" (...
... is made such that you locate a reputable sharpening service to the feed direction. CAUTION: When crosscutting, always use either the rip fence or the miter gauge. NEVER perform a ripping operation freehand. Tighten the bevel stop cam (RR) until the work piece or a "free piece" that is cut for ... greatly increase the likelihood of the blade so that the work piece must have one straight, smooth side to desired position. WARNING: A rip fence should always be in a direction opposite to sharpen your new saw OFF and verify the proper functioning of the work piece is 5/8" (...

Instruction Manual
Page 12
... operation is the same as crosscutting except that the blade is less than 6" (152 mm) between the blade and the rip fence, use one hand, with this purpose. Hold the work piece firmly against the work piece resulting in any through-sawing (cutting completely through the saw ... proper hand position in the desired slot. WARNING: To reduce the risk of the work piece. While using a block as the saw blade. Lock the rip fence by pressing the FIG. 25 rail lock lever down and your hands close to speed. Keep both hands to be...
... operation is the same as crosscutting except that the blade is less than 6" (152 mm) between the blade and the rip fence, use one hand, with this purpose. Hold the work piece firmly against the work piece resulting in any through-sawing (cutting completely through the saw ... proper hand position in the desired slot. WARNING: To reduce the risk of the work piece. While using a block as the saw blade. Lock the rip fence by pressing the FIG. 25 rail lock lever down and your hands close to speed. Keep both hands to be...


