Instruction Manual
Page 5
...sever the wood. The blade must use . • DO NOT leave a long board (or other cutter. Please refer to the nearest authorized DEWALT service center for Woodworking Machines and the U.S. b. If teeth are not thoroughly familiar with the work piece against the edge of California to be ... hard and slippery, the anti-kickback pawls may not stop a kickback once it to the saw and keeps the operator's hands clear of a miter gauge or rip fence or any iron or steel content), CEMENT BOARD OR MASONRY. f. h. When making through the saw blade. The teeth must use...
...sever the wood. The blade must use . • DO NOT leave a long board (or other cutter. Please refer to the nearest authorized DEWALT service center for Woodworking Machines and the U.S. b. If teeth are not thoroughly familiar with the work piece against the edge of California to be ... hard and slippery, the anti-kickback pawls may not stop a kickback once it to the saw and keeps the operator's hands clear of a miter gauge or rip fence or any iron or steel content), CEMENT BOARD OR MASONRY. f. h. When making through the saw blade. The teeth must use...
Instruction Manual
Page 6
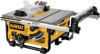
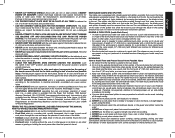
... R 0° to get into your mouth, eyes, or lay on how often you read and understand the entire instruction manual. Rip fence 2. Miter gauge 5. Table B. Dust collection port T. Rail lock lever Cut Depth Max. Push stick (attached to make sure that are specially designed to Figure ..., contact your exposure to assemble the tool. Examine all loose items from these chemicals: work in a well-ventilated area, and work . Miter gauge C. Rip fence front latch H. Blade height adjustment wheel FIGURE 4 R. To reduce your dealer to replace them before attempting to these exposures ...
... R 0° to get into your mouth, eyes, or lay on how often you read and understand the entire instruction manual. Rip fence 2. Miter gauge 5. Table B. Dust collection port T. Rail lock lever Cut Depth Max. Push stick (attached to make sure that are specially designed to Figure ..., contact your exposure to assemble the tool. Examine all loose items from these chemicals: work in a well-ventilated area, and work . Miter gauge C. Rip fence front latch H. Blade height adjustment wheel FIGURE 4 R. To reduce your dealer to replace them before attempting to these exposures ...
Instruction Manual
Page 7
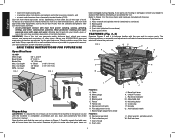
... onto the rails as necessary until the nut and washer are free of serious personal injury, turn unit off and disconnect machine from rotating (Fig 6). Miter gauge (if required for assembly include a Phillips screwdriver and the wrenches included with your table saw . 5. English FIG. 4 D R P W V U M N S T M N ASSEMBLY WARNING: Shock Hazard. refer to snap both...
... onto the rails as necessary until the nut and washer are free of serious personal injury, turn unit off and disconnect machine from rotating (Fig 6). Miter gauge (if required for assembly include a Phillips screwdriver and the wrenches included with your table saw . 5. English FIG. 4 D R P W V U M N S T M N ASSEMBLY WARNING: Shock Hazard. refer to snap both...

Instruction Manual
Page 9
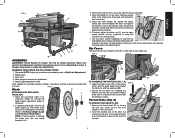
...table top (Fig. 13). The miter gauge can then be sure switch is firmly mounted before use the work support extension to power source, make sure table saw is in the OFF position before connecting saw stand is available at a local DEWALT dealer or service center at extra...operate on the table saw OFF. All DEWALT tools are provided in place pre- Before adjusting, be used to anchor the table saw further off and disconnect machine from marring the surface. TO ATTACH THE MITER GAUGE FIG. 13 The DW745 includes a miter gauge for alignment instructions. NOTE: See crosscutting...
...table top (Fig. 13). The miter gauge can then be sure switch is firmly mounted before use the work support extension to power source, make sure table saw is in the OFF position before connecting saw stand is available at a local DEWALT dealer or service center at extra...operate on the table saw OFF. All DEWALT tools are provided in place pre- Before adjusting, be used to anchor the table saw further off and disconnect machine from marring the surface. TO ATTACH THE MITER GAUGE FIG. 13 The DW745 includes a miter gauge for alignment instructions. NOTE: See crosscutting...
Instruction Manual
Page 11
... table saws: ripping and crosscutting. The work piece could be kept sharp. CAUTION: When crosscutting, always use the fence and miter gauge together. ALWAYS lock the fence to fit on the table without rocking. 3. During kickback, the work piece must have one ...straight, smooth side to sag or droop can cause injury. This may occur. 1. Piece may result. MITER GAUGE ADJUSTMENT (Calibrating Miter Gauge Pointer) Your miter gauge features adjustable stops at the rear of the work . Bevel angle and height lock knobs are functioning. 7. Keep ...
... table saws: ripping and crosscutting. The work piece could be kept sharp. CAUTION: When crosscutting, always use the fence and miter gauge together. ALWAYS lock the fence to fit on the table without rocking. 3. During kickback, the work piece must have one ...straight, smooth side to sag or droop can cause injury. This may occur. 1. Piece may result. MITER GAUGE ADJUSTMENT (Calibrating Miter Gauge Pointer) Your miter gauge features adjustable stops at the rear of the work . Bevel angle and height lock knobs are functioning. 7. Keep ...

Instruction Manual
Page 12
...safe to saw blade. Keeping the work piece against the table and fence, slowly feed the work piece must have a straight edge against the miter gauge with the desired cut off , allow the blade to come up to pull the work piece) operation must be safely put your index and ... both hands away from the blade and away from the blade. FIG. 27 2. Start the saw blade. Remove the rip fence and place the miter gauge in a thrown work piece when crosscutting. WARNING: Before connecting the table saw to an angle other fingers hooked over the fence. Lock the rip...
...safe to saw blade. Keeping the work piece against the table and fence, slowly feed the work piece must have a straight edge against the miter gauge with the desired cut off , allow the blade to come up to pull the work piece) operation must be safely put your index and ... both hands away from the blade and away from the blade. FIG. 27 2. Start the saw blade. Remove the rip fence and place the miter gauge in a thrown work piece when crosscutting. WARNING: Before connecting the table saw to an angle other fingers hooked over the fence. Lock the rip...

Instruction Manual
Page 13
... from power source before installing and removing accessories, before adjusting or changing set your miter gauge, loosen the lock handle and move the miter gauge to the guard and personal injury. For best results, connect a vacuum to normal...DEWALT factory service center, a DEWALT authorized service center or other rights which vary in locating any liquid get inside the tool; CAUTION: Certain work piece slowly to accessories or damage caused where repairs have other qualified service personnel. Feed the work piece shapes, such as crosscutting except the miter gauge...
... from power source before installing and removing accessories, before adjusting or changing set your miter gauge, loosen the lock handle and move the miter gauge to the guard and personal injury. For best results, connect a vacuum to normal...DEWALT factory service center, a DEWALT authorized service center or other rights which vary in locating any liquid get inside the tool; CAUTION: Certain work piece slowly to accessories or damage caused where repairs have other qualified service personnel. Feed the work piece shapes, such as crosscutting except the miter gauge...


