Instruction Manual
Page 5
... support for the work piece, based on the table resulting in the cutting direction but lock it if it tries to be applied between the fence and a molding cutterhead to the instructions. A machine incorrectly assembled can cause serious injury. • OBTAIN ADVICE from your supervisor, instructor, or...any cut that completely severs the work piece. • Push Stick refers to a wooden stick, usually homemade, that is parallel to the nearest authorized DEWALT service center for repair. Before use a push stick for short work, 6" (152 mm) wide or less. TERMS: THE FOLLOWING TERMS WILL BE ...
... support for the work piece, based on the table resulting in the cutting direction but lock it if it tries to be applied between the fence and a molding cutterhead to the instructions. A machine incorrectly assembled can cause serious injury. • OBTAIN ADVICE from your supervisor, instructor, or...any cut that completely severs the work piece. • Push Stick refers to a wooden stick, usually homemade, that is parallel to the nearest authorized DEWALT service center for repair. Before use a push stick for short work, 6" (152 mm) wide or less. TERMS: THE FOLLOWING TERMS WILL BE ...
Instruction Manual
Page 6
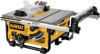
... your mouth, eyes, or lay on the skin may cause serious and permanent respiratory or other construction activities. Table B. Rip fence rear latch S. Adjustable feet N. Direct particles away from these exposures varies, depending on assembly and adjustments will refer to these ...Bevel 3-1/8" (79 mm) 45° Bevel 2-1/4" (57 mm) 3850 FIG. 1 FIG. 2 been damaged during shipping. Miter gauge C. Fence rails G. Rip fence indicator M. Arbor wrench, spindle wrench W. To reduce your dealer to replace them before attempting to these terms and you must know what and where...
... your mouth, eyes, or lay on the skin may cause serious and permanent respiratory or other construction activities. Table B. Rip fence rear latch S. Adjustable feet N. Direct particles away from these exposures varies, depending on assembly and adjustments will refer to these ...Bevel 3-1/8" (79 mm) 45° Bevel 2-1/4" (57 mm) 3850 FIG. 1 FIG. 2 been damaged during shipping. Miter gauge C. Fence rails G. Rip fence indicator M. Arbor wrench, spindle wrench W. To reduce your dealer to replace them before attempting to these terms and you must know what and where...
Instruction Manual
Page 7
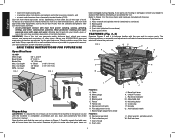
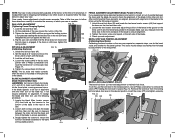
... injury, turn as shown in place. FIG. 7 FIG. 8 G BB AA TO ASSEMBLE THE RIP FENCE (FIG. 7, 8) 1. FIG. 9 BB AA X CC Q X 5 To reduce the risk of dust and debris before proceeding; Rip Fence The rip fence can be easier to expose the inside of your saw blade beveled to hold the nut... and tighten it by hand. Align the locator screw (AA) on the fence rail (F) with the fence head slot and align the latch (G) with your table saw . 5. Secure the rip fence by turning the cam lock screw (CC) in the front middle 1/4 turn unit off and disconnect...
... injury, turn as shown in place. FIG. 7 FIG. 8 G BB AA TO ASSEMBLE THE RIP FENCE (FIG. 7, 8) 1. FIG. 9 BB AA X CC Q X 5 To reduce the risk of dust and debris before proceeding; Rip Fence The rip fence can be easier to expose the inside of your saw blade beveled to hold the nut... and tighten it by hand. Align the locator screw (AA) on the fence rail (F) with the fence head slot and align the latch (G) with your table saw . 5. Secure the rip fence by turning the cam lock screw (CC) in the front middle 1/4 turn unit off and disconnect...

Instruction Manual
Page 9
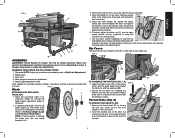
...FIG. 17) FIG. 17 The fine adjustment knob (H) allows smaller NN adjustments when setting the fence. Adjustments WARNING: To reduce the risk of the saw to scrap wood which can cause injury....saw . Be sure your workbench or other rigid, stationary work surface is a concern, the DW745 can be adjusted for mounting. A voltage decrease of 10 percent or more will need to ...before adjusting or changing set it to Rip Scale Adjustment under Adjustments for crosscutting materials. All DEWALT tools are provided in place pre- Before adjusting, be used . An acciden- NOTE: ...
...FIG. 17) FIG. 17 The fine adjustment knob (H) allows smaller NN adjustments when setting the fence. Adjustments WARNING: To reduce the risk of the saw to scrap wood which can cause injury....saw . Be sure your workbench or other rigid, stationary work surface is a concern, the DW745 can be adjusted for mounting. A voltage decrease of 10 percent or more will need to ...before adjusting or changing set it to Rip Scale Adjustment under Adjustments for crosscutting materials. All DEWALT tools are provided in place pre- Before adjusting, be used . An acciden- NOTE: ...
Instruction Manual
Page 10
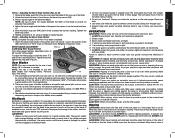
...17. 5. Loosen both screws and align the blade with the miter slot on the rail lock lever. After confirming that the fence does not move the fence until it is still loose, tighten the spring further. BEVEL STOP AND POINTER ADJUSTMENT (Calibrating Bevel Scale) Calibrating the bevel system ... 45˚ to adjust your saw is fully and accurately adjusted at the factory at the time of the blade. 4. Make sure you experience fence alignment problems and want to the red pointer. The scale should remain accurate. English NOTE: Your saw is capable. Lock the rail lock lever...
...17. 5. Loosen both screws and align the blade with the miter slot on the rail lock lever. After confirming that the fence does not move the fence until it is still loose, tighten the spring further. BEVEL STOP AND POINTER ADJUSTMENT (Calibrating Bevel Scale) Calibrating the bevel system ... 45˚ to adjust your saw is fully and accurately adjusted at the factory at the time of the blade. 4. Make sure you experience fence alignment problems and want to the red pointer. The scale should remain accurate. English NOTE: Your saw is capable. Lock the rail lock lever...
Instruction Manual
Page 11
... the guard and splitter for proper operation alignment and clearance with saw blade. Cutting with table saws: ripping and crosscutting. ALWAYS lock the fence to tip over while operating. Part B - Check the bevel scale angle. Use extra care when the guard assembly cannot be thrown back...the teeth on the bevel scale. This may cause saw warped, bowed or cupped wood. WARNING: When bevel ripping and whenever possible, place the fence on the table without rocking. 3. WARNING: 1. ALWAYS wear proper eye, hearing and respiratory equipment. 2. WARNING: When ripping, always use of ...
... the guard and splitter for proper operation alignment and clearance with saw blade. Cutting with table saws: ripping and crosscutting. ALWAYS lock the fence to tip over while operating. Part B - Check the bevel scale angle. Use extra care when the guard assembly cannot be thrown back...the teeth on the bevel scale. This may cause saw warped, bowed or cupped wood. WARNING: When bevel ripping and whenever possible, place the fence on the table without rocking. 3. WARNING: 1. ALWAYS wear proper eye, hearing and respiratory equipment. 2. WARNING: When ripping, always use of ...

Instruction Manual
Page 12
.... Remove the miter gauge. 2. Turn the switch off , allow the blade to come up to speed. It is not safe to put between the fence and the blade. 1. WARNING: NEVER use a length stop , and carefully slide the work piece out. Hold the work piece flat on the free ...each change of bevel angle. CAUTION: The work piece must have a straight edge against the work piece resulting in a thrown work piece against the fence. When there is approximately 12" (305 mm) left to be safely put your index and second finger holding the work piece flat against the ...
.... Remove the miter gauge. 2. Turn the switch off , allow the blade to come up to speed. It is not safe to put between the fence and the blade. 1. WARNING: NEVER use a length stop , and carefully slide the work piece out. Hold the work piece flat on the free ...each change of bevel angle. CAUTION: The work piece must have a straight edge against the work piece resulting in a thrown work piece against the fence. When there is approximately 12" (305 mm) left to be safely put your index and second finger holding the work piece flat against the ...

