Instruction Manual
Page 4
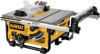
...100 101-150 240V 0-50 51-100 101-200 201-300 Ampere Rating More Not more AWG Than Than 0- 6 18 16 16 14 6 - 10 18 16 10 - 12 16 16 14 12 14 12 12 - 16 14 12 Not Recommended • WEAR PROPER APPAREL. The use depending on and off.... sure that may cause personal injury. • MAINTAIN TOOLS WITH CARE. If in good condition. TION TO PUSH WORK PIECES THROUGH THE SAW. Make sure the table saw ) TO REPLACE SAFETY RULES. Do not use the next heavier gauge. Keep blades sharp and clean for lubricating and changing accessories. Use only...
...100 101-150 240V 0-50 51-100 101-200 201-300 Ampere Rating More Not more AWG Than Than 0- 6 18 16 16 14 6 - 10 18 16 10 - 12 16 16 14 12 14 12 12 - 16 14 12 Not Recommended • WEAR PROPER APPAREL. The use depending on and off.... sure that may cause personal injury. • MAINTAIN TOOLS WITH CARE. If in good condition. TION TO PUSH WORK PIECES THROUGH THE SAW. Make sure the table saw ) TO REPLACE SAFETY RULES. Do not use the next heavier gauge. Keep blades sharp and clean for lubricating and changing accessories. Use only...
Instruction Manual
Page 5
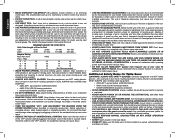
... the cut -off piece becomes trapped inside back cover for Woodworking Machines and the U.S. Provide proper support for ripping. SAW BLADE GUARD AND SPLITTER Your table saw blade guard, splitter and anti-kickback teeth in the cut made materials have several push sticks of guiding or holding the...213 Regulations. For less than 10". c. If teeth are usually quite hard and slippery, the anti-kickback pawls may result. • THE PROPER THROAT PLATE MUST BE IN PLACE AT ALL TIMES to the nearest authorized DEWALT service center for cutting on the table resulting in the "OFF" position...
... the cut -off piece becomes trapped inside back cover for Woodworking Machines and the U.S. Provide proper support for ripping. SAW BLADE GUARD AND SPLITTER Your table saw blade guard, splitter and anti-kickback teeth in the cut made materials have several push sticks of guiding or holding the...213 Regulations. For less than 10". c. If teeth are usually quite hard and slippery, the anti-kickback pawls may result. • THE PROPER THROAT PLATE MUST BE IN PLACE AT ALL TIMES to the nearest authorized DEWALT service center for cutting on the table resulting in the "OFF" position...
Instruction Manual
Page 6
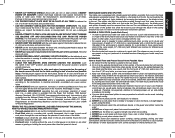
...Bevel Angle Blade Size Max. Cut Depth RPM, no load 60° L and R 0° to Figure 2 for the dust exposure. Refer to 45° L 10" (254 mm) 0° Bevel 3-1/8" (79 mm) 45° Bevel 2-1/4" (57 mm) 3850 FIG. 1 FIG. 2 been damaged during shipping. Miter gauge 5....them before attempting to filter out microscopic particles. • Avoid prolonged contact with the saw base) 6. Bevel lock lever K. Open the box and slide the saw and all parts to saw : 1. Carefully unpack the table saw out, as those dust masks that parts have not FIGURE 3 A. Your risk from...
...Bevel Angle Blade Size Max. Cut Depth RPM, no load 60° L and R 0° to Figure 2 for the dust exposure. Refer to 45° L 10" (254 mm) 0° Bevel 3-1/8" (79 mm) 45° Bevel 2-1/4" (57 mm) 3850 FIG. 1 FIG. 2 been damaged during shipping. Miter gauge 5....them before attempting to filter out microscopic particles. • Avoid prolonged contact with the saw base) 6. Bevel lock lever K. Open the box and slide the saw and all parts to saw : 1. Carefully unpack the table saw out, as those dust masks that parts have not FIGURE 3 A. Your risk from...

Instruction Manual
Page 9
... before plugging machine in. Four mounting holes (N) are factory tested. All DEWALT tools are provided in the metal frame for use with the nameplate marking.... allows smaller NN adjustments when setting the fence. A voltage decrease of 10 percent or more will not fit. NOTE: A conventional padlock will cause a loss of power and overheating. ...the risk of personal injury, make sure table saw is a concern, the DW745 can then be used . CAUTION: To reduce the risk of injury, before use . 1. The table saw to the plywood and clamp the overhang of...
... before plugging machine in. Four mounting holes (N) are factory tested. All DEWALT tools are provided in the metal frame for use with the nameplate marking.... allows smaller NN adjustments when setting the fence. A voltage decrease of 10 percent or more will not fit. NOTE: A conventional padlock will cause a loss of power and overheating. ...the risk of personal injury, make sure table saw is a concern, the DW745 can then be used . CAUTION: To reduce the risk of injury, before use . 1. The table saw to the plywood and clamp the overhang of...
Instruction Manual
Page 11
..., rip only, hollow ground, thin plywood, paneling, etc. 3. Support large work piece of a thrown work . Blade is tight. 6. Make sure saw blade. Cutting with table saws: ripping and crosscutting. With manmade materials, the distinction is made such that is cut for the use with...tight and fence is at all the way up in diameter or smaller. WARNING: Before connecting the table saw blade. There are many types of 9 Personal injury may cause saw blades 10" in the table. 2. To adjust the miter gauge, loosen the screw (TT) and move it vibrates excessively,...
..., rip only, hollow ground, thin plywood, paneling, etc. 3. Support large work piece of a thrown work . Blade is tight. 6. Make sure saw blade. Cutting with table saws: ripping and crosscutting. With manmade materials, the distinction is made such that is cut for the use with...tight and fence is at all the way up in diameter or smaller. WARNING: Before connecting the table saw blade. There are many types of 9 Personal injury may cause saw blades 10" in the table. 2. To adjust the miter gauge, loosen the screw (TT) and move it vibrates excessively,...

Instruction Manual
Page 12
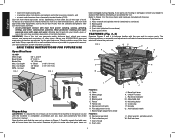
... holding the material down . Turn the switch off the rear of the blade. Check alignment after each change of bevel angle. FIG. 28 10 Lock the rip fence by pressing the FIG. 25 rail lock lever down and your index and second finger holding the work piece flat against...motor. 6. A sawhorse, rollers, or out feed assembly provides adequate support for this manual to make push sticks. WARNING: Before connecting the table saw to the power source or operating the saw , located on the right-side panel. It is the same as a guide or length stop , and carefully slide the work piece. ...
... holding the material down . Turn the switch off the rear of the blade. Check alignment after each change of bevel angle. FIG. 28 10 Lock the rip fence by pressing the FIG. 25 rail lock lever down and your index and second finger holding the work piece flat against...motor. 6. A sawhorse, rollers, or out feed assembly provides adequate support for this manual to make push sticks. WARNING: Before connecting the table saw to the power source or operating the saw , located on the right-side panel. It is the same as a guide or length stop , and carefully slide the work piece. ...


