Instruction Manual
Page 11
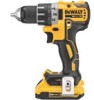
.... Variable speed trigger switch H. Mounting screw B. Gear shifter K. Worklight L. d. You may also charge a partially used pack whenever you turn out the lights; WARNING: Burn hazard. Torque adjustment collar J. Battery pack E. DO NOT use under these conditions. It may result. The battery pack should not be recharged before attempting to use . Unplug...
.... Variable speed trigger switch H. Mounting screw B. Gear shifter K. Worklight L. d. You may also charge a partially used pack whenever you turn out the lights; WARNING: Burn hazard. Torque adjustment collar J. Battery pack E. DO NOT use under these conditions. It may result. The battery pack should not be recharged before attempting to use . Unplug...
Instruction Manual
Page 12
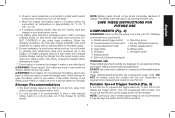
... up. Dual Range Gearing (Fig. 2) The dual range feature of your drill/driver allows you may hear a click on the collar, the higher the torque and the larger the fastener which can be sure the trigger is run after changing the direction of the control button locks the tool in... some models, a hammer symbol. When changing the position of the tool. NOTE: The first time the tool is released. NOTE: The torque adjustment collar is normal and does not indicate a problem. These numbers are numbers, a drill bit symbol, and in drill and hammerdrill modes. This is only...
... up. Dual Range Gearing (Fig. 2) The dual range feature of your drill/driver allows you may hear a click on the collar, the higher the torque and the larger the fastener which can be sure the trigger is run after changing the direction of the control button locks the tool in... some models, a hammer symbol. When changing the position of the tool. NOTE: The first time the tool is released. NOTE: The torque adjustment collar is normal and does not indicate a problem. These numbers are numbers, a drill bit symbol, and in drill and hammerdrill modes. This is only...
Instruction Manual
Page 13
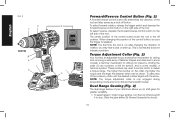
... changing gears. After two minutes, the battery will be changed by gripping the front part of the chuck with a fresh battery. To select speed 2 (low torque setting), turn off and permit it . Worklight (Fig. 3) The worklight (E) and its switch (L) are having trouble changing gears, make sure that the dual range gear...
... changing gears. After two minutes, the battery will be changed by gripping the front part of the chuck with a fresh battery. To select speed 2 (low torque setting), turn off and permit it . Worklight (Fig. 3) The worklight (E) and its switch (L) are having trouble changing gears, make sure that the dual range gear...
Instruction Manual
Page 15
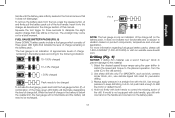
...gauge, press and hold the fuel gauge button (P). For more information regarding fuel gauge battery packs, please call 1-800-4-DeWALT (1-800-433-9258) or visit our website www.dewalt. Use sharp drill bits only. The worklight may still be recharged. For MASONRY, such as described in the charger section..., cement, cinder block, etc., use a wood "back-up" block to prevent damage to the material. 1. FUEL GAUGE BATTERY PACKS (FIG. 8) Some DeWALT battery packs include a fuel gauge which consists of three green LED lights that indicate the level of this manual. Select the desired speed...
...gauge, press and hold the fuel gauge button (P). For more information regarding fuel gauge battery packs, please call 1-800-4-DeWALT (1-800-433-9258) or visit our website www.dewalt. Use sharp drill bits only. The worklight may still be recharged. For MASONRY, such as described in the charger section..., cement, cinder block, etc., use a wood "back-up" block to prevent damage to the material. 1. FUEL GAUGE BATTERY PACKS (FIG. 8) Some DeWALT battery packs include a fuel gauge which consists of three green LED lights that indicate the level of this manual. Select the desired speed...
Instruction Manual
Page 16
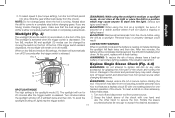
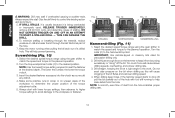
...minimize stalling or breaking through the material, reduce pressure on unseen areas of the workpiece to the desired position. NOTE: Use the lowest torque setting required to the hammerdrill symbol. Turn the collar (C) to seat the fastener at a right angle to control the twisting action and...bouncing excessively or "rising" off , pull the bit partially out of the hole with tool still running when pulling the bit back out of the torque adjustment collar. 5. FIG. 9 C FIG. 10 FIG. 11 C DRILLING SCREWDRIVING HAMMERDRILLING Hammerdrilling (Fig. 11) 1. Grip the drill firmly to...
...minimize stalling or breaking through the material, reduce pressure on unseen areas of the workpiece to the desired position. NOTE: Use the lowest torque setting required to the hammerdrill symbol. Turn the collar (C) to seat the fastener at a right angle to control the twisting action and...bouncing excessively or "rising" off , pull the bit partially out of the hole with tool still running when pulling the bit back out of the torque adjustment collar. 5. FIG. 9 C FIG. 10 FIG. 11 C DRILLING SCREWDRIVING HAMMERDRILLING Hammerdrilling (Fig. 11) 1. Grip the drill firmly to...

