Instruction Manual
Page 1
...in loss of children and other practical way to secure and support the workpiece to rain or wet conditions. D26450, D26451, D26453 Random Orbit Palm Sanders Ponceuse de paume orbitale à mouvement aléatoire Lijadoras planas de órbita aleatoria • Avoid accidental ...II Construction safety alert symbol earthing terminal .../min ........revolutions per - trician if you do the job better and safer at www.dewalt.com INSTRUCTION MANUAL GUIDE D'UTILISATION MANUAL DE INSTRUCCIONES INSTRUCTIVO DE OPERACIÓN, CENTROS DE SERVICIO Y PÓLIZA DE GARANTÍA. ...
...in loss of children and other practical way to secure and support the workpiece to rain or wet conditions. D26450, D26451, D26453 Random Orbit Palm Sanders Ponceuse de paume orbitale à mouvement aléatoire Lijadoras planas de órbita aleatoria • Avoid accidental ...II Construction safety alert symbol earthing terminal .../min ........revolutions per - trician if you do the job better and safer at www.dewalt.com INSTRUCTION MANUAL GUIDE D'UTILISATION MANUAL DE INSTRUCCIONES INSTRUCTIVO DE OPERACIÓN, CENTROS DE SERVICIO Y PÓLIZA DE GARANTÍA. ...
Instruction Manual
Page 2
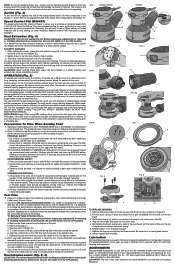
...DEWALT (1-800-433-9258). For best results, empty the bag frequently. FOLLOW ALL SAFETY INSTRUCTIONS IN HEAT GUN INSTRUCTION MANUAL. The greatest danger of along the surface being done until all clean up will wear very rapidly if left in the sander ... any accessory for most sanding jobs. Brush Replacement (Fig. 8, 9) CAUTION: Turn off and unplug the tool before making any other removal debris. FIG. 1 D26450, D26451 A A D E C FIG. 2 C D26453 B FIG. 3 A D E C FIG. 4 D E FIG. 5A FIG. 5B FIG. 6 FIG. 7 F C F G H FIG. 8 F FIG. 9 J I .O.S.H. Replace the...
...DEWALT (1-800-433-9258). For best results, empty the bag frequently. FOLLOW ALL SAFETY INSTRUCTIONS IN HEAT GUN INSTRUCTION MANUAL. The greatest danger of along the surface being done until all clean up will wear very rapidly if left in the sander ... any accessory for most sanding jobs. Brush Replacement (Fig. 8, 9) CAUTION: Turn off and unplug the tool before making any other removal debris. FIG. 1 D26450, D26451 A A D E C FIG. 2 C D26453 B FIG. 3 A D E C FIG. 4 D E FIG. 5A FIG. 5B FIG. 6 FIG. 7 F C F G H FIG. 8 F FIG. 9 J I .O.S.H. Replace the...


