
Rack Installation Guide
Page 3
...Instructions 1-1 Installation Instructions 1-2 RapidRails Rack Kit Contents 1-2 Dell Rack Requirements 1-3 VersaRails Rack Kit Contents 1-3 Non-Dell Rack Requirements 1-4 Before You Begin 1-4 Important Safety ...Information 1-4 Rack Stabilizer Feet 1-4 Recommended Tools and Supplies 1-5 Installation Tasks 1-5 Removing the Rack Doors 1-5 Marking the Rack 1-5 Installing the RapidRails Mounting Rails 1-7 Installing the VersaRails Mounting Rails 1-9 Installing the Tower-to-Rack Conversion Kit 1-10 Removing the Bezel...
...Instructions 1-1 Installation Instructions 1-2 RapidRails Rack Kit Contents 1-2 Dell Rack Requirements 1-3 VersaRails Rack Kit Contents 1-3 Non-Dell Rack Requirements 1-4 Before You Begin 1-4 Important Safety ...Information 1-4 Rack Stabilizer Feet 1-4 Recommended Tools and Supplies 1-5 Installation Tasks 1-5 Removing the Rack Doors 1-5 Marking the Rack 1-5 Installing the RapidRails Mounting Rails 1-7 Installing the VersaRails Mounting Rails 1-9 Installing the Tower-to-Rack Conversion Kit 1-10 Removing the Bezel...

Rack Installation Guide
Page 4
Figure 1-5. Figure 1-8. Figures Figure 1-1. Figure 1-9. Figure 1-3. Figure 1-6. Figure 1-10. Figure 1-7. RapidRails Rack Kit Contents 1-3 VersaRails Rack Kit Contents 1-3 One Rack Unit 1-6 Marking the Vertical Rails 1-7 Installing the RapidRails Mounting Rails 1-8 Installing the VersaRails Mounting Rails 1-9 Removing the Front Bezel 1-11 Removing the Tower System Cover 1-12 Installing the Rack Front Panel 1-14 Installing the System in the Rack 1-15 4 Contents Figure 1-4. Figure 1-2.
Figure 1-5. Figure 1-8. Figures Figure 1-1. Figure 1-9. Figure 1-3. Figure 1-6. Figure 1-10. Figure 1-7. RapidRails Rack Kit Contents 1-3 VersaRails Rack Kit Contents 1-3 One Rack Unit 1-6 Marking the Vertical Rails 1-7 Installing the RapidRails Mounting Rails 1-8 Installing the VersaRails Mounting Rails 1-9 Removing the Front Bezel 1-11 Removing the Tower System Cover 1-12 Installing the Rack Front Panel 1-14 Installing the System in the Rack 1-15 4 Contents Figure 1-4. Figure 1-2.

Rack Installation Guide
Page 14
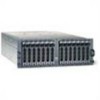
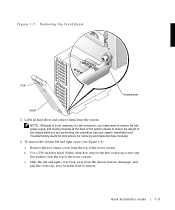
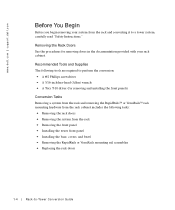
... on the other side of the rack. 7 Ensure that secure the bezel hinge to the front panel (see Figure 1-7): a Using the system key, unlock the front bezel. d Pull the bezel away and set it is perpendicular to the system. www.dell.com | support.dell.com 5 Using two 10-32 x 0.5 Phillips screws, secure the back mounting...
... on the other side of the rack. 7 Ensure that secure the bezel hinge to the front panel (see Figure 1-7): a Using the system key, unlock the front bezel. d Pull the bezel away and set it is perpendicular to the system. www.dell.com | support.dell.com 5 Using two 10-32 x 0.5 Phillips screws, secure the back mounting...
Rack Installation Guide
Page 15
... and replacing these modules). 4 To remove the system left and right covers (see Figure 1-8): a Remove the two round covers from the system. Removing the Front Bezel lock thumbscrew bezel 3 Label all hard drives and remove them from the top of the tower system.
... and replacing these modules). 4 To remove the system left and right covers (see Figure 1-8): a Remove the two round covers from the system. Removing the Front Bezel lock thumbscrew bezel 3 Label all hard drives and remove them from the top of the tower system.

Rack Installation Guide
Page 17
... chassis. 6 To remove the tower system front panel (see Figure 1-9): a Position the system so that you removed in step 6 of the last procedure, "Removing the Bezel, Drives, Covers, and Front Panel" (see Figure 1-9). 3 Reinstall the power and cooling modules (if they were removed). b Remove the 14 4-40 x 0.25-inch pan head...
... chassis. 6 To remove the tower system front panel (see Figure 1-9): a Position the system so that you removed in step 6 of the last procedure, "Removing the Bezel, Drives, Covers, and Front Panel" (see Figure 1-9). 3 Reinstall the power and cooling modules (if they were removed). b Remove the 14 4-40 x 0.25-inch pan head...

Rack-to-Tower Conversion Guide
Page 4
... step on or stand on Guide Rack-to-Tower Kit Contents The rack-to-tower kit includes the following items (see Figure 1-1): • One tower bezel, including keylock and keys • One tower front panel • One tower left-side cover • One tower right-side cover • One tower base... release latches and sliding a component into the rack. • Do not overload the AC supply branch circuit that provides power to the rack. www.dell.com | support.dell.com • Before working on the rack, make sure that the stabilizers are secured to the rack, extend to the floor, and that the...
... step on or stand on Guide Rack-to-Tower Kit Contents The rack-to-tower kit includes the following items (see Figure 1-1): • One tower bezel, including keylock and keys • One tower front panel • One tower left-side cover • One tower right-side cover • One tower base... release latches and sliding a component into the rack. • Do not overload the AC supply branch circuit that provides power to the rack. www.dell.com | support.dell.com • Before working on the rack, make sure that the stabilizers are secured to the rack, extend to the floor, and that the...

Rack-to-Tower Conversion Guide
Page 5
Figure 1-1. Rack-to-Tower Kit Contents tower left and right covers base assembly tower front panel tower bezel, system badge assembly, and keylock round covers (2) ¼ x 1 x 0.08-inch washers (4) ¼-20 x 0.5-inch hex socket-head screws (4) Rack-to-Tower C onversi on Gui de 1-3
Figure 1-1. Rack-to-Tower Kit Contents tower left and right covers base assembly tower front panel tower bezel, system badge assembly, and keylock round covers (2) ¼ x 1 x 0.08-inch washers (4) ¼-20 x 0.5-inch hex socket-head screws (4) Rack-to-Tower C onversi on Gui de 1-3
Rack-to-Tower Conversion Guide
Page 6
www.dell.com | support.dell.com Before You Begin Before you begin removing your rack cabinet. Recommended Tools and Supplies The following tasks: • Removing the rack doors • Removing ... documentation provided with your system from the rack • Removing the front panel • Installing the tower front panel • Installing the base, covers, and bezel • Removing the RapidRails or VersaRails mounting rail assemblies • Replacing the rack doors 1-4 Rac k -t o -Tow er C on v e r si on Guide...
www.dell.com | support.dell.com Before You Begin Before you begin removing your rack cabinet. Recommended Tools and Supplies The following tasks: • Removing the rack doors • Removing ... documentation provided with your system from the rack • Removing the front panel • Installing the tower front panel • Installing the base, covers, and bezel • Removing the RapidRails or VersaRails mounting rail assemblies • Replacing the rack doors 1-4 Rac k -t o -Tow er C on v e r si on Guide...

Rack-to-Tower Conversion Guide
Page 10
... over the screws you just installed (see Figure 1-4). Tabs on the bottom of the chassis (see Figure 1-4). 1-8 Rac k -t o -Tow er C on v e r si on Guide www.dell.com | support.dell.com Installing the Base, Covers, and Bezel 1 To install the base: a Position the base assembly and align the two holes on its base.
... over the screws you just installed (see Figure 1-4). Tabs on the bottom of the chassis (see Figure 1-4). 1-8 Rac k -t o -Tow er C on v e r si on Guide www.dell.com | support.dell.com Installing the Base, Covers, and Bezel 1 To install the base: a Position the base assembly and align the two holes on its base.

Rack-to-Tower Conversion Guide
Page 12
... were removed (see the Installation and Troubleshooting Guide for information about installing and configuring your system. See the Installation and Troubleshooting Guide for instructions). www.dell.com | support.dell.com 3 To install the bezel: a Position the bezel so it is perpendicular to the system. Figure 1-5.
... were removed (see the Installation and Troubleshooting Guide for information about installing and configuring your system. See the Installation and Troubleshooting Guide for instructions). www.dell.com | support.dell.com 3 To install the bezel: a Position the bezel so it is perpendicular to the system. Figure 1-5.

Optimizing Dell SCSI Solutions
Page 14
...Up to eight enclosures per server ƒ Scales up to 12 meters from a PV220S to the mounting hardware and front bezel features. Each system offers maximized drive-spindle count, hot-plug hard drives, optional redundant power, redundant cooling, rack mount ...Figure 3-1. A REFERENCE GUIDE FOR OPTIMIZING DELL™ SCSI SOLUTIONS VER A02 3. PowerEdge™ RAID Controllers The PowerEdge RAID Controller (PERC) is a free standing floor tower. Dell's Product Offering PowerVault™ 220S & 221S Storage Enclosure Dell™ PowerVault 220xS systems are flexible, external SCSI ...
...Up to eight enclosures per server ƒ Scales up to 12 meters from a PV220S to the mounting hardware and front bezel features. Each system offers maximized drive-spindle count, hot-plug hard drives, optional redundant power, redundant cooling, rack mount ...Figure 3-1. A REFERENCE GUIDE FOR OPTIMIZING DELL™ SCSI SOLUTIONS VER A02 3. PowerEdge™ RAID Controllers The PowerEdge RAID Controller (PERC) is a free standing floor tower. Dell's Product Offering PowerVault™ 220S & 221S Storage Enclosure Dell™ PowerVault 220xS systems are flexible, external SCSI ...