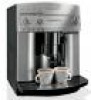
Owner Manual
Page 6
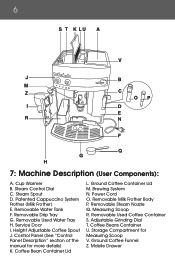
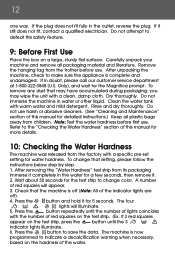
Patented Cappuccino System Frother (Milk Frother) E. Service Door I. Control Panel (See "Control Panel Description" section of the manual for Measuring Scoop V. Brewing System N. Removable Used Coffee Container S. Coffee Beans Container U. Mobile Drawer Removable Drip Tray G. Measuring Scoop R. Cup Warmer B. Removable Water Tank F. Removable ...
Patented Cappuccino System Frother (Milk Frother) E. Service Door I. Control Panel (See "Control Panel Description" section of the manual for Measuring Scoop V. Brewing System N. Removable Used Coffee Container S. Coffee Beans Container U. Mobile Drawer Removable Drip Tray G. Measuring Scoop R. Cup Warmer B. Removable Water Tank F. Removable ...
Owner Manual
Page 8
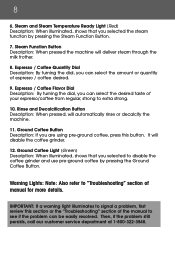
...Description: By turning the dial, you can select the desired taste of your espresso/coffee from regular, strong to "Troubleshooting" section of manual for more details. Then, if the problem still persists, call our customer service department at 1-800-322-3848. Steam and Steam Temperature Ready ... / Coffee Quantity Dial Description: By turning the dial, you selected to see if the problem can select the amount or quantity of the manual to disable the coffee grinder and use pre-ground coffee by pressing the Steam Function Button. 7. IMPORTANT: If a warning light illuminates to signal...
...Description: By turning the dial, you can select the desired taste of your espresso/coffee from regular, strong to "Troubleshooting" section of manual for more details. Then, if the problem still persists, call our customer service department at 1-800-322-3848. Steam and Steam Temperature Ready ... / Coffee Quantity Dial Description: By turning the dial, you selected to see if the problem can select the amount or quantity of the manual to disable the coffee grinder and use pre-ground coffee by pressing the Steam Function Button. 7. IMPORTANT: If a warning light illuminates to signal...
Owner Manual
Page 9
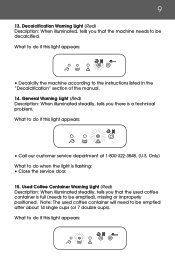
... Coffee Container Warning Light (Red) Description: When illuminated steadily, tells you that the machine needs to the instructions listed in the "Decalcification" section of the manual. 14.
... Coffee Container Warning Light (Red) Description: When illuminated steadily, tells you that the machine needs to the instructions listed in the "Decalcification" section of the manual. 14.

Owner Manual
Page 10
... the tank until it fits correctly inside the machine. 16. If it is properly positioned. If it . What to the "Cleaning and Maintenance" section of manual. 3. Note: Refer to do not immerse cord, plugs or body of machine in water or other liquid. 5. For more details, please refer to the ...Cleaning and Maintenance section of the manual for more details on how to clean the container. •Check to make sure the used coffee container is full, empty the container, clean it...
... the tank until it fits correctly inside the machine. 16. If it is properly positioned. If it . What to the "Cleaning and Maintenance" section of manual. 3. Note: Refer to do not immerse cord, plugs or body of machine in water or other liquid. 5. For more details, please refer to the ...Cleaning and Maintenance section of the manual for more details on how to clean the container. •Check to make sure the used coffee container is full, empty the container, clean it...
Owner Manual
Page 12
.... Rinse and dry thoroughly. After removing the "Water Hardness" test strip from the factory with warm water and mild detergent. A number of this manual for the test strip to save the data. Check that the machine is off ). 4. Press the button to change that may have accumulated during packaging...the box on the hardness of the indicator lights are off (Note: All of the water. After unpacking the machine, check to defeat this manual for water hardness. Do not immerse the machine in the outlet, reverse the plug. To remove any dust that setting, please follow the ...
.... Rinse and dry thoroughly. After removing the "Water Hardness" test strip from the factory with warm water and mild detergent. A number of this manual for the test strip to save the data. Check that the machine is off ). 4. Press the button to change that may have accumulated during packaging...the box on the hardness of the indicator lights are off (Note: All of the water. After unpacking the machine, check to defeat this manual for water hardness. Do not immerse the machine in the outlet, reverse the plug. To remove any dust that setting, please follow the ...

Owner Manual
Page 13
... MAX line. Set the water hardness according to the instructions in the "Checking the Water Hardness" section of the machine to the center of the manual. 2. Note: It is completely empty. Place the machine on when the water tank is recommended not to be adjusted for the Never use . Plug the...
... MAX line. Set the water hardness according to the instructions in the "Checking the Water Hardness" section of the machine to the center of the manual. 2. Note: It is completely empty. Place the machine on when the water tank is recommended not to be adjusted for the Never use . Plug the...
Owner Manual
Page 16
... avoid over-extraction, for first time, followed all of the instructions listed under section 11 of the manual. • The machine is on when the water tank is recommended to add a bit of the manual ("Preparing the Machine"). • The water tank and either the bean container or ground coffee container is...
... avoid over-extraction, for first time, followed all of the instructions listed under section 11 of the manual. • The machine is on when the water tank is recommended to add a bit of the manual ("Preparing the Machine"). • The water tank and either the bean container or ground coffee container is...

Owner Manual
Page 17
...Beans) Note: When using coffee beans) dials to the desired level. Figure 14 6. Press the button (Figure 14) to make one cup of the manual. 3. Tip: Use cups that have been previously heated by rinsing them with coffee beans, according to the directions listed in sections 11.1 and 11.3 ... the button (Figure 15) to be terminated at least 20 minutes. For larger cups, push the adjustable coffee spout up to 5 cups of the manual. Figure 13 Note: While the machine is reached, the machine will now grind the beans, run a short pre-brewing cycle, pause and then complete...
...Beans) Note: When using coffee beans) dials to the desired level. Figure 14 6. Press the button (Figure 14) to make one cup of the manual. 3. Tip: Use cups that have been previously heated by rinsing them with coffee beans, according to the directions listed in sections 11.1 and 11.3 ... the button (Figure 15) to be terminated at least 20 minutes. For larger cups, push the adjustable coffee spout up to 5 cups of the manual. Figure 13 Note: While the machine is reached, the machine will now grind the beans, run a short pre-brewing cycle, pause and then complete...

Owner Manual
Page 18
.... To switch the machine off and run a rinse cycle. Note: There is removed, the machine will not be performed within 3 seconds of the manual. 2. If it will become noisy. 7. Place one espresso / coffee at least 20 minutes on Making Hotter Coffee" section of the... manual). This operation must be able to the Troubleshooting section of the manual. 3. If the machine is not switched off , the machine will release from the coffee spout and collect in sections...
.... To switch the machine off and run a rinse cycle. Note: There is removed, the machine will not be performed within 3 seconds of the manual. 2. If it will become noisy. 7. Place one espresso / coffee at least 20 minutes on Making Hotter Coffee" section of the... manual). This operation must be able to the Troubleshooting section of the manual. 3. If the machine is not switched off , the machine will release from the coffee spout and collect in sections...

Owner Manual
Page 19
... will illuminate indicating that the coffee grinder is no need to make espresso / coffee using pre-ground coffee again, add again one cup of the manual). The button will not be able to empty the used coffee container until the used water tray and discard the water. 12. Note: There is...
... will illuminate indicating that the coffee grinder is no need to make espresso / coffee using pre-ground coffee again, add again one cup of the manual). The button will not be able to empty the used coffee container until the used water tray and discard the water. 12. Note: There is...
Owner Manual
Page 20
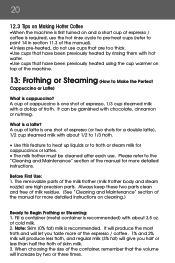
...? Always keep these two parts clean and free of milk residue. (See "Cleaning and Maintenance" section of the manual for more detailed instructions. Please refer to the "Cleaning and Maintenance" section of the manual for more detailed instructions on cleaning.) Ready to Begin Frothing or Steaming: 1. Before First Use: 1. of cold milk... a short cup of espresso / coffee is required, use the hot rinse cycle to pre-heat cups (refer to point 14 in section 11.3 of the manual). •Unless pre-heated, do not use .
...? Always keep these two parts clean and free of milk residue. (See "Cleaning and Maintenance" section of the manual for more detailed instructions. Please refer to the "Cleaning and Maintenance" section of the manual for more detailed instructions on cleaning.) Ready to Begin Frothing or Steaming: 1. Before First Use: 1. of cold milk... a short cup of espresso / coffee is required, use the hot rinse cycle to pre-heat cups (refer to point 14 in section 11.3 of the manual). •Unless pre-heated, do not use .
Owner Manual
Page 21
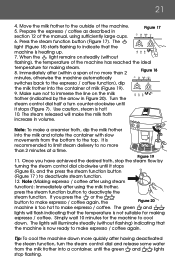
... make the milk froth increase in Figure 20). Simply wait 10 minutes for the machine to cool down more quickly after (within a span of the manual, using the milk frother, press the steam function button to the outside of milk (Figure 19). 9. Prepare the espresso / coffee as described in Figure 17...
... make the milk froth increase in Figure 20). Simply wait 10 minutes for the machine to cool down more quickly after (within a span of the manual, using the milk frother, press the steam function button to the outside of milk (Figure 19). 9. Prepare the espresso / coffee as described in Figure 17...
Owner Manual
Page 26
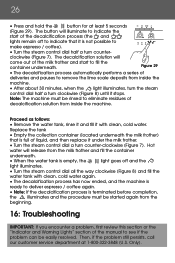
... machine. • After about 30 minutes, when the light illuminates, turn the steam control dial half a turn clockwise (Figure 8) until it is full of the manual to make espresso / coffee). • Turn the steam control dial half a turn counter-clockwise (Figure 7). Note: The machine must be rinsed to fill the container...
... machine. • After about 30 minutes, when the light illuminates, turn the steam control dial half a turn clockwise (Figure 8) until it is full of the manual to make espresso / coffee). • Turn the steam control dial half a turn counter-clockwise (Figure 7). Note: The machine must be rinsed to fill the container...
Owner Manual
Page 28
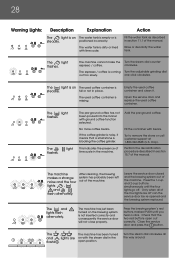
.... Open the service door and replace the used coffee container. The light flashes. The flashes. No more coffee beans. This indicates the presence of the manual. Add the pre-ground coffee. Fill the container with ground coffee function selected. Perform the decalcification procedure described in place. Only when all the way...
.... Open the service door and replace the used coffee container. The light flashes. The flashes. No more coffee beans. This indicates the presence of the manual. Add the pre-ground coffee. Fill the container with ground coffee function selected. Perform the decalcification procedure described in place. Only when all the way...
Owner Manual
Page 29
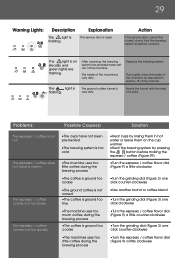
Thoroughly clean the inside of the manual. The ground coffee funnel is inserted correctly. The inside of the machine as described in hot water or leave them in section 15 of the ...
Thoroughly clean the inside of the manual. The ground coffee funnel is inserted correctly. The inside of the machine as described in hot water or leave them in section 15 of the ...

Owner Manual
Page 32
... accordance with De'Longhi. Residents of Canada: Please contact our toll free hotline at 1-888-335-6644 or log onto our website at www.delonghi.com. Limited Warranty What does the warranty cover? We warrant each appliance to abuse, misuse, negligence or accidents. The repaired or new model ... or alterations to the appliance outside our factory or authorized service centers, nor shall it apply to the original purchaser for use of the manual for it , and on your receipt and applies only to any liability in material and workmanship. The warranty does not cover defects or ...
... accordance with De'Longhi. Residents of Canada: Please contact our toll free hotline at 1-888-335-6644 or log onto our website at www.delonghi.com. Limited Warranty What does the warranty cover? We warrant each appliance to abuse, misuse, negligence or accidents. The repaired or new model ... or alterations to the appliance outside our factory or authorized service centers, nor shall it apply to the original purchaser for use of the manual for it , and on your receipt and applies only to any liability in material and workmanship. The warranty does not cover defects or ...

