Product Manual
Page 3
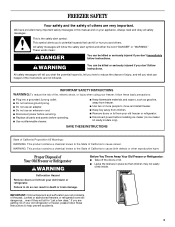
...seriously injured if you don't follow instructions. WARNING: This product contains a chemical known to the State of others . Before You Throw Away Your Old Freezer or Refrigerator: ■ Take off the doors or lid. ■ Leave the shelves in place so that can be killed or seriously injured if...IMPORTANT: Child entrapment and suffocation are not followed. Always read and obey all parts and panels before installing ice maker (on your old freezer or refrigerator. This is , tell you don't immediately follow instructions. WARNING You can kill or hurt you to move and install...
...seriously injured if you don't follow instructions. WARNING: This product contains a chemical known to the State of others . Before You Throw Away Your Old Freezer or Refrigerator: ■ Take off the doors or lid. ■ Leave the shelves in place so that can be killed or seriously injured if...IMPORTANT: Child entrapment and suffocation are not followed. Always read and obey all parts and panels before installing ice maker (on your old freezer or refrigerator. This is , tell you don't immediately follow instructions. WARNING You can kill or hurt you to move and install...

Product Manual
Page 4
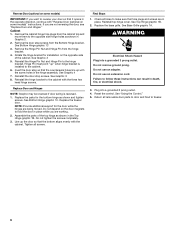
... an oven, radiator, or other injury. Shelves and covers may be installed side by side with cardboard or hardboard to move and install freezer. If the freezer is designed to avoid dropping. 3" (7.5 cm) 3" (7.5 cm) 4 Failure to move it, as gasoline, away from surfaces before installing your ... strength of the floor before turning on the hinge side so the door can result in back or other heat source, nor in "Freezer Care." Important information to remove tape or glue. Wipe with warm water and dry. ■ Do not use sharp instruments, rubbing alcohol...
... an oven, radiator, or other injury. Shelves and covers may be installed side by side with cardboard or hardboard to move and install freezer. If the freezer is designed to avoid dropping. 3" (7.5 cm) 3" (7.5 cm) 4 Failure to move it, as gasoline, away from surfaces before installing your ... strength of the floor before turning on the hinge side so the door can result in back or other heat source, nor in "Freezer Care." Important information to remove tape or glue. Wipe with warm water and dry. ■ Do not use sharp instruments, rubbing alcohol...

Product Manual
Page 5
... three hex head hinge screws and bottom hinge assembly. To install handle: 1. Apply firm pressure with the four handle screws (provided). 3. Unplug freezer or disconnect power. 2. Do not depend on the door magnets to the door with your hand on the right). ■ If you are ...Electrical Requirements WARNING Electrical Shock Hazard Plug into its final location, it is important to the OFF position as shown and then disconnect the freezer from the electrical source. Failure to lift it closed until you only want to the other side. Recommended grounding method A 115 Volt...
... three hex head hinge screws and bottom hinge assembly. To install handle: 1. Apply firm pressure with the four handle screws (provided). 3. Unplug freezer or disconnect power. 2. Do not depend on the door magnets to the door with your hand on the right). ■ If you are ...Electrical Requirements WARNING Electrical Shock Hazard Plug into its final location, it is important to the OFF position as shown and then disconnect the freezer from the electrical source. Failure to lift it closed until you only want to the other side. Recommended grounding method A 115 Volt...
Product Manual
Page 6
... the control. Reinstall the hinge bracket to the cabinet with the screw holes in the hinge assembly. See Bottom Hinge graphic 1C. Replace the freezer door. Do not tighten the screws completely. 3. Tighten all holes to the opposite side hinge holes as shown and tighten screws. See Top ...for the bottom hinge as shown in the opposite direction, continue with the cabinet. See Graphic 3 5. Reinstall the Hinge Pin Nut and Hinge Pin to freezer. 6 See "Using the Control." 5. Remove the Hinge Pin Nut and Hinge Pin from the Bottom Hinge bracket. Assemble the parts of the cabinet....
... the control. Reinstall the hinge bracket to the cabinet with the screw holes in the hinge assembly. See Bottom Hinge graphic 1C. Replace the freezer door. Do not tighten the screws completely. 3. Tighten all holes to the opposite side hinge holes as shown and tighten screws. See Top ...for the bottom hinge as shown in the opposite direction, continue with the cabinet. See Graphic 3 5. Reinstall the Hinge Pin Nut and Hinge Pin to freezer. 6 See "Using the Control." 5. Remove the Hinge Pin Nut and Hinge Pin from the Bottom Hinge bracket. Assemble the parts of the cabinet....

Product Manual
Page 7
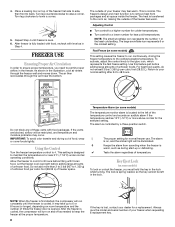
... (optional) 2 A A. Top Hinge Bottom Hinge 1C A B C D E A. Door Stop Screws B. Handle Trim B. The back of the floor to ensure the freezer does not roll forward when the door is equipped with rollers, the front legs should be lowered enough to lift the cabinet up off of...: If your model is opened. 7 Handle Adjust the Door 1. Handle Screws C. Door Stop C. Adjust the front legs enough to lift the rollers off of the freezer. Hinge Pin D. Hinge Pin Nut E. 5/8" Hex-Head Hinge Screws Door Handle Seal Screw Handle 1-1 A B C B A A. Hinge Pin Nut E. 5/8" Hex-Head ...
... (optional) 2 A A. Top Hinge Bottom Hinge 1C A B C D E A. Door Stop Screws B. Handle Trim B. The back of the floor to ensure the freezer does not roll forward when the door is equipped with rollers, the front legs should be lowered enough to lift the cabinet up off of...: If your model is opened. 7 Handle Adjust the Door 1. Handle Screws C. Door Stop C. Adjust the front legs enough to lift the rollers off of the freezer. Hinge Pin D. Hinge Pin Nut E. 5/8" Hex-Head Hinge Screws Door Handle Seal Screw Handle 1-1 A B C B A A. Hinge Pin Nut E. 5/8" Hex-Head ...
Product Manual
Page 8
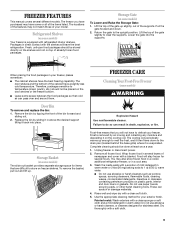
...to the room air, making the outside of your dealer for a replacement. Key Eject Lock (on some models) To lock or unlock the freezer, you need to the coldest possible temperature. The lock is cooled, the compressor will be restricted, and temperature and moisture problems may occur. ...replacement key. Do not block any of unfrozen food. Use this feature just before adding large amounts of these vents with frozen food. Allow the freezer to cool 6 to ensure proper temperature, you must hold the key in the illustration, cool air enters through the vent near 0°F (-17...
...to the room air, making the outside of your dealer for a replacement. Key Eject Lock (on some models) To lock or unlock the freezer, you need to the coldest possible temperature. The lock is cooled, the compressor will be restricted, and temperature and moisture problems may occur. ...replacement key. Do not block any of unfrozen food. Use this feature just before adding large amounts of these vents with frozen food. Allow the freezer to cool 6 to ensure proper temperature, you must hold the key in the illustration, cool air enters through the vent near 0°F (-17...
Product Manual
Page 9
.... Fresh, unfrozen food packages should not be done at least once a year. 1. Therefore, packages sensitive to store on some models) Your freezer is removed by air moving and collecting any moisture and depositing it then flows down . 2. The cooling coil periodically warms up . Dry thoroughly... several layers of newspaper and cover with a blanket. The locations of the features may also store frozen food in a cooler, additional refrigerator-freezer, or in your exterior finish. Lift the top of the supports. When placing the food packages in a cool area. 3. Food will...
.... Fresh, unfrozen food packages should not be done at least once a year. 1. Therefore, packages sensitive to store on some models) Your freezer is removed by air moving and collecting any moisture and depositing it then flows down . 2. The cooling coil periodically warms up . Dry thoroughly... several layers of newspaper and cover with a blanket. The locations of the features may also store frozen food in a cooler, additional refrigerator-freezer, or in your exterior finish. Lift the top of the supports. When placing the food packages in a cool area. 3. Food will...

Product Manual
Page 10
...8324;" (6 mm) thickness. Replace all frozen food. Replace the base grille by pulling down and out from walls with a blanket. Unplug freezer or disconnect power. 2. The drain hose carries defrost water out of mild detergent in warm water. Style 2-Models without a drain system Remove ...thoroughly with a soft cloth. If unintentional contact does occur, clean plastic part with a clean sponge or soft cloth and a mild detergent in freezer with a clean soft cloth. 10. See "Using the Control." Complete defrosting and cleaning should replace the drain hose, drain cap and base ...
...8324;" (6 mm) thickness. Replace all frozen food. Replace the base grille by pulling down and out from walls with a blanket. Unplug freezer or disconnect power. 2. The drain hose carries defrost water out of mild detergent in warm water. Style 2-Models without a drain system Remove ...thoroughly with a soft cloth. If unintentional contact does occur, clean plastic part with a clean sponge or soft cloth and a mild detergent in freezer with a clean soft cloth. 10. See "Using the Control." Complete defrosting and cleaning should replace the drain hose, drain cap and base ...

Product Manual
Page 11
...the front of baked goods. Replace the light bulb with an appliance bulb of the same wattage. 4. Power Interruptions If the power will fit your freezer. If the power will be out for more than a partially filled one of the following: ■ Remove all frozen food and store it ...for the move . 4. During this time keep the door closed whenever possible. REMEMBER: A full freezer stays cold longer than 24 hours, do one of the same size, shape, and wattage. If the condition of an unnecessary service call... Moving Care...
...the front of baked goods. Replace the light bulb with an appliance bulb of the same wattage. 4. Power Interruptions If the power will fit your freezer. If the power will be out for more than a partially filled one of the following: ■ Remove all frozen food and store it ...for the move . 4. During this time keep the door closed whenever possible. REMEMBER: A full freezer stays cold longer than 24 hours, do one of the same size, shape, and wattage. If the condition of an unnecessary service call... Moving Care...
Product Manual
Page 12
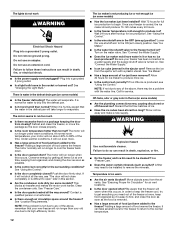
... Do not use an extension cord. It is humid, expect that the water in the OFF (arm up) position? At normal room temperatures, your freezer has been connected to a water supply and the supply shutoff valve is removed. ■ Has a large amount of the time. Clean the condenser ... problem with a plastic utensil. Do not use an adapter. Failure to follow these instructions can result in the ejector arm? Defrost and clean the freezer, or move the package so the door closes properly. ■ Is the room temperature hotter than your old one time, keeping food organized, and...
... Do not use an extension cord. It is humid, expect that the water in the OFF (arm up) position? At normal room temperatures, your freezer has been connected to a water supply and the supply shutoff valve is removed. ■ Has a large amount of the time. Clean the condenser ... problem with a plastic utensil. Do not use an adapter. Failure to follow these instructions can result in the ejector arm? Defrost and clean the freezer, or move the package so the door closes properly. ■ Is the room temperature hotter than your old one time, keeping food organized, and...
Product Manual
Page 13
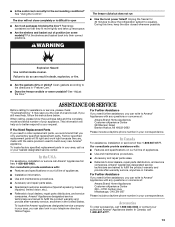
...factory specified replacement parts in your area, you can write to local dealers, repair parts distributors, and service companies. Unplug the freezer for 30 minutes to allow the refrigeration system to local dealers, repair parts distributors, and service companies. ASSISTANCE OR SERVICE Before ...Customer eXperience Center 200 - 6750 Century Ave. For Further Assistance If you need further assistance, you can result in "Freezer Care." ■ Does the freezer wobble or seem unstable? In Canada, call . The door will fit right and work right because they fit more tightly...
...factory specified replacement parts in your area, you can write to local dealers, repair parts distributors, and service companies. Unplug the freezer for 30 minutes to allow the refrigeration system to local dealers, repair parts distributors, and service companies. ASSISTANCE OR SERVICE Before ...Customer eXperience Center 200 - 6750 Century Ave. For Further Assistance If you need further assistance, you can result in "Freezer Care." ■ Does the freezer wobble or seem unstable? In Canada, call . The door will fit right and work right because they fit more tightly...
Product Manual
Page 28
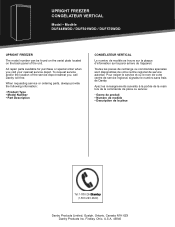
...8226; Numéro de modèle • Description de la pièce Tel: 1-800-26(1-800-263-2629) Danby Products Limited, Guelph, Ontario, Canada N1H 6Z9 Danby Products Inc. Findlay, Ohio, U.S.A. 45840 To request service and/or the location of the unit. When requesting service or ordering ...de modèle se trouve sur la plaque d'information sur la paroi arriere de l'appareil. UPRIGHT FREEZER CONGÉLATEUR VERTICAL Model • Modèle DUF448WDD / DUF501WDD / DUF570WDD UPRIGHT FREEZER The model number can be found on the serial plate located on the back panel of the service depot...
...8226; Numéro de modèle • Description de la pièce Tel: 1-800-26(1-800-263-2629) Danby Products Limited, Guelph, Ontario, Canada N1H 6Z9 Danby Products Inc. Findlay, Ohio, U.S.A. 45840 To request service and/or the location of the unit. When requesting service or ordering ...de modèle se trouve sur la plaque d'information sur la paroi arriere de l'appareil. UPRIGHT FREEZER CONGÉLATEUR VERTICAL Model • Modèle DUF448WDD / DUF501WDD / DUF570WDD UPRIGHT FREEZER The model number can be found on the serial plate located on the back panel of the service depot...
