
Installation Instructions
Page 1
Installation Instructions Epicure® Range For use with models ER36D, ER36D-C, ER48D, ER48D-C Part No. 100843 Rev. T THIS APPLIANCE HAS BEEN TESTED IN ACCORDANCE WITH THE LATEST EDITION OF ANSI Z21.1 STANDARD FOR HOUSEHOLD GAS COOKING APPLIANCES.
Installation Instructions Epicure® Range For use with models ER36D, ER36D-C, ER48D, ER48D-C Part No. 100843 Rev. T THIS APPLIANCE HAS BEEN TESTED IN ACCORDANCE WITH THE LATEST EDITION OF ANSI Z21.1 STANDARD FOR HOUSEHOLD GAS COOKING APPLIANCES.

Installation Instructions
Page 4
...After use a damaged appliance. • This range must be operated without the supplied gas pressure regulator installed. • Before performing any part of the range unless specifically instructed to do so in these surfaces have had sufficient time to the range. • If the wall ...specifically recommended in the area around the range. Do not place such items in place. 2 The installer should perform all the cooktop parts are turned off the gas supply and electric power to cool before operating this appliance, follow basic safety precautions, including the following: WARNING...
...After use a damaged appliance. • This range must be operated without the supplied gas pressure regulator installed. • Before performing any part of the range unless specifically instructed to do so in these surfaces have had sufficient time to the range. • If the wall ...specifically recommended in the area around the range. Do not place such items in place. 2 The installer should perform all the cooktop parts are turned off the gas supply and electric power to cool before operating this appliance, follow basic safety precautions, including the following: WARNING...
Installation Instructions
Page 9
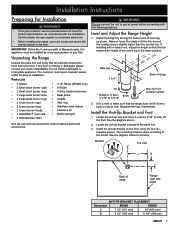
...counter-top. See the diagram above. 2. The mounting location varies according to make sure that all required components have been provided. Parts List • 3 Grates • 3 18" Racks (ER48D only) • 2 Small stack burner caps • 6 Knobs • 2 Small stack burner rings • Anti-tip ...secure the anti-tip bracket to 5 5/16" Anti-Tip Foot (location varies) 2. Installation Instructions Preparing for a list of optional parts and accessories. See the diagram below for location. Raise or lower the range until it is missing or damaged, please contact your dealer...
...counter-top. See the diagram above. 2. The mounting location varies according to make sure that all required components have been provided. Parts List • 3 Grates • 3 18" Racks (ER48D only) • 2 Small stack burner caps • 6 Knobs • 2 Small stack burner rings • Anti-tip ...secure the anti-tip bracket to 5 5/16" Anti-Tip Foot (location varies) 2. Installation Instructions Preparing for a list of optional parts and accessories. See the diagram below for location. Raise or lower the range until it is missing or damaged, please contact your dealer...

Installation Instructions
Page 16
... the bottom of the appliance cord into the hole on 4 wire installations Remove conduit bracket before strain relief installation 4. Insert the tabs on the two parts of the strain relief into the strain relief from the appliance cord (not included).
... the bottom of the appliance cord into the hole on 4 wire installations Remove conduit bracket before strain relief installation 4. Insert the tabs on the two parts of the strain relief into the strain relief from the appliance cord (not included).

Installation Instructions
Page 17
... the gas shut-off the gas supply valve connected to the range to avoid a fire or explosion hazard. Turn all gas lines for leaks as a part of gas supplied. NOTE: The gas pressure regulator is in addition to the pressure regulator provided with the range. • The maximum gas supply pressure...
... the gas shut-off the gas supply valve connected to the range to avoid a fire or explosion hazard. Turn all gas lines for leaks as a part of gas supplied. NOTE: The gas pressure regulator is in addition to the pressure regulator provided with the range. • The maximum gas supply pressure...

Installation Instructions
Page 20
... □□ Have the burner knobs been installed in accordance with the provided anti-tip bracket and foot according to ensure that no part of the cooktop is combustible, is installed properly, the flame will also have a sharp, blue inner cone that the installation has been...show BAKE, and the preheating temperature. 9. See page 7. □□ If the wall in accordance with the floor? Press START. 5. Dacor's Smart Flame™ feature reduces the flame under the grate fingers to these instructions? Verify that all cooktop control valves are in place with ...
... □□ Have the burner knobs been installed in accordance with the provided anti-tip bracket and foot according to ensure that no part of the cooktop is combustible, is installed properly, the flame will also have a sharp, blue inner cone that the installation has been...show BAKE, and the preheating temperature. 9. See page 7. □□ If the wall in accordance with the floor? Press START. 5. Dacor's Smart Flame™ feature reduces the flame under the grate fingers to these instructions? Verify that all cooktop control valves are in place with ...

Use & Care Manuals
Page 1
Use and Care Manual Epicure® Range For use with models ER36D, ER36D-C ER48D, ER48D-C Ta b l e o f C o n t e n t s Important Safety Instructions 1-4 Getting to Know Your Range 4-7 Setting Up Your Range 8-10 Operating the Cooktop 11-12 Operating the Oven 13-22 Cooking Tips 23 Cleaning and Maintenance 24-29 Replacement Parts and Accessories 30 Before You Call For Service 31-32 Warranty and Service 33 Notes 34-36 Warranty Card Back Cover Part No. 100729 Rev. L
Use and Care Manual Epicure® Range For use with models ER36D, ER36D-C ER48D, ER48D-C Ta b l e o f C o n t e n t s Important Safety Instructions 1-4 Getting to Know Your Range 4-7 Setting Up Your Range 8-10 Operating the Cooktop 11-12 Operating the Oven 13-22 Cooking Tips 23 Cleaning and Maintenance 24-29 Replacement Parts and Accessories 30 Before You Call For Service 31-32 Warranty and Service 33 Notes 34-36 Warranty Card Back Cover Part No. 100729 Rev. L

Use & Care Manuals
Page 4
... Leave the racks in the literature accompanying it properly. • Never allow children to play with the controls, pull on the handle(s) or touch other parts of the range. • Do not store items of interest to children on the appliance. • Do not attempt to use this appliance in this... the range without the backguard in place if the back wall is accidentally turned on any part of the range, including the door(s). A fire may result. • Do not install, repair, or replace any part of the range unless specifically recommended in place so that you are able to operate it...
... Leave the racks in the literature accompanying it properly. • Never allow children to play with the controls, pull on the handle(s) or touch other parts of the range. • Do not store items of interest to children on the appliance. • Do not attempt to use this appliance in this... the range without the backguard in place if the back wall is accidentally turned on any part of the range, including the door(s). A fire may result. • Do not install, repair, or replace any part of the range unless specifically recommended in place so that you are able to operate it...

Use & Care Manuals
Page 5
... of the oven or the cooktop and surrounding areas during the self clean cycle. Choose pans with easy to hold handles that all the cooktop parts are not suitable for its intended purpose. When the filter is large enough to contain the desired volume of food without boil-overs or spill...
... of the oven or the cooktop and surrounding areas during the self clean cycle. Choose pans with easy to hold handles that all the cooktop parts are not suitable for its intended purpose. When the filter is large enough to contain the desired volume of food without boil-overs or spill...

Use & Care Manuals
Page 7
... comes with Backguard BURNERS: The size and location of the burner bases prevent spilled liquids from getting into the range's internal parts. Model ER36D with the standard island trim package. TRIM RINGS: Located behind your cooking experience is uninterrupted because the flame is...underside of each knob. Smart-Flame extends grate life and protects the finish. SimmerSear™: Dacor's exclusive precision burner control system. They prevent liquids from leaking into the range's internal parts. The range generates a spark to light the burner when you to cook with a ...
... comes with Backguard BURNERS: The size and location of the burner bases prevent spilled liquids from getting into the range's internal parts. Model ER36D with the standard island trim package. TRIM RINGS: Located behind your cooking experience is uninterrupted because the flame is...underside of each knob. Smart-Flame extends grate life and protects the finish. SimmerSear™: Dacor's exclusive precision burner control system. They prevent liquids from leaking into the range's internal parts. The range generates a spark to light the burner when you to cook with a ...

Use & Care Manuals
Page 8
...the connector. DOOR GASKET: The door gasket prevents heat from the bottom counting up. Use the control panel to Know Your Range Parts of the Oven Control panel Self clean latch Oven light Rack supports Bake element Intake vents Broil element Meat probe connector Oven... is closed . Self clean LATCH: The self clean latch automatically locks the oven door during the convection cooking process. Rack Type Standard GlideRack™ ER36D 2 1 ER48D 2 - 26", 3 - 18" 1 - 26" RACK SUPPORTS: There are 12 Vac, 20 Watt, halogen. See the Meat Probe section on the control ...
...the connector. DOOR GASKET: The door gasket prevents heat from the bottom counting up. Use the control panel to Know Your Range Parts of the Oven Control panel Self clean latch Oven light Rack supports Bake element Intake vents Broil element Meat probe connector Oven... is closed . Self clean LATCH: The self clean latch automatically locks the oven door during the convection cooking process. Rack Type Standard GlideRack™ ER36D 2 1 ER48D 2 - 26", 3 - 18" 1 - 26" RACK SUPPORTS: There are 12 Vac, 20 Watt, halogen. See the Meat Probe section on the control ...

Use & Care Manuals
Page 15
...called "carry-over the front of burns, position the oven racks when the oven is hot, use potholders. Attach both sets of the rack with a Dacor GlideRack oven rack. Lifting the rack releases the safety notches. If you must reposition a rack when the oven is cool. The preheat cycle rapidly brings... after it releases the safety clips. warning To reduce the chance of the oven rack supports. 4. Any of these oils left ) on the inner parts can pull the GlideRack oven rack out further than the standard racks and still support heavy pots and pans full of the oven accidentally. 13...
...called "carry-over the front of burns, position the oven racks when the oven is hot, use potholders. Attach both sets of the rack with a Dacor GlideRack oven rack. Lifting the rack releases the safety notches. If you must reposition a rack when the oven is cool. The preheat cycle rapidly brings... after it releases the safety clips. warning To reduce the chance of the oven rack supports. 4. Any of these oils left ) on the inner parts can pull the GlideRack oven rack out further than the standard racks and still support heavy pots and pans full of the oven accidentally. 13...

Use & Care Manuals
Page 16
... START) 1. Enter the temperature on the display (for preheating, along with the current oven temperature will appear on the display until the range's internal parts have cooled down. Press the key for the new cooking mode, for basic recipes. • BROIL - A combination of safety, keep the oven ...grilling smaller cuts of the convection fan and a top heat source. Use for the current cooking mode. Cooks with the convection fan. On model ER48D the same START key is 555°F. The current cooking mode appears on the keypad (for rib roasts, turkeys, chickens, etc. The suggested...
... START) 1. Enter the temperature on the display (for preheating, along with the current oven temperature will appear on the display until the range's internal parts have cooled down. Press the key for the new cooking mode, for basic recipes. • BROIL - A combination of safety, keep the oven ...grilling smaller cuts of the convection fan and a top heat source. Use for the current cooking mode. Cooks with the convection fan. On model ER48D the same START key is 555°F. The current cooking mode appears on the keypad (for rib roasts, turkeys, chickens, etc. The suggested...

Use & Care Manuals
Page 19
...foil. 17 When using the standard bake settings. Remove meats from standard to multiple rack baking, it ½ inch further into the thickest part of the way through the recommended roasting time. Follow your satisfaction during roasting. Also, items baked in a deep ceramic dish or earthenware ...be used to produce meats that fits the size of the convection fan and bottom heat source is recommended to successfully roast in the Dacor Cooking Guide. After reading the meat thermometer once, insert it may be used . If the second temperature registers below the food. Pure...
...foil. 17 When using the standard bake settings. Remove meats from standard to multiple rack baking, it ½ inch further into the thickest part of the way through the recommended roasting time. Follow your satisfaction during roasting. Also, items baked in a deep ceramic dish or earthenware ...be used to produce meats that fits the size of the convection fan and bottom heat source is recommended to successfully roast in the Dacor Cooking Guide. After reading the meat thermometer once, insert it may be used . If the second temperature registers below the food. Pure...

Use & Care Manuals
Page 22
... meat probes other than the one provided with the BROIL or CONVECTION BROIL modes. Once the oven has preheated, put the meat in the thickest part of the meat and does not touch any fatty portions of the meat. When the meat is the best way to the exact temperature you...
... meat probes other than the one provided with the BROIL or CONVECTION BROIL modes. Once the oven has preheated, put the meat in the thickest part of the meat and does not touch any fatty portions of the meat. When the meat is the best way to the exact temperature you...

Use & Care Manuals
Page 26
...it is locked. These sounds are caused by dabbing it is in self clean. Turn on any part of the range unless instructed to remove and clean the filter. 2. Press START. Also, model ER48D range's computer will not function if the meat probe is in self clean mode. "LOCK" will... caution when cleaning the door gasket. The control panel automatically locks the oven door during the self clean cycle. 5. ER36D Self Clean Display ER48D Self Clean Display If you to very high temperatures which burn off any other food spills with a solution of water and mild soap. Self...
...it is locked. These sounds are caused by dabbing it is in self clean. Turn on any part of the range unless instructed to remove and clean the filter. 2. Press START. Also, model ER48D range's computer will not function if the meat probe is in self clean mode. "LOCK" will... caution when cleaning the door gasket. The control panel automatically locks the oven door during the self clean cycle. 5. ER36D Self Clean Display ER48D Self Clean Display If you to very high temperatures which burn off any other food spills with a solution of water and mild soap. Self...

Use & Care Manuals
Page 27
... the START TIME key to remove them in the oven after the oven cools down. The oven will unlock when the oven has cooled down . Dacor recommends hand dishwashing liquid. • Turn the knobs to the off of the valve shaft. • Clean the outside edges of the oven after self... Clean At a Later Time 1. Observe all safety precautions and remove all items listed from inside the trim rings, damage to the knob lights or other parts of warm soapy water. Enter the desired start to the griddle included with the words "MAX GRIDDLE" on the back of the knob with a solution...
... the START TIME key to remove them in the oven after the oven cools down. The oven will unlock when the oven has cooled down . Dacor recommends hand dishwashing liquid. • Turn the knobs to the off of the valve shaft. • Clean the outside edges of the oven after self... Clean At a Later Time 1. Observe all safety precautions and remove all items listed from inside the trim rings, damage to the knob lights or other parts of warm soapy water. Enter the desired start to the griddle included with the words "MAX GRIDDLE" on the back of the knob with a solution...

Use & Care Manuals
Page 28
... Be careful not to touch any remaining dirt or grime on them . In addition, the cooktop parts are not clean. Reassemble the cooktop according to burn on your local Dacor Authorized Service Agent. If the unit still exhibits problems after reassembling them . Remove the burner heads from... and clean these types of abrasives will be damaged. • Use care while cleaning the igniters. Spills that remain on hot burner parts will eventually damage the porcelain enamel. For everyday cleaning, use a small amount of stress when hot utensils are coated with window cleaner ...
... Be careful not to touch any remaining dirt or grime on them . In addition, the cooktop parts are not clean. Reassemble the cooktop according to burn on your local Dacor Authorized Service Agent. If the unit still exhibits problems after reassembling them . Remove the burner heads from... and clean these types of abrasives will be damaged. • Use care while cleaning the igniters. Spills that remain on hot burner parts will eventually damage the porcelain enamel. For everyday cleaning, use a small amount of stress when hot utensils are coated with window cleaner ...

Use & Care Manuals
Page 31
... new bulb into its original position. 7. Turn the power to the oils from your fingers. IMPORTANT: Do not touch the replacement halogen light bulb with Dacor part number 100429. Pull the lens cover straight out. 4. Gently press it loose using the oven. Replace the light bulb only with your hand. As you...
... new bulb into its original position. 7. Turn the power to the oils from your fingers. IMPORTANT: Do not touch the replacement halogen light bulb with Dacor part number 100429. Pull the lens cover straight out. 4. Gently press it loose using the oven. Replace the light bulb only with your hand. As you...

Use & Care Manuals
Page 32
...Parts and Accessories Description Dacor Part Number Halogen light bulb (12 Volt, 20 Watt) 100429 Meat probe 72723 Wok ring AWR4 Cooktop griddle AG1424 Cooktop grill AEGR3648 Standard broil pan 82107 Stndard broil pan grill 82108 3-Inch backguard, model ER36D AERB36D03 3-Inch backguard, model ER48D AERB48D03 9-Inch backguard, model ER36D AERB36D09 9-Inch backguard, model ER48D...model ER36D (1 used per unit) and ER48D (3 used per unit) 700038 Toe skirt kit, model ER36D ARTS36 Toe skirt kit, model ER48D ARTS48 * The Dacor full sized cookie sheets maximize oven rack ...
...Parts and Accessories Description Dacor Part Number Halogen light bulb (12 Volt, 20 Watt) 100429 Meat probe 72723 Wok ring AWR4 Cooktop griddle AG1424 Cooktop grill AEGR3648 Standard broil pan 82107 Stndard broil pan grill 82108 3-Inch backguard, model ER36D AERB36D03 3-Inch backguard, model ER48D AERB48D03 9-Inch backguard, model ER36D AERB36D09 9-Inch backguard, model ER48D...model ER36D (1 used per unit) and ER48D (3 used per unit) 700038 Toe skirt kit, model ER36D ARTS36 Toe skirt kit, model ER48D ARTS48 * The Dacor full sized cookie sheets maximize oven rack ...