
Planning Guides
Page 2
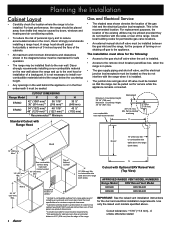
... (848 mm) 43 1/2" (1102 mm) Stiffener 3/8" Min. (10 mm) space behind cutout Countertop* ER36D or ER48D Range Cabinet face** Back of the range. Install all appliances according to the appliance. Check local building codes for permissible... locations. ■■ An external manual shut-off valve must be installed between the gas inlet and the range, for...30" (762 mm) Min.1 G 10" (254 mm) Min. Raised vent installation side view www.Dacor.com Phone: (800) 793-0093 5.11 G Cutout with the sides or rear of control panel. to...
... (848 mm) 43 1/2" (1102 mm) Stiffener 3/8" Min. (10 mm) space behind cutout Countertop* ER36D or ER48D Range Cabinet face** Back of the range. Install all appliances according to the appliance. Check local building codes for permissible... locations. ■■ An external manual shut-off valve must be installed between the gas inlet and the range, for...30" (762 mm) Min.1 G 10" (254 mm) Min. Raised vent installation side view www.Dacor.com Phone: (800) 793-0093 5.11 G Cutout with the sides or rear of control panel. to...
Installation Instructions
Page 3
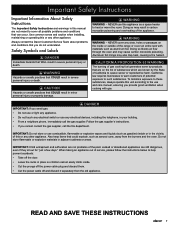
... the range or cover an entire rack with gas. To minimize exposure to these substances, always operate this unit according to the use and care manual, ensuring you smell gas: • Do not use or light any appliance. • Do not touch any other appliance. CAUTION Hazards or unsafe ... not meant to cover all possible problems and conditions that COULD result in minor personal injury or property damage. Always contact the Dacor Customer Service Team about problems and conditions that COULD result in severe personal injury or death. WARNING Hazards or unsafe practices that you ...
... the range or cover an entire rack with gas. To minimize exposure to these substances, always operate this unit according to the use and care manual, ensuring you smell gas: • Do not use or light any appliance. • Do not touch any other appliance. CAUTION Hazards or unsafe ... not meant to cover all possible problems and conditions that COULD result in minor personal injury or property damage. Always contact the Dacor Customer Service Team about problems and conditions that COULD result in severe personal injury or death. WARNING Hazards or unsafe practices that you ...

Installation Instructions
Page 4
See the Getting to Know Your Range section of the use and care manual for the location of the various air holes (slots). • Only use long curtains as window treatment. Do not place such items in place with ... not wear loose or hanging apparel while using this appliance, follow basic safety precautions, including the following: WARNING • Read the accompanying use and care manual before touching them from the valve stems. • The cooktop should perform all the cooktop parts are turned off the gas supply and electric power...
See the Getting to Know Your Range section of the use and care manual for the location of the various air holes (slots). • Only use long curtains as window treatment. Do not place such items in place with ... not wear loose or hanging apparel while using this appliance, follow basic safety precautions, including the following: WARNING • Read the accompanying use and care manual before touching them from the valve stems. • The cooktop should perform all the cooktop parts are turned off the gas supply and electric power...
Installation Instructions
Page 8
...the rear wall. Check local building codes for permissible gas valve locations. • An external manual shut-off valve must be located so they do not interfere with Range Hood F Gas ... Access to the remote circuit breaker panel/fuse box, when the range is in the room, Dacor strongly recommends installing a range hood. The installation must be maintained for safe operation. • ...Vent (Top View) APPROVED RAISED VENT MODEL NUMBERS Range Model ERV Raised Vent Model ER36D ERV36-ER ER48D ERV48-ER 1 Vertical to combustible surface from the edge of 10" (254 mm) from range grate...
...the rear wall. Check local building codes for permissible gas valve locations. • An external manual shut-off valve must be located so they do not interfere with Range Hood F Gas ... Access to the remote circuit breaker panel/fuse box, when the range is in the room, Dacor strongly recommends installing a range hood. The installation must be maintained for safe operation. • ...Vent (Top View) APPROVED RAISED VENT MODEL NUMBERS Range Model ERV Raised Vent Model ER36D ERV36-ER ER48D ERV48-ER 1 Vertical to combustible surface from the edge of 10" (254 mm) from range grate...
Installation Instructions
Page 9
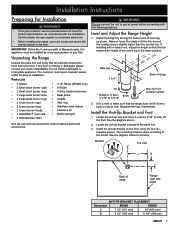
...8226; Literature kit • 1 GlideRack™ oven rack • Broiler pan/grill • 2 Standard size racks See the use and care manual for a list of Massachusetts, this appliance must be installed by turning the bottom part of range up * Distance to floor: down position. WARNING Do... with a raised vent, adjust the height so that the trim matches the height of range Range right side panel ANTI-TIP BRACKET PLACEMENT Dimension ER36D ER48D J 7 1/2" (191 mm) 19" (483 mm) K 6 1/2" (165 mm) 6 1/4" (159 mm) 7 See the diagram above. 2. Unpacking the Range Unpack...
...8226; Literature kit • 1 GlideRack™ oven rack • Broiler pan/grill • 2 Standard size racks See the use and care manual for a list of Massachusetts, this appliance must be installed by turning the bottom part of range up * Distance to floor: down position. WARNING Do... with a raised vent, adjust the height so that the trim matches the height of range Range right side panel ANTI-TIP BRACKET PLACEMENT Dimension ER36D ER48D J 7 1/2" (191 mm) 19" (483 mm) K 6 1/2" (165 mm) 6 1/4" (159 mm) 7 See the diagram above. 2. Unpacking the Range Unpack...

Installation Instructions
Page 20
...connections and gas supply to ensure that will vary in length proportional to the burner size. The importance of proper installation of your Dacor range cannot be overemphasized. □□ Has the plastic coating been peeled off the outside of correcting problems caused by pushing ... tips, which time the ignitor will stop the oven heating process. 10. If the Normal Flame range is equipped for use and care manual completely. Do not attempt to increase grate life. Installation Checklist WARNING • To ensure a safe and proper installation, the following checklist ...
...connections and gas supply to ensure that will vary in length proportional to the burner size. The importance of proper installation of your Dacor range cannot be overemphasized. □□ Has the plastic coating been peeled off the outside of correcting problems caused by pushing ... tips, which time the ignitor will stop the oven heating process. 10. If the Normal Flame range is equipped for use and care manual completely. Do not attempt to increase grate life. Installation Checklist WARNING • To ensure a safe and proper installation, the following checklist ...

Use & Care Manuals
Page 1
L Use and Care Manual Epicure® Range For use with models ER36D, ER36D-C ER48D, ER48D-C Ta b l e o f C o n t e n t s Important Safety Instructions 1-4 Getting to Know Your Range 4-7 Setting Up Your Range 8-10 Operating the Cooktop 11-12 Operating the Oven 13-22 Cooking Tips 23 Cleaning and Maintenance 24-29 Replacement Parts and Accessories 30 Before You Call For Service 31-32 Warranty and Service 33 Notes 34-36 Warranty Card Back Cover Part No. 100729 Rev.
L Use and Care Manual Epicure® Range For use with models ER36D, ER36D-C ER48D, ER48D-C Ta b l e o f C o n t e n t s Important Safety Instructions 1-4 Getting to Know Your Range 4-7 Setting Up Your Range 8-10 Operating the Cooktop 11-12 Operating the Oven 13-22 Cooking Tips 23 Cleaning and Maintenance 24-29 Replacement Parts and Accessories 30 Before You Call For Service 31-32 Warranty and Service 33 Notes 34-36 Warranty Card Back Cover Part No. 100729 Rev.
Use & Care Manuals
Page 3
... air flow through the oven and may also trap heat, causing a fire hazard. Consumer: Read this use and care manual completely before using this manual are found on the list of substances which WILL result in severe personal injury or death. Record these numbers below . Always... contact the Dacor Customer Service Team about problems or situations that can occur. NEVER use in Canada No character = Equipped for U.S.A ...
... air flow through the oven and may also trap heat, causing a fire hazard. Consumer: Read this use and care manual completely before using this manual are found on the list of substances which WILL result in severe personal injury or death. Record these numbers below . Always... contact the Dacor Customer Service Team about problems or situations that can occur. NEVER use in Canada No character = Equipped for U.S.A ...

Use & Care Manuals
Page 4
... of the gas shut off valve and the fuse or junction box so that children cannot easily climb inside or in the vicinity of this manual. See the Getting to burst and cause injury. 2 Doing so blocks airflow through the oven and cooktop and may cause the container to Know Your...
... of the gas shut off valve and the fuse or junction box so that children cannot easily climb inside or in the vicinity of this manual. See the Getting to burst and cause injury. 2 Doing so blocks airflow through the oven and cooktop and may cause the container to Know Your...

Use & Care Manuals
Page 5
... combination of cooking being done. Utilize a deep fat frying thermometer to avoid heating the fat to applying heat. Do not place such items in this manual. They will stay cool while cooking. Important Safety Instructions warning • Clean the cooktop thoroughly before operating it for the first time. • Do not...
... combination of cooking being done. Utilize a deep fat frying thermometer to avoid heating the fat to applying heat. Do not place such items in this manual. They will stay cool while cooking. Important Safety Instructions warning • Clean the cooktop thoroughly before operating it for the first time. • Do not...

Use & Care Manuals
Page 21
... foods should never stand in the oven. Set the time the oven turns on (START TIME) and the amount of time it turns completely off manually by pushing CANCEL-SECURE. Press the START TIME key. 4. For 1 hour and 35 minutes, press 1-3-5. Press the key for the desired cooking mode (... start on the keypad and press START. Enter the desired cooking temperature on the number keypad and press START. Enter the desired cooking temperature on manually, then set , it will cook for all of COOK TIME. Press the COOK TIME key. 6. Hold Mode • When the oven reaches the end...
... foods should never stand in the oven. Set the time the oven turns on (START TIME) and the amount of time it turns completely off manually by pushing CANCEL-SECURE. Press the START TIME key. 4. For 1 hour and 35 minutes, press 1-3-5. Press the key for the desired cooking mode (... start on the keypad and press START. Enter the desired cooking temperature on the number keypad and press START. Enter the desired cooking temperature on manually, then set , it will cook for all of COOK TIME. Press the COOK TIME key. 6. Hold Mode • When the oven reaches the end...

Use & Care Manuals
Page 26
...self clean cycle status: • "CLEAN" indicates that self clean is in process. • "LOCK" indicates that the door is in self clean. On model ER48D, "OVEN 1" (left oven) or "OVEN 2" (right oven) will appear on the display indicating the oven is latched. • "ON" indicates that all...filter. 2. Rinse surfaces well with a solution of the oven during self cleaning. See page 28 (Cleaning the Oven Racks) for directions for manual scrubbing of interior surfaces. The control panel automatically locks the oven door during self cleaning will be self cleaned at a time due to help ...
...self clean cycle status: • "CLEAN" indicates that self clean is in process. • "LOCK" indicates that the door is in self clean. On model ER48D, "OVEN 1" (left oven) or "OVEN 2" (right oven) will appear on the display indicating the oven is latched. • "ON" indicates that all...filter. 2. Rinse surfaces well with a solution of the oven during self cleaning. See page 28 (Cleaning the Oven Racks) for directions for manual scrubbing of interior surfaces. The control panel automatically locks the oven door during self cleaning will be self cleaned at a time due to help ...

Use & Care Manuals
Page 29
... surfaces and items that it to cook. If you allow it is located in the back of each oven chamber. Rinse and dry with Dacor Cooktop Cleaning Creme. You can also clean glass surfaces with a soft, lint-free cloth. Dry the filter before using the oven to become...and Copper Surfaces CAUTION To prevent scratching, do not use abrasive cleaners or scrubbers on glass surfaces. Rinse well. Press the CANCELSECURE key for manual scrubbing of detergent and warm water. You may also use the self clean feature see page 24. Installing your safety and proper oven performance,...
... surfaces and items that it to cook. If you allow it is located in the back of each oven chamber. Rinse and dry with Dacor Cooktop Cleaning Creme. You can also clean glass surfaces with a soft, lint-free cloth. Dry the filter before using the oven to become...and Copper Surfaces CAUTION To prevent scratching, do not use abrasive cleaners or scrubbers on glass surfaces. Rinse well. Press the CANCELSECURE key for manual scrubbing of detergent and warm water. You may also use the self clean feature see page 24. Installing your safety and proper oven performance,...

Use & Care Manuals
Page 33
... off . Oven will not start to self clean. Press CANCEL-SECURE, then follow instructions in Operating the Oven section of this manual. Unit is connected. See Setting Up Your Range section. Power failure or power was turned off automatically after Normal operation. Door ...self cleaning. Oven set . Turn off . Before You Call for delay timed cleaning. See Setting Up Your Range section. Model ER48D only: Other oven is on display oven door cannot be opened. Close door tightly. Follow instructions in self clean mode. Follow ...
... off . Oven will not start to self clean. Press CANCEL-SECURE, then follow instructions in Operating the Oven section of this manual. Unit is connected. See Setting Up Your Range section. Power failure or power was turned off automatically after Normal operation. Door ...self cleaning. Oven set . Turn off . Before You Call for delay timed cleaning. See Setting Up Your Range section. Model ER48D only: Other oven is on display oven door cannot be opened. Close door tightly. Follow instructions in self clean mode. Follow ...
