Installation Instructions
Page 9
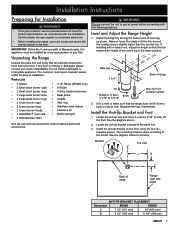
...level to make sure that all required components have been provided. See the diagram above. 2. Parts List • 3 Grates • 3 18" Racks (ER48D only) • 2 Small stack burner caps • 6 Knobs • 2 Small stack burner rings • Anti-tip bracket w/screws • ...2 Large stack burner caps • 2 Large stack burner rings • Meat probe • Griddle • 2 Crown burner caps • Wok ring • 2 Crown burner rings • Stainless steel cleaner • 2 Crown burner heads •...
...level to make sure that all required components have been provided. See the diagram above. 2. Parts List • 3 Grates • 3 18" Racks (ER48D only) • 2 Small stack burner caps • 6 Knobs • 2 Small stack burner rings • Anti-tip bracket w/screws • ...2 Large stack burner caps • 2 Large stack burner rings • Meat probe • Griddle • 2 Crown burner caps • Wok ring • 2 Crown burner rings • Stainless steel cleaner • 2 Crown burner heads •...

Installation Instructions
Page 18
... on them . 1. Push until it stops. Remove any packaging from it falling off of the door. Put the knobs with the words "MAX GRIDDLE" on Outer Burner Knobs Notch on bottom of hinge Lower lip of each hinge rests on them onto the inner (center burner) valve shafts. Carefully... on the hinge receptacles. Icons on the outer valve shafts. Installation Instructions Final Installation 1. The knobs for the center burners have the words "MAX GRIDDLE" on top of the lower lip of each of the bottom corners of the range, including the door. 2. Put the remaining knobs on Center ...
... on them . 1. Push until it stops. Remove any packaging from it falling off of the door. Put the knobs with the words "MAX GRIDDLE" on Outer Burner Knobs Notch on bottom of hinge Lower lip of each hinge rests on them onto the inner (center burner) valve shafts. Carefully... on the hinge receptacles. Icons on the outer valve shafts. Installation Instructions Final Installation 1. The knobs for the center burners have the words "MAX GRIDDLE" on top of the lower lip of each of the bottom corners of the range, including the door. 2. Put the remaining knobs on Center ...
Use & Care Manuals
Page 11
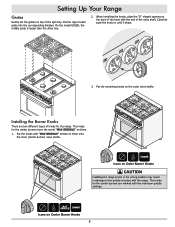
On the model ER36D, the middle grate is larger than the other two. 2. Installing the Burner Knobs There are marked with "MAX GRIDDLE" written on the outer valve shafts. Icons on Center Burner Knobs 9 Icons on Outer Burner Knobs caution Installing the range knobs in the wrong position ...may result in damage to the griddle included with the range. Setting Up Your Range Grates Gently set the grates on the back of the knob with the end of the valve...
On the model ER36D, the middle grate is larger than the other two. 2. Installing the Burner Knobs There are marked with "MAX GRIDDLE" written on the outer valve shafts. Icons on Center Burner Knobs 9 Icons on Outer Burner Knobs caution Installing the range knobs in the wrong position ...may result in damage to the griddle included with the range. Setting Up Your Range Grates Gently set the grates on the back of the knob with the end of the valve...

Use & Care Manuals
Page 14
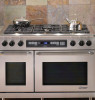
... The grease trap goes toward the back of the grate. Line up griddle on the surface because they are poor conductors of the center grate on the range*. Operating the Cooktop Cooktop Tips • Dacor's SimmerSear feature allows you start to dry thoroughly. 2. Maintaining a higher... boil than the MAX GRIDDLE setting after each use. Turn the center front burner knob to the MAX GRIDDLE position, or lower if desired. See page 28 for...
... The grease trap goes toward the back of the grate. Line up griddle on the surface because they are poor conductors of the center grate on the range*. Operating the Cooktop Cooktop Tips • Dacor's SimmerSear feature allows you start to dry thoroughly. 2. Maintaining a higher... boil than the MAX GRIDDLE setting after each use. Turn the center front burner knob to the MAX GRIDDLE position, or lower if desired. See page 28 for...

Use & Care Manuals
Page 27
... the oven will still be hot. Doing so will lock. Observe all safety precautions and remove all items listed from the range. Press START. 6. Dacor recommends hand dishwashing liquid. • Turn the knobs to the off of the valve shaft. • Clean the outside edges of abrasive cleaners such ... moisture inside the trim rings, damage to the knob lights or other parts of the trim rings while the knobs are marked with the maximum griddle settings. • To prevent damage, do not use of the trim rings. The words "CLEAN", "LOCK" and "ON" will still be hot (about a minute...
... the oven will still be hot. Doing so will lock. Observe all safety precautions and remove all items listed from the range. Press START. 6. Dacor recommends hand dishwashing liquid. • Turn the knobs to the off of the valve shaft. • Clean the outside edges of abrasive cleaners such ... moisture inside the trim rings, damage to the knob lights or other parts of the trim rings while the knobs are marked with the maximum griddle settings. • To prevent damage, do not use of the trim rings. The words "CLEAN", "LOCK" and "ON" will still be hot (about a minute...

Use & Care Manuals
Page 30
... a while. Cleaning the Broil Pan Your broil pan has a porcelain enamel finish. If your roast/ broil pan is constructed of a sponge. Griddle Clean the griddle after cleaning. To prevent scratching, do not immerse the meat probe in water. Do not scrub it or it . Cleaning the Meat Probe warning...Cleaning the Optional Cookie Sheets Clean the optional aluminum cookie sheets with "V" Shaped Rack Your roast/broil pan has a porcelain enamel finish. The griddle is porous and soap will affect the flavor of detergent and hot water. Use the soft side of a sponge to make them with a ...
... a while. Cleaning the Broil Pan Your broil pan has a porcelain enamel finish. If your roast/ broil pan is constructed of a sponge. Griddle Clean the griddle after cleaning. To prevent scratching, do not immerse the meat probe in water. Do not scrub it or it . Cleaning the Meat Probe warning...Cleaning the Optional Cookie Sheets Clean the optional aluminum cookie sheets with "V" Shaped Rack Your roast/broil pan has a porcelain enamel finish. The griddle is porous and soap will affect the flavor of detergent and hot water. Use the soft side of a sponge to make them with a ...

Use & Care Manuals
Page 32
.... 30 Replacement Parts and Accessories Description Dacor Part Number Halogen light bulb (12 Volt, 20 Watt) 100429 Meat probe 72723 Wok ring AWR4 Cooktop griddle AG1424 Cooktop grill AEGR3648 Standard broil pan 82107 Stndard broil pan grill 82108 3-Inch backguard, model ER36D AERB36D03 3-Inch backguard, model ER48D AERB48D03 9-Inch backguard, model ER36D AERB36D09...
.... 30 Replacement Parts and Accessories Description Dacor Part Number Halogen light bulb (12 Volt, 20 Watt) 100429 Meat probe 72723 Wok ring AWR4 Cooktop griddle AG1424 Cooktop grill AEGR3648 Standard broil pan 82107 Stndard broil pan grill 82108 3-Inch backguard, model ER36D AERB36D03 3-Inch backguard, model ER48D AERB48D03 9-Inch backguard, model ER36D AERB36D09...