Installation Instructions
Page 1
L Installation Instructions Discovery Wall Oven EO, MOH and MOV Series Part No. 65433 Rev.
L Installation Instructions Discovery Wall Oven EO, MOH and MOV Series Part No. 65433 Rev.

Installation Instructions
Page 3
...future reference and the local electrical inspector's use this or any other appliance. • Always contact the Dacor Customer Service Team about problems and conditions that can occur. Use common sense and caution when installing, ...Product Specifications 4 Product Dimensions 4 Planning the Installation 6 Selecting the Location 6 Cabinet Cutout 6 Electrical Specifications 9 Installation Instructions 9 Parts List 9 Electrical Service Installation 10 Final Installation 12 Verify Proper Operation 14 Installation Checklist 15 Before You Begin... Table of safety and...
...future reference and the local electrical inspector's use this or any other appliance. • Always contact the Dacor Customer Service Team about problems and conditions that can occur. Use common sense and caution when installing, ...Product Specifications 4 Product Dimensions 4 Planning the Installation 6 Selecting the Location 6 Cabinet Cutout 6 Electrical Specifications 9 Installation Instructions 9 Parts List 9 Electrical Service Installation 10 Final Installation 12 Verify Proper Operation 14 Installation Checklist 15 Before You Begin... Table of safety and...
Installation Instructions
Page 4
.... 2 They will be damaged. • Do not allow children to play with aluminum foil or other service. • Before performing any part of the oven during cooking. • To prevent damage, remove the meat probe from children. In addition, the objects themselves could cause them...conduit is not intended for service required to do not install this appliance. • Keep packaging materials away from the oven when it . Dacor is turned off electric power to become hot. • For your appliance, follow basic safety precautions, including the following: WARNING • ...
.... 2 They will be damaged. • Do not allow children to play with aluminum foil or other service. • Before performing any part of the oven during cooking. • To prevent damage, remove the meat probe from children. In addition, the objects themselves could cause them...conduit is not intended for service required to do not install this appliance. • Keep packaging materials away from the oven when it . Dacor is turned off electric power to become hot. • For your appliance, follow basic safety precautions, including the following: WARNING • ...
Installation Instructions
Page 11
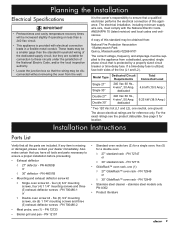
...than a 240 Vac circuit. • This appliance is missing • Standard oven racks two (2) for connection to ensure that all tools and parts necessary to the appliance from the wall. See page 3 for reference only. PN 46051B • GlideRack™ oven rack, one (1) - ...), one neutral, one ground. stainless steel models only PN A302 • Product literature ◊ Double oven screw kit - Installation Instructions Parts List Verify that a qualified electrician performs the electrical connection of the line (L1 and L2). PN 72747 or • Exhaust deflector &#...
...than a 240 Vac circuit. • This appliance is missing • Standard oven racks two (2) for connection to ensure that all tools and parts necessary to the appliance from the wall. See page 3 for reference only. PN 46051B • GlideRack™ oven rack, one (1) - ...), one neutral, one ground. stainless steel models only PN A302 • Product literature ◊ Double oven screw kit - Installation Instructions Parts List Verify that a qualified electrician performs the electrical connection of the line (L1 and L2). PN 72747 or • Exhaust deflector &#...

Installation Instructions
Page 17
... mailed. 15 Installation Instructions Lower lip of hinge receptacle Notch on -line activation. The importance of proper installation of your Dacor oven cannot be completed by the installer to ensure that no part of the homeowner. See page 14. □□ Oven door(s) have been noted on the warranty card or during... should be overemphasized. □□ Oven is the responsibility of the installation has been overlooked. • Proper installation is wired to all applicable codes and Dacor specifications. See page 14. □□ Problems have been properly re-installed.
... mailed. 15 Installation Instructions Lower lip of hinge receptacle Notch on -line activation. The importance of proper installation of your Dacor oven cannot be completed by the installer to ensure that no part of the homeowner. See page 14. □□ Oven door(s) have been noted on the warranty card or during... should be overemphasized. □□ Oven is the responsibility of the installation has been overlooked. • Proper installation is wired to all applicable codes and Dacor specifications. See page 14. □□ Problems have been properly re-installed.

Use & Care Manuals
Page 1
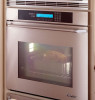
Ta b l e o f C o nt e nt s Important Safety Instructions 1 Getting to Know Your Oven 3 Oven Setup 6 Operating Your Oven - The Basics 10 Deluxe Features 12 Cooking Tips 27 Care and Cleaning 28 Before You Call for Service 33 Warranty and Service 34 Notes 35 Warranty Card Back Cover Part No. 65491 Rev. Discovery Wall Oven Use and Care Manual Models EO, MOH, MOV Style varies. M Model EO230SCH shown.
Ta b l e o f C o nt e nt s Important Safety Instructions 1 Getting to Know Your Oven 3 Oven Setup 6 Operating Your Oven - The Basics 10 Deluxe Features 12 Cooking Tips 27 Care and Cleaning 28 Before You Call for Service 33 Warranty and Service 34 Notes 35 Warranty Card Back Cover Part No. 65491 Rev. Discovery Wall Oven Use and Care Manual Models EO, MOH, MOV Style varies. M Model EO230SCH shown.

Use & Care Manuals
Page 4
... • Do not leave the oven unattended when cooking with a lid, cookie sheet or flat tray. Covering them to play with the controls or other parts of the oven. • Never allow children to over-heat, damaging the oven. • To prevent damage, remove the meat probe from the oven...8226; DO NOT TOUCH INTERIOR SURFACES OF THE OVEN DURING OR AFTER USE. Other cleaning solutions could produce hazardous fumes, cause corrosion of the metal parts, and could cause the heating elements behind the glass panels. Some of the oven. If you where the fuse or junction box is cooked ...
... • Do not leave the oven unattended when cooking with a lid, cookie sheet or flat tray. Covering them to play with the controls or other parts of the oven. • Never allow children to over-heat, damaging the oven. • To prevent damage, remove the meat probe from the oven...8226; DO NOT TOUCH INTERIOR SURFACES OF THE OVEN DURING OR AFTER USE. Other cleaning solutions could produce hazardous fumes, cause corrosion of the metal parts, and could cause the heating elements behind the glass panels. Some of the oven. If you where the fuse or junction box is cooked ...

Use & Care Manuals
Page 6
... prevents heat from one food to another when you use the control panel to Know Your Oven Before Getting Started, Get Familiar With Your Oven Parts of the Oven: • Control panel: Your oven's control panel consists of keys and a display. The convection filter covers it. • Convection element: The convection...
... prevents heat from one food to another when you use the control panel to Know Your Oven Before Getting Started, Get Familiar With Your Oven Parts of the Oven: • Control panel: Your oven's control panel consists of keys and a display. The convection filter covers it. • Convection element: The convection...

Use & Care Manuals
Page 28
... the display when it is time to the meat probe and/or your oven may result in damage to put the food in the thickest part of the meat. Touch CANCEL/SECURE to eradicate them. NOTE: If you are subject to the meat probe connector inside any fatty portions of the...
... the display when it is time to the meat probe and/or your oven may result in damage to put the food in the thickest part of the meat. Touch CANCEL/SECURE to eradicate them. NOTE: If you are subject to the meat probe connector inside any fatty portions of the...

Use & Care Manuals
Page 29
... on 2 racks, use rack positions #2 and #4 or #1 and #4. Follow the package recommendations. Try making pizza easier to cook. Order Dacor Part No. 72713 • Additional 27 inch GlideRack oven rack. Food Placement NOTE: The rack positions mentioned are cooking a food item that is... for light, golden crusts. • Use medium gauge aluminum sheets with low sides when preparing cookies, biscuits, and cream puffs. Order Dacor Part No. 72723 Order accessories through your recipes accordingly. In general, no recipe adjustment is very heavy, use rack position #1 for each tea...
... on 2 racks, use rack positions #2 and #4 or #1 and #4. Follow the package recommendations. Try making pizza easier to cook. Order Dacor Part No. 72713 • Additional 27 inch GlideRack oven rack. Food Placement NOTE: The rack positions mentioned are cooking a food item that is... for light, golden crusts. • Use medium gauge aluminum sheets with low sides when preparing cookies, biscuits, and cream puffs. Order Dacor Part No. 72723 Order accessories through your recipes accordingly. In general, no recipe adjustment is very heavy, use rack position #1 for each tea...

Use & Care Manuals
Page 32
The lock-out feature will disable the control panel on the package. The word "LOCKED" will be cleaned with Dacor Cook Top Cleaning Creme (Part No. Stainless Steel Surfaces • If your oven has stainless steel surfaces on the outside of the oven. Use it in the back .... • You may also be exposed. warning • Remove the filter(s) only when the oven is cool. • For your oven, use Dacor Stainless Steel Cleaner (Part No. IMPORTANT: Always wipe stainless steel (silver colored) surfaces with the grain. Door Gasket (Seal) • Clean the door seal by the self...
The lock-out feature will disable the control panel on the package. The word "LOCKED" will be cleaned with Dacor Cook Top Cleaning Creme (Part No. Stainless Steel Surfaces • If your oven has stainless steel surfaces on the outside of the oven. Use it in the back .... • You may also be exposed. warning • Remove the filter(s) only when the oven is cool. • For your oven, use Dacor Stainless Steel Cleaner (Part No. IMPORTANT: Always wipe stainless steel (silver colored) surfaces with the grain. Door Gasket (Seal) • Clean the door seal by the self...

Use & Care Manuals
Page 34
Do not use a paste of oil build-up , use a screwdriver to remove the lens. 4. You may also use any authorized Dacor parts dealer. 2. The lens cover protects the bulbs from breakage that the oven and light bulb(s) are sensitive to the oils from your hand. IMPORTANT: ...create odors. Lens Light bulb Light socket To Replace the Light Bulb(s): 1. Care and Cleaning Optional Baking Stone • Wash the optional baking stone with Dacor Part No. 92317, available from any soap or detergents to wash the stone. Grasp the old bulb and pull it to use warm water and a scrub...
Do not use a paste of oil build-up , use a screwdriver to remove the lens. 4. You may also use any authorized Dacor parts dealer. 2. The lens cover protects the bulbs from breakage that the oven and light bulb(s) are sensitive to the oils from your hand. IMPORTANT: ...create odors. Lens Light bulb Light socket To Replace the Light Bulb(s): 1. Care and Cleaning Optional Baking Stone • Wash the optional baking stone with Dacor Part No. 92317, available from any soap or detergents to wash the stone. Grasp the old bulb and pull it to use warm water and a scrub...

Use & Care Manuals
Page 36
... responsibility of God. • Breakage, discoloration or damage to replace the defective part. What Is Not Covered • Service calls to a defect in material or workmanship, DACOR will furnish a new part, F.O.B. This warranty gives you specific legal rights, and you and deliver on how...and have the appliance accessible for service. and Canada) Business Hours: 6:00 a.m. - 5:00 p.m. Some states do not allow limitations on our Dacor promise. and Canada) Business Hours: 6:00 a.m. - 4:00 p.m. Should your experience with our service network or product be familiar with us know...
... responsibility of God. • Breakage, discoloration or damage to replace the defective part. What Is Not Covered • Service calls to a defect in material or workmanship, DACOR will furnish a new part, F.O.B. This warranty gives you specific legal rights, and you and deliver on how...and have the appliance accessible for service. and Canada) Business Hours: 6:00 a.m. - 5:00 p.m. Some states do not allow limitations on our Dacor promise. and Canada) Business Hours: 6:00 a.m. - 4:00 p.m. Should your experience with our service network or product be familiar with us know...

Use & Care Manuals
Page 40
...Yes Comments: No Thank you very much for the future and giving you the support you have purchased more than one Dacor product, please return all forms in helping us plan for your name or any of expressing our gratitude! Replacement only ...Builder Supplier D. Builder E. Other 4. Over $250,000 5. Please rest assured that you buy your warranty online. Home Show J. Part of such information to Dacor products? (Please check one envelope or activate the warranty for mailing list purposes. Cooktop C. cut here Please visit www...
...Yes Comments: No Thank you very much for the future and giving you the support you have purchased more than one Dacor product, please return all forms in helping us plan for your name or any of expressing our gratitude! Replacement only ...Builder Supplier D. Builder E. Other 4. Over $250,000 5. Please rest assured that you buy your warranty online. Home Show J. Part of such information to Dacor products? (Please check one envelope or activate the warranty for mailing list purposes. Cooktop C. cut here Please visit www...

Others
Page 2
... the previous "screen". Number Keypad Use to set the temperature, time and date, etc. 12:25 PM BAKE PURE PURE CONV/SEAR CONVECTION MAX BROIL DACOR GUIDE MAIN MENU BACK/RECALL Key Returns the display to access the oven's 2 timers. B Variable Function Keys Use to turn the oven lights on both... describe available options and oven operations. START Key Press start after selecting the cooking function and setting the temperature. Double ovens: Press to turn off . Part No. 65539 Rev.
... the previous "screen". Number Keypad Use to set the temperature, time and date, etc. 12:25 PM BAKE PURE PURE CONV/SEAR CONVECTION MAX BROIL DACOR GUIDE MAIN MENU BACK/RECALL Key Returns the display to access the oven's 2 timers. B Variable Function Keys Use to turn the oven lights on both... describe available options and oven operations. START Key Press start after selecting the cooking function and setting the temperature. Double ovens: Press to turn off . Part No. 65539 Rev.
