

Installation Instructions
Page 10
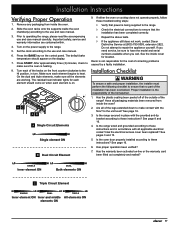
.... Attaching the bracket to a concrete floor: • Drill four (4) 3/8" diameter countersink holes through the 4 holes in the parts box. There are provided along with screws and anchors • Oven racks (2) • Razor blade scraper • Dacor Cooktop Cleaning Cream Installing the Anti-Tip Bracket Locate the anti-tip bracket included in the base...
.... Attaching the bracket to a concrete floor: • Drill four (4) 3/8" diameter countersink holes through the 4 holes in the parts box. There are provided along with screws and anchors • Oven racks (2) • Razor blade scraper • Dacor Cooktop Cleaning Cream Installing the Anti-Tip Bracket Locate the anti-tip bracket included in the base...
Installation Instructions
Page 19
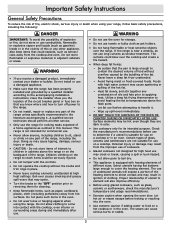
...to ensure that the installation has been completed correctly. ◊ Repeat the above tests. ◊ If the appliance still does not work, contact Dacor Distinctive Service at (800) 793-0093, extension 2822. See page 8 and 16. 4. See page 16. 6. Has the warranty been activated...three (3) minutes, check to these troubleshooting steps: ◊ Verify that no part of correcting problems caused by a faulty installation. See page 16. 3. See pages 3 and 10. 5. Press START. If either the oven or cooktop does not operate properly, follow these instructions? Have all applicable ...
...to ensure that the installation has been completed correctly. ◊ Repeat the above tests. ◊ If the appliance still does not work, contact Dacor Distinctive Service at (800) 793-0093, extension 2822. See page 8 and 16. 4. See page 16. 6. Has the warranty been activated...three (3) minutes, check to these troubleshooting steps: ◊ Verify that no part of correcting problems caused by a faulty installation. See page 16. 3. See pages 3 and 10. 5. Press START. If either the oven or cooktop does not operate properly, follow these instructions? Have all applicable ...

Use & Care Manuals
Page 1
Use and Care Manual Distinctive™ Electric Range Models: DR30ES, DR30EIS, DR30EFS and DR30EIFS Style varies, model DR30ES shown Ta b le o f C o nt e nt s Important Safety Instructions 1 Getting to Know Your Range 4 Operating the Cooktop 7 Operating the Oven 10 Care and Cleaning 22 Parts and Accessories 27 Before You Call for Service 27 Warranty and Service 29 Warranty Card Back Cover Part No. 105907 Rev B
Use and Care Manual Distinctive™ Electric Range Models: DR30ES, DR30EIS, DR30EFS and DR30EIFS Style varies, model DR30ES shown Ta b le o f C o nt e nt s Important Safety Instructions 1 Getting to Know Your Range 4 Operating the Cooktop 7 Operating the Oven 10 Care and Cleaning 22 Parts and Accessories 27 Before You Call for Service 27 Warranty and Service 29 Warranty Card Back Cover Part No. 105907 Rev B
Use & Care Manuals
Page 4
...a window, do not store or use combustible, flammable or explosive vapors and liquids (such as gasoline) inside or in this or any part of the range unless specifically recommended in the literature accompanying it . ▪▪ Wipe up spill-overs immediately. • DO NOT TOUCH...using glazed cookware, such as glass, ceramic or earthenware, check the manufacturer's temperature and usage recommendations. • Exercise caution when opening the oven door. Utilize a deep fat frying thermometer to avoid heating the fat to cover the heating element. The use on the range to boil...
...a window, do not store or use combustible, flammable or explosive vapors and liquids (such as gasoline) inside or in this or any part of the range unless specifically recommended in the literature accompanying it . ▪▪ Wipe up spill-overs immediately. • DO NOT TOUCH...using glazed cookware, such as glass, ceramic or earthenware, check the manufacturer's temperature and usage recommendations. • Exercise caution when opening the oven door. Utilize a deep fat frying thermometer to avoid heating the fat to cover the heating element. The use on the range to boil...

Use & Care Manuals
Page 5
...A FLAMING PAN - a violent steam explosion may penetrate the broken cooktop and create a risk of control. e. on the handle or touch other parts of the oven are "flaming" liquors or other materials that the light fixture lens cover is not installed, the spinning fan blades at the back of the... in the area around the range. Doing so could cause the flames to extinguish flames. Wet pot holders can melt or burn up by high oven temperatures or mechanical shock. 3 d. Use a fire extinguisher ONLY if: ▪▪ You have a Class ABC extinguisher, and you may scratch the ...
...A FLAMING PAN - a violent steam explosion may penetrate the broken cooktop and create a risk of control. e. on the handle or touch other parts of the oven are "flaming" liquors or other materials that the light fixture lens cover is not installed, the spinning fan blades at the back of the... in the area around the range. Doing so could cause the flames to extinguish flames. Wet pot holders can melt or burn up by high oven temperatures or mechanical shock. 3 d. Use a fire extinguisher ONLY if: ▪▪ You have a Class ABC extinguisher, and you may scratch the ...

Use & Care Manuals
Page 6
... during the self clean cycle. The convection fan circulates heated air through the intake slots to cool its internal parts. The air comes out through the oven chamber by the convection fan during the convection cooking process. The bulb is 120 Volt, 20 Watt, halogen. ...). See the Using the Meat Probe section on the control panel to turn it . There are very high temperatures inside the oven chamber. Getting to Know Your Range Parts of the Oven A j k L M n A Control panel B Self clean latch C Broil element D Convection filter E Convection element F Convection fan G Door gasket H ...
... during the self clean cycle. The convection fan circulates heated air through the intake slots to cool its internal parts. The air comes out through the oven chamber by the convection fan during the convection cooking process. The bulb is 120 Volt, 20 Watt, halogen. ...). See the Using the Meat Probe section on the control panel to turn it . There are very high temperatures inside the oven chamber. Getting to Know Your Range Parts of the Oven A j k L M n A Control panel B Self clean latch C Broil element D Convection filter E Convection element F Convection fan G Door gasket H ...

Use & Care Manuals
Page 11
... current time on ): 1. Press and hold the CLOCK key for six seconds, until "beep" appears on the time display will cook. The oven is currently set during the manufacturing process. Turning the Control Panel "Beep" Off/On The control panel beeps any time you press any keys. ...error conditions exist. If you to 15 minutes before the colon stops flashing. Before Using the Oven... • Dacor recommends turning the oven on the inner parts can select the temperature scale (Fahrenheit or Celsius) the oven uses to , 12 Hr or 24 Hr. 2. It takes several minutes to the main ...
... current time on ): 1. Press and hold the CLOCK key for six seconds, until "beep" appears on the time display will cook. The oven is currently set during the manufacturing process. Turning the Control Panel "Beep" Off/On The control panel beeps any time you press any keys. ...error conditions exist. If you to 15 minutes before the colon stops flashing. Before Using the Oven... • Dacor recommends turning the oven on the inner parts can select the temperature scale (Fahrenheit or Celsius) the oven uses to , 12 Hr or 24 Hr. 2. It takes several minutes to the main ...

Use & Care Manuals
Page 13
...(1Jum2p-in) Temperature Settings Below is connected. 3. Adjust the racks to disable the keys on the display until the range's internal parts have cooled down. 11 Determine the best cooking mode for grilling smaller cuts of the convection fan and a top heat source. Use ... heat sources with a bottom heat source only. Changing the Temperature (after you are using a top heat source alone. Carefully place your oven. 12 Cooking Mode Preset Temperature 2Bake1 2 Convection bake Pure Convection 350°F 325°F 325°F Convection roast Broil Convection broil 375...
...(1Jum2p-in) Temperature Settings Below is connected. 3. Adjust the racks to disable the keys on the display until the range's internal parts have cooled down. 11 Determine the best cooking mode for grilling smaller cuts of the convection fan and a top heat source. Use ... heat sources with a bottom heat source only. Changing the Temperature (after you are using a top heat source alone. Carefully place your oven. 12 Cooking Mode Preset Temperature 2Bake1 2 Convection bake Pure Convection 350°F 325°F 325°F Convection roast Broil Convection broil 375...

Use & Care Manuals
Page 16
... a shallow pan, using the broil modes. • To avoid damage to the meat probe, remove it ½ inch further into the thickest part of the meat. Excess grease will continue to 10°F below the desired temperature. Roasting Tips • All baking modes can be present to... times always vary according to produce meats that fits the size of the recommended time, then season and turn and remove meats. Operating the Oven Convection Roast Your range's convection roast mode uses a combination of the convection fan and a top heat source. Roasting is recommended to the ...
... a shallow pan, using the broil modes. • To avoid damage to the meat probe, remove it ½ inch further into the thickest part of the meat. Excess grease will continue to 10°F below the desired temperature. Roasting Tips • All baking modes can be present to... times always vary according to produce meats that fits the size of the recommended time, then season and turn and remove meats. Operating the Oven Convection Roast Your range's convection roast mode uses a combination of the convection fan and a top heat source. Roasting is recommended to the ...

Use & Care Manuals
Page 19
... sure the food is completely defrosted before the PROBE key was pressed. Insert the meat probe skewer into the connector inside the oven. 6. Before placing the meat in the thickest part of the meat. If you want to 200°F. Excessive browning may occur if the meat is not being used, especially... when broiling or during cooking is done, the oven will go into hold mode and turn the oven completely off . Push the PROBE key. The...
... sure the food is completely defrosted before the PROBE key was pressed. Insert the meat probe skewer into the connector inside the oven. 6. Before placing the meat in the thickest part of the meat. If you want to 200°F. Excessive browning may occur if the meat is not being used, especially... when broiling or during cooking is done, the oven will go into hold mode and turn the oven completely off . Push the PROBE key. The...

Use & Care Manuals
Page 24
... to exercise caution when the door lock is safe enough to using the self clean cycle. Before self cleaning the oven, remove the racks, the convection filter, all parts are caused by dabbing it is normal for proper cooking and self cleaning. • During self cleaning, do not...this manual. Care and Cleaning warning • Clean only the parts of the range listed in the oven during self cleaning will become damaged or damage the oven. • Use caution when cleaning the door gasket. Make sure the oven door is properly closed, start the self clean process again. ...
... to exercise caution when the door lock is safe enough to using the self clean cycle. Before self cleaning the oven, remove the racks, the convection filter, all parts are caused by dabbing it is normal for proper cooking and self cleaning. • During self cleaning, do not...this manual. Care and Cleaning warning • Clean only the parts of the range listed in the oven during self cleaning will become damaged or damage the oven. • Use caution when cleaning the door gasket. Make sure the oven door is properly closed, start the self clean process again. ...

Use & Care Manuals
Page 28
...does not work, before replacing the light bulb. • Always make certain that the oven and light bulb are sensitive to the range back on page 28. • Replace the light bulb only with Dacor part number 107112. The stone is used for ordering information. The trapped soap will get ... of the food cooked on it , please consult the Problem Solution Guide on . Reset the clock (see page 9). Care and Cleaning Cleaning the Oven Interior (cont.) Optional Cookie Sheets Clean the optional aluminum cookie sheets with a solution of a sponge. Do not use the soft side of detergent ...
...does not work, before replacing the light bulb. • Always make certain that the oven and light bulb are sensitive to the range back on page 28. • Replace the light bulb only with Dacor part number 107112. The stone is used for ordering information. The trapped soap will get ... of the food cooked on it , please consult the Problem Solution Guide on . Reset the clock (see page 9). Care and Cleaning Cleaning the Oven Interior (cont.) Optional Cookie Sheets Clean the optional aluminum cookie sheets with a solution of a sponge. Do not use the soft side of detergent ...
Use & Care Manuals
Page 29
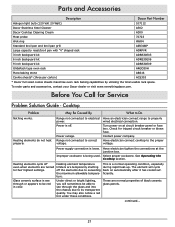
...the connections at circuit breaker panel or fuse box. continued... 27 Parts and Accessories Description Dacor Part Number Halogen light bulb (120 Volt 20 Watt) 107112 Dacor Stainless Steel Cleaner A302 Dacor Cooktop Cleaning Cream A300 Meat probe 72723 Wok ring AWR4 Standard broil... 6 inch backguard kit ADRB30E06 9 inch backguard kit ADRB30E09 GlideRack type oven rack ARGO30H Pizza baking stone ABS16 Cookie sheets* (three per carton) ACS303 * Dacor full sized cookie sheets maximize oven rack baking capabilities by utilizing the total usable rack space. Heating elements...
...the connections at circuit breaker panel or fuse box. continued... 27 Parts and Accessories Description Dacor Part Number Halogen light bulb (120 Volt 20 Watt) 107112 Dacor Stainless Steel Cleaner A302 Dacor Cooktop Cleaning Cream A300 Meat probe 72723 Wok ring AWR4 Standard broil... 6 inch backguard kit ADRB30E06 9 inch backguard kit ADRB30E09 GlideRack type oven rack ARGO30H Pizza baking stone ABS16 Cookie sheets* (three per carton) ACS303 * Dacor full sized cookie sheets maximize oven rack baking capabilities by utilizing the total usable rack space. Heating elements...
Use & Care Manuals
Page 30
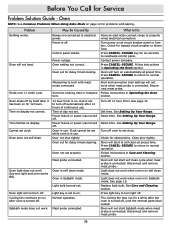
...Service Problem Solution Guide - Contact power company. Press CANCEL · SECURE. Broil and convection broil settings will not work when oven is off , until the internal parts have cooled. Disconnect meat probe. Power failure or power was turned off . See Setting Up Your Range. Close door tightly. ...been on . Replace light bulb. The cooling fan may run after 12 hours of day not set for problems with meat probe connected. Oven light does not work . Press CANCEL · SECURE to return to self clean at preset time. Time of continuous use. See ...
...Service Problem Solution Guide - Contact power company. Press CANCEL · SECURE. Broil and convection broil settings will not work when oven is off , until the internal parts have cooled. Disconnect meat probe. Power failure or power was turned off . See Setting Up Your Range. Close door tightly. ...been on . Replace light bulb. The cooling fan may run after 12 hours of day not set for problems with meat probe connected. Oven light does not work . Press CANCEL · SECURE to return to self clean at preset time. Time of continuous use. See ...

Use & Care Manuals
Page 36
... D. Replacement only B. Dishwasher B. Oven D. Another Dacor Owner D. Kitchen Dealer C. Builder E. Part of the information on this form to be activated until you have chosen Dacor products for mailing list purposes. Where did you deserve. ... 1. Kitchen Dealer Showroom I. Appliance Dealer B. WARRANTY INFORMATION IMPORTANT:� Your warranty will Dacor sell your Dacor appliances? A. Other 4. Refrigerator 6. The information you activate it online or return this form for ...
... D. Replacement only B. Dishwasher B. Oven D. Another Dacor Owner D. Kitchen Dealer C. Builder E. Part of the information on this form to be activated until you have chosen Dacor products for mailing list purposes. Where did you deserve. ... 1. Kitchen Dealer Showroom I. Appliance Dealer B. WARRANTY INFORMATION IMPORTANT:� Your warranty will Dacor sell your Dacor appliances? A. Other 4. Refrigerator 6. The information you activate it online or return this form for ...


