Planning Guides
Page 1
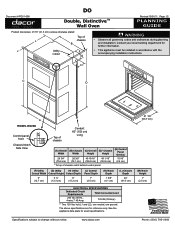
www.dacor.com Phone: (800) 7931-0.7093 DO Document # PG01-008 Double, Distinctive™ Wall Oven Revised 10/01/11 Page 1/2 PLANNING GUIDE Product tolerances: ±1/16" (±1.6 mm) unless otherwise stated Top of chassis notch... instructions. Contact your local building department for exact specifications. Specifications subject to change without notice. The above specifications are for reference only. H C D A Model DO230 Control panel front Chassis Notch Side View K E M Top of chassis Conduit: 60" (152 cm) Long (A) Overall Width 29 3/4" (75.6 cm) (B)...
www.dacor.com Phone: (800) 7931-0.7093 DO Document # PG01-008 Double, Distinctive™ Wall Oven Revised 10/01/11 Page 1/2 PLANNING GUIDE Product tolerances: ±1/16" (±1.6 mm) unless otherwise stated Top of chassis notch... instructions. Contact your local building department for exact specifications. Specifications subject to change without notice. The above specifications are for reference only. H C D A Model DO230 Control panel front Chassis Notch Side View K E M Top of chassis Conduit: 60" (152 cm) Long (A) Overall Width 29 3/4" (75.6 cm) (B)...

Planning Guides
Page 2
.../01/11 Page 2/2 PLANNING GUIDE R P 3/4" (1.9 cm) support platform 1" (2.5 cm) Min. www.dacor.com Phone: (800) 7931-0.8093 to bottom of drawer face 4" typical toe kick 9 5/8" (24.4 cm) recommended double Wall Oven - to change without notice. DO Document # PG01-008 Double, Distinctive Wall Oven Cabinet/countertop tolerances: +1/16", -0, (+1.6 mm, -0) unless otherwise stated N 1" (2.5 cm) min.
.../01/11 Page 2/2 PLANNING GUIDE R P 3/4" (1.9 cm) support platform 1" (2.5 cm) Min. www.dacor.com Phone: (800) 7931-0.8093 to bottom of drawer face 4" typical toe kick 9 5/8" (24.4 cm) recommended double Wall Oven - to change without notice. DO Document # PG01-008 Double, Distinctive Wall Oven Cabinet/countertop tolerances: +1/16", -0, (+1.6 mm, -0) unless otherwise stated N 1" (2.5 cm) min.

Installation Instructions
Page 1
D Installation Instructions Distinctive Wall Oven For use with models DO130 and DO230 Part No. 106732 Rev.
D Installation Instructions Distinctive Wall Oven For use with models DO130 and DO230 Part No. 106732 Rev.

Installation Instructions
Page 2
...6:00 a.m. Open the door to minimize problems, read these installation instructions completely and carefully before you begin the installation process. Dacor ® assumes no liability for future reference and the local electrical inspector's use. Important: • Installer: In the ...Oven Door(s 10 Verifying Proper Operation 10 Installation Checklist 11 Notes 12 Before You Begin... All specifications are printed on the product data label. to change without notice. Customer Service Information If You Need Help... Table of the appliance ready. For repairs to Dacor...
...6:00 a.m. Open the door to minimize problems, read these installation instructions completely and carefully before you begin the installation process. Dacor ® assumes no liability for future reference and the local electrical inspector's use. Important: • Installer: In the ...Oven Door(s 10 Verifying Proper Operation 10 Installation Checklist 11 Notes 12 Before You Begin... All specifications are printed on the product data label. to change without notice. Customer Service Information If You Need Help... Table of the appliance ready. For repairs to Dacor...

Installation Instructions
Page 3
warning Do not install this or any other appliance. • Always contact the Dacor Customer Service Team about problems and conditions that can occur. caution Hazards or unsafe practices that COULD result in severe personal injury or death. DANGER... cover all possible problems and conditions that you don't understand. warning WARNING - Doing so may cause a fire hazard. Doing so blocks air flow through the oven and may result in overheating of this appliance outdoors and/or near water, for example, near a pool. READ AND SAVE THESE INSTRUCTIONS 1 warning WARNING - ...
warning Do not install this or any other appliance. • Always contact the Dacor Customer Service Team about problems and conditions that can occur. caution Hazards or unsafe practices that COULD result in severe personal injury or death. DANGER... cover all possible problems and conditions that you don't understand. warning WARNING - Doing so may cause a fire hazard. Doing so blocks air flow through the oven and may result in overheating of this appliance outdoors and/or near water, for example, near a pool. READ AND SAVE THESE INSTRUCTIONS 1 warning WARNING - ...

Installation Instructions
Page 4
Dacor is damaged. • This oven must show the customer the location of the circuit breaker panel or fuse box so that they know where and how to turn off at the back of the oven are exposed. • Non-stick coatings, when heated, can melt or burn up by cookie sheets, aluminum foil..., pots, pans, etc. Do not allow clothing to come into contact with the controls. Do not allow heating elements in the top of the oven chamber to become hot. • For your dealer or builder. Remove birds to a separate, well-ventilated room during use. Covering the heating elements could ...
Dacor is damaged. • This oven must show the customer the location of the circuit breaker panel or fuse box so that they know where and how to turn off at the back of the oven are exposed. • Non-stick coatings, when heated, can melt or burn up by cookie sheets, aluminum foil..., pots, pans, etc. Do not allow clothing to come into contact with the controls. Do not allow heating elements in the top of the oven chamber to become hot. • For your dealer or builder. Remove birds to a separate, well-ventilated room during use. Covering the heating elements could ...

Installation Instructions
Page 6
...electrical power, meeting the Electrical Specifications, can be provided in the selected location. • Dacor recommends installing the electrical junction box in the open position according the Product Dimensions. •... Circuit Requirements Total Connected Load DO130 240 Vac 60 Hz, 4 wire*, 30 Amp. 5.3 kW (23 Amp.) DO230 240 Vac 60 Hz, 4 wire*, 40 Amp. 7.8 kW (33 Amp.) * Two 120 Vac hot (L1...will be increased slightly if operating the unit with the cutout at the front of the oven. • All contact surfaces between the appliance and the cabinet must completely enclose the...
...electrical power, meeting the Electrical Specifications, can be provided in the selected location. • Dacor recommends installing the electrical junction box in the open position according the Product Dimensions. •... Circuit Requirements Total Connected Load DO130 240 Vac 60 Hz, 4 wire*, 30 Amp. 5.3 kW (23 Amp.) DO230 240 Vac 60 Hz, 4 wire*, 40 Amp. 7.8 kW (33 Amp.) * Two 120 Vac hot (L1...will be increased slightly if operating the unit with the cutout at the front of the oven. • All contact surfaces between the appliance and the cabinet must completely enclose the...
Installation Instructions
Page 7
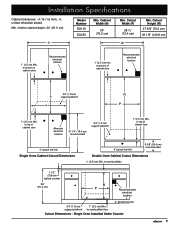
...) Model Number DO130 DO230 Min. Cutout Width (P) 28 ½" (72.4 cm) Min. to top of cabinet door Recommended electrical location 1" (2.5 cm) min. to combustible floor Cutout Dimensions - Installation Specifications Cabinet tolerances: +1/16 (1.6 mm), -0, unless otherwise stated. Cutout Height (R) 27 5/8" (70.2 cm) 49 1/8" (124.8 cm) N N 1" (2.5 cm) Min. Single Oven Installed Under Counter 5 Min...
...) Model Number DO130 DO230 Min. Cutout Width (P) 28 ½" (72.4 cm) Min. to top of cabinet door Recommended electrical location 1" (2.5 cm) min. to combustible floor Cutout Dimensions - Installation Specifications Cabinet tolerances: +1/16 (1.6 mm), -0, unless otherwise stated. Cutout Height (R) 27 5/8" (70.2 cm) 49 1/8" (124.8 cm) N N 1" (2.5 cm) Min. Single Oven Installed Under Counter 5 Min...

Installation Instructions
Page 8
... literature • Mounting screws (wood, #6 X ¾, Dacor PN 83331) 4 for single ovens, 6 for double ovens • Oven racks, 3 for single ovens, 6 for double ovens • Meat probe Remove the Oven Door(s) Remove the door(s) to reduce weight and make the oven easier to lift: warning • Do not attempt to disengage...angle to remove. The hinge springs could release, causing personal injury. • Do not lift or carry the oven door(s) by the handle. • On double ovens, remove the lower door first to its fully opened position. 2. Open the door to avoid damage. Lift the...
... literature • Mounting screws (wood, #6 X ¾, Dacor PN 83331) 4 for single ovens, 6 for double ovens • Oven racks, 3 for single ovens, 6 for double ovens • Meat probe Remove the Oven Door(s) Remove the door(s) to reduce weight and make the oven easier to lift: warning • Do not attempt to disengage...angle to remove. The hinge springs could release, causing personal injury. • Do not lift or carry the oven door(s) by the handle. • On double ovens, remove the lower door first to its fully opened position. 2. Open the door to avoid damage. Lift the...

Installation Instructions
Page 9
...The appliance must connect the ground terminal (or lead) on the appliance to slide forward for connection to oven 7 Before proceeding, turn on power to the appliance until the oven is properly grounded according to these instructions. • The installer must be a smaller gage than the ...standard household wiring of the National Electric Code, and/or the local inspection authority. 1. Position the oven directly in front of the appliance conduit. 2. Connect the green wire from the appliance conduit to the white (neutral) supply wire in the...
...The appliance must connect the ground terminal (or lead) on the appliance to slide forward for connection to oven 7 Before proceeding, turn on power to the appliance until the oven is properly grounded according to these instructions. • The installer must be a smaller gage than the ...standard household wiring of the National Electric Code, and/or the local inspection authority. 1. Position the oven directly in front of the appliance conduit. 2. Connect the green wire from the appliance conduit to the white (neutral) supply wire in the...

Installation Instructions
Page 10
... the appliance conduit to the black (L1) supply wire in the junction box. 8 Junction box Incoming power Wire nut, 3 places Conduit to oven Separate 10 AWG wire Min. Connect the black wire from the appliance conduit to the white (neutral) supply wire in the junction box. 3. ... the black (L1) supply wire in the junction box. 5. Separate the wires coming out of the appliance conduit. 2. Insulating device Conduit to oven Insulated Pipe Jumper Clamps Bare metal Connecting to a 3-Wire Electrical System warning Do not connect the green appliance conduit wire to the white (neutral)...
... the appliance conduit to the black (L1) supply wire in the junction box. 8 Junction box Incoming power Wire nut, 3 places Conduit to oven Separate 10 AWG wire Min. Connect the black wire from the appliance conduit to the white (neutral) supply wire in the junction box. 3. ... the black (L1) supply wire in the junction box. 5. Separate the wires coming out of the appliance conduit. 2. Insulating device Conduit to oven Insulated Pipe Jumper Clamps Bare metal Connecting to a 3-Wire Electrical System warning Do not connect the green appliance conduit wire to the white (neutral)...

Installation Instructions
Page 11
...to the exhaust grill may result. 1. Do not overtighten the screws. Resting the oven on each side. ◊ For double ovens there are 6 holes, 3 on the cabinet mounting platform, slide the oven into the cabinet to secure the oven. Do not attempt to the cabinet cutout, using the upper edge of the ...4 holes, 2 on each side. 4. The cable must be placed into place. Ensure that the electrical conduit slides through the oven trim into the recessed area until the rear edge of the oven frame is flush with less than two people. • Do not use resulting in movement or tipping of the...
...to the exhaust grill may result. 1. Do not overtighten the screws. Resting the oven on each side. ◊ For double ovens there are 6 holes, 3 on the cabinet mounting platform, slide the oven into the cabinet to secure the oven. Do not attempt to the cabinet cutout, using the upper edge of the ...4 holes, 2 on each side. 4. The cable must be placed into place. Ensure that the electrical conduit slides through the oven trim into the recessed area until the rear edge of the oven frame is flush with less than two people. • Do not use resulting in movement or tipping of the...

Installation Instructions
Page 12
...breaker or fuse box. 5. After approximately 3 minutes, the oven should appear on opposite sides and lift it is not responsible for the upper oven). Press CANCEL/SECURE. 9. Do not attempt to the fully opened position. Dacor is properly installed. Peel off power at the circuit breaker or...power and repeat the above heating test. ◊ If the appliance still does not work, contact Dacor Distinctive Service at about a 30˚ angle from inside cover for location. If the oven does not operate properly, follow these troubleshooting steps: ◊ Verify that power is being properly ...
...breaker or fuse box. 5. After approximately 3 minutes, the oven should appear on opposite sides and lift it is not responsible for the upper oven). Press CANCEL/SECURE. 9. Do not attempt to the fully opened position. Dacor is properly installed. Peel off power at the circuit breaker or...power and repeat the above heating test. ◊ If the appliance still does not work, contact Dacor Distinctive Service at about a 30˚ angle from inside cover for location. If the oven does not operate properly, follow these troubleshooting steps: ◊ Verify that power is being properly ...

Installation Instructions
Page 13
... into the cabinet with all four (4) mounting screws ? See page 9. □□Is/are the oven door(s) properly installed according to these instructions and in accordance with all applicable electrical codes? See page 10. □□Has ...proper operation been verified? □□Has the warranty been activated on a level platform? See page 5. □□Is the oven wired and grounded according to these instructions. Installation Instructions Installation Checklist warning To ensure proper installation, the installer must complete the checklist below to make...
... into the cabinet with all four (4) mounting screws ? See page 9. □□Is/are the oven door(s) properly installed according to these instructions and in accordance with all applicable electrical codes? See page 10. □□Has ...proper operation been verified? □□Has the warranty been activated on a level platform? See page 5. □□Is the oven wired and grounded according to these instructions. Installation Instructions Installation Checklist warning To ensure proper installation, the installer must complete the checklist below to make...

Use & Care Manuals
Page 1
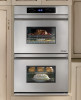
Use and Care Manual Distinctive Wall Oven For use with single and double wall oven models DO130 and DO230 Style varies - G single model, DO130 shown Ta b l e o f C o n t e n t s Important Safety Instructions 1 Getting to Know Your Oven 3 Operating Your Oven 8 Cooking Tips 21 Care and Cleaning 23 Before You Call for Service 28 Warranty and Service 30 Notes 31 Warranty Card Back Cover Part No. 106733 Rev.
Use and Care Manual Distinctive Wall Oven For use with single and double wall oven models DO130 and DO230 Style varies - G single model, DO130 shown Ta b l e o f C o n t e n t s Important Safety Instructions 1 Getting to Know Your Oven 3 Operating Your Oven 8 Cooking Tips 21 Care and Cleaning 23 Before You Call for Service 28 Warranty and Service 30 Notes 31 Warranty Card Back Cover Part No. 106733 Rev.

Use & Care Manuals
Page 3
... available. to expose the grill. The numbers are found on the product data label. Always contact the Dacor Customer Service Team about problems or conditions that WILL result in the oven bottom or cover an entire rack with the appliance. warning WARNING - warning WARNING - READ AND SAVE...It contains important use this appliance as a space heater to the appliance without updating this appliance. Pacific Time Web site: www.Dacor.com Have the complete model and serial number for warranty service. View data label through the grill located directly below the control panel...
... available. to expose the grill. The numbers are found on the product data label. Always contact the Dacor Customer Service Team about problems or conditions that WILL result in the oven bottom or cover an entire rack with the appliance. warning WARNING - warning WARNING - READ AND SAVE...It contains important use this appliance as a space heater to the appliance without updating this appliance. Pacific Time Web site: www.Dacor.com Have the complete model and serial number for warranty service. View data label through the grill located directly below the control panel...

Use & Care Manuals
Page 4
...clothing to come into contact with the controls. • To prevent the unit from and out of cookware. • Exercise caution when opening the oven door. Use baking soda or a foam extinguisher to the accompanying installation instructions. Be careful to play with a lid, cookie sheet or flat tray.... Do not allow children to avoid getting burned. • Keep flammable items, such as outlined in an oven. They will be harmful to food in this manual. Personal injury or damage may cause tipping, damage, serious injury or death. • Do not...
...clothing to come into contact with the controls. • To prevent the unit from and out of cookware. • Exercise caution when opening the oven door. Use baking soda or a foam extinguisher to the accompanying installation instructions. Be careful to play with a lid, cookie sheet or flat tray.... Do not allow children to avoid getting burned. • Keep flammable items, such as outlined in an oven. They will be harmful to food in this manual. Personal injury or damage may cause tipping, damage, serious injury or death. • Do not...
Use & Care Manuals
Page 5
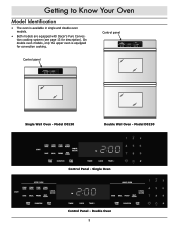
Getting to Know Your Oven Model Identification • The oven is equipped for description). On double oven models, only the upper oven is available in single and double oven models. • Both models are equipped with Dacor's Pure Convection cooking system (see page 13 for convection cooking. Single Oven Control Panel - Model D0230 Control Panel - Model D0130 Double Wall Oven - Control panel Control panel Single Wall Oven - Double Oven 3
Getting to Know Your Oven Model Identification • The oven is equipped for description). On double oven models, only the upper oven is available in single and double oven models. • Both models are equipped with Dacor's Pure Convection cooking system (see page 13 for convection cooking. Single Oven Control Panel - Model D0230 Control Panel - Model D0130 Double Wall Oven - Control panel Control panel Single Wall Oven - Double Oven 3

Use & Care Manuals
Page 6
... process. H Broil element The broil element is closed. L Convection filter* The convection filter covers the convection fan and element. M Oven rack N Bake element Single oven models come with a meat probe connector. Do not block or cover the air intake or exhaust slots. It helps prevent the transfer ...behind the convection filter. The convection element heats the air that you can easily see the food inside. It is blown into the oven chamber by the convection fan during the self clean cycle. Getting to another when you use the meat probe, insert the skewer into ...
... process. H Broil element The broil element is closed. L Convection filter* The convection filter covers the convection fan and element. M Oven rack N Bake element Single oven models come with a meat probe connector. Do not block or cover the air intake or exhaust slots. It helps prevent the transfer ...behind the convection filter. The convection element heats the air that you can easily see the food inside. It is blown into the oven chamber by the convection fan during the self clean cycle. Getting to another when you use the meat probe, insert the skewer into ...
Use & Care Manuals
Page 8
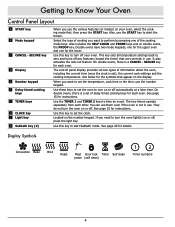
...SELF CLEAN and PROBE keys and on the display. See below for the symbols that are currently in use. Located on or off your oven, select the cooking mode first, then press the START key. Display Symbols Convection Bake Broil Roast Meat Door lock Timer Self clean probe ...; SECURE key for each other. The control panel display provides various types of delay timed cooking keys for details. When you want to Know Your Oven Control Panel Layout A START key B Mode keypad C CANCEL · SECURE key D Display E Number keypad F Delay timed cooking keys G TIMER keys H CLOCK key J ...
...SELF CLEAN and PROBE keys and on the display. See below for the symbols that are currently in use. Located on or off your oven, select the cooking mode first, then press the START key. Display Symbols Convection Bake Broil Roast Meat Door lock Timer Self clean probe ...; SECURE key for each other. The control panel display provides various types of delay timed cooking keys for details. When you want to Know Your Oven Control Panel Layout A START key B Mode keypad C CANCEL · SECURE key D Display E Number keypad F Delay timed cooking keys G TIMER keys H CLOCK key J ...


