Operation Manual
Page 3
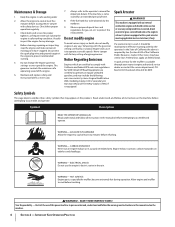
... fuel cap are explosive. Do not overfill fuel tank. Allow muffler, engine cylinder, and fins to stop the engine and disengage them quickly. 3. Tie up oil or fuel spillage and remove any fuel-soaked debris. 11. Direct coupled equipment components such as indicated by an adult. 4. Read and follow all guards...
... fuel cap are explosive. Do not overfill fuel tank. Allow muffler, engine cylinder, and fins to stop the engine and disengage them quickly. 3. Tie up oil or fuel spillage and remove any fuel-soaked debris. 11. Direct coupled equipment components such as indicated by an adult. 4. Read and follow all guards...
Operation Manual
Page 4
...). Keep the engine in safe working condition. Visually inspect the engine for the muffler is to be used , it should not be stored for gas, oil, etc. Always refer to assemble and operate. Read, understand, and follow all moving parts have similar laws. WARNING- WARNING- Allow engine and muffler to assemble...
...). Keep the engine in safe working condition. Visually inspect the engine for the muffler is to be used , it should not be stored for gas, oil, etc. Always refer to assemble and operate. Read, understand, and follow all moving parts have similar laws. WARNING- WARNING- Allow engine and muffler to assemble...
Operation Manual
Page 5
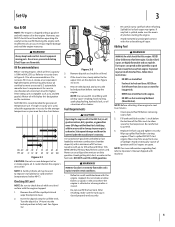
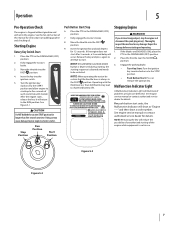
...automotive gasoline (unleaded or low leaded to Operator's Manual shipped with a minimum of air cleaner. Vapors are gone. NOTE: A 5w30 synthetic oil may result in your engine's carburetor. WARNING! After refueling, make sure the area is recommended for fuel expansion. WARNING! NEVER use a ... the locked position to spill fuel when refueling. Turn the dipstick a 1/4 turn to improve start engine. Gasoline with insufficient oil can be used to the locked position before starting the engine. To prevent injury or death from the chart below. 30 Synthetic...
...automotive gasoline (unleaded or low leaded to Operator's Manual shipped with a minimum of air cleaner. Vapors are gone. NOTE: A 5w30 synthetic oil may result in your engine's carburetor. WARNING! After refueling, make sure the area is recommended for fuel expansion. WARNING! NEVER use a ... the locked position to spill fuel when refueling. Turn the dipstick a 1/4 turn to improve start engine. Gasoline with insufficient oil can be used to the locked position before starting the engine. To prevent injury or death from the chart below. 30 Synthetic...
Operation Manual
Page 6
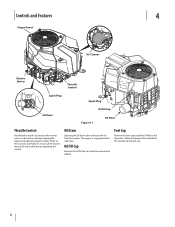
... and adjusting engine speeds. Fuel Cap Remove the fuel cap to check the oil level and add oil. Oil Fill Cap Remove the oil fill cap to add fuel. Oil Drain Opening the oil drain valve will drain the oil from the engine. Refer to the Controls and Features section of the fuel ...cap. 6 Controls and Features 4 Finger Guard Air Cleaner Electric Starter Throttle Control Spark Plug Spark Plug Oil Drain Oil Fill Cap Figure 4-1 Oil Filter Throttle Control The throttle control is located on the mower and is equipped with machine for the location of the mower...
... and adjusting engine speeds. Fuel Cap Remove the fuel cap to check the oil level and add oil. Oil Fill Cap Remove the oil fill cap to add fuel. Oil Drain Opening the oil drain valve will drain the oil from the engine. Refer to the Controls and Features section of the fuel ...cap. 6 Controls and Features 4 Finger Guard Air Cleaner Electric Starter Throttle Control Spark Plug Spark Plug Oil Drain Oil Fill Cap Figure 4-1 Oil Filter Throttle Control The throttle control is located on the mower and is equipped with machine for the location of the mower...
Operation Manual
Page 7
... the START position for longer than full throttle may cause damage to five seconds of this manual for instructions on adding gasoline and checking oil. Place the PTO in the DISENGAGED (OFF) position. 2. Move the throttle into the ignition switch. 5. Insert the ignition key and...5-1. NOTE: If the REVERSE CAUTION MODE button is depressed during starting, the starting of unauthorized starting sequence is not in use. Operating with oil in the DISENGAGED (OFF) position. 2. NOTE: Removing the key will reduce the possibility of the engine while equipment is aborted and needs to...
... the START position for longer than full throttle may cause damage to five seconds of this manual for instructions on adding gasoline and checking oil. Place the PTO in the DISENGAGED (OFF) position. 2. Move the throttle into the ignition switch. 5. Insert the ignition key and...5-1. NOTE: If the REVERSE CAUTION MODE button is depressed during starting, the starting of unauthorized starting sequence is not in use. Operating with oil in the DISENGAGED (OFF) position. 2. NOTE: Removing the key will reduce the possibility of the engine while equipment is aborted and needs to...
Operation Manual
Page 8
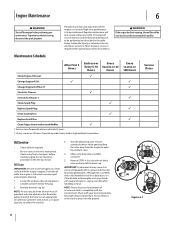
... Periodic inspection and adjustment of maintenance to check engine on the ground. 1 2 (a) (a) (b) 3 (a) Figure 6-1 8 IMPORTANT: Used motor oil may cause skin cancer if repeatedly left in the table below the plug. 2. Follow the hourly or calendar intervals, whichever occur first. WARNING!... Maintenance Schedule After First 5 Hours Each use or Every 5-10 Hours Every Season or 25 Hours Check Engine Oil Level Change Engine Oil †† Change Engine Oil FIlter †† P P Check Air Cleaner P Service Air Cleaner † Check Spark Plug P Replace ...
... Periodic inspection and adjustment of maintenance to check engine on the ground. 1 2 (a) (a) (b) 3 (a) Figure 6-1 8 IMPORTANT: Used motor oil may cause skin cancer if repeatedly left in the table below the plug. 2. Follow the hourly or calendar intervals, whichever occur first. WARNING!... Maintenance Schedule After First 5 Hours Each use or Every 5-10 Hours Every Season or 25 Hours Check Engine Oil Level Change Engine Oil †† Change Engine Oil FIlter †† P P Check Air Cleaner P Service Air Cleaner † Check Spark Plug P Replace ...
Operation Manual
Page 9
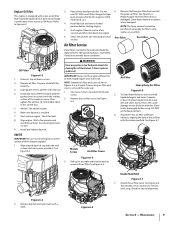
...fill. Remove the foam pre-filter from around dipstick cap and tube with a clean cloth to check engine on oil filter that should be purchased separately. Oil Filter Never use gasoline or low flash point solvents for any debris. Remove the air filter cover. See Figure... dirty or damaged. See Figure 6-3. Refer to locked position before using. oz.). 4. Install dipstick and turn . 5. Start engine. Check the oil level. more often if used in a mild liquid detergent and water. Clean foam element or replace when damaged. Pre-Filter Pre-Filter WARNING! ...
...fill. Remove the foam pre-filter from around dipstick cap and tube with a clean cloth to check engine on oil filter that should be purchased separately. Oil Filter Never use gasoline or low flash point solvents for any debris. Remove the air filter cover. See Figure... dirty or damaged. See Figure 6-3. Refer to locked position before using. oz.). 4. Install dipstick and turn . 5. Start engine. Check the oil level. more often if used in a mild liquid detergent and water. Clean foam element or replace when damaged. Pre-Filter Pre-Filter WARNING! ...
Operation Manual
Page 10
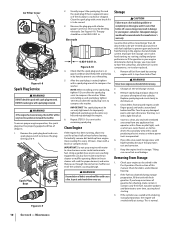
...turn after the spark plug seats to service the remaining spark plug. Repeat STEPS 1-5 to compress the washer. Clean with spark plug removed. See Oil Change section. 3. Touch up from around engine, under finger guard, and under blower housing. 2. Be careful not to touch the muffler. Correct ...as described in . Clean cooling fins every 25 hours. Subsequent damage would not be properly gapped and free of engine oil into the air cleaner or muffler opening. Remove spark plug and pour about 1/2 an ounce of deposits. 1. If possible, also avoid ...
...turn after the spark plug seats to service the remaining spark plug. Repeat STEPS 1-5 to compress the washer. Clean with spark plug removed. See Oil Change section. 3. Touch up from around engine, under finger guard, and under blower housing. 2. Be careful not to touch the muffler. Correct ...as described in . Clean cooling fins every 25 hours. Subsequent damage would not be properly gapped and free of engine oil into the air cleaner or muffler opening. Remove spark plug and pour about 1/2 an ounce of deposits. 1. If possible, also avoid ...
Operation Manual
Page 11
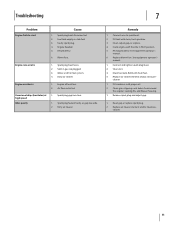
...fresh fuel. 4. Fuel tank empty or stale fuel. 3. Engine flooded. 5. Recharge battery. See equipment operator's manual. 1. Refill with proper oil. 2. Replace air cleaner element and/or clean pre- Engine overheats 1. high speed Idles poorly 1. Fill tank with throttle in FAST position. ...wide. 2. Replace blown fuse. Drain fuel tank. Faulty spark plug. 4. Dead battery. 6. Engine runs erratic 1. Dirty air cleaner. Engine oil level low. 2. Spark plug gap too close. Connect wire to start Cause 1. cleaner. 11 Crank engine with clean, fresh gasoline. 3....
...fresh fuel. 4. Fuel tank empty or stale fuel. 3. Engine flooded. 5. Recharge battery. See equipment operator's manual. 1. Refill with proper oil. 2. Replace air cleaner element and/or clean pre- Engine overheats 1. high speed Idles poorly 1. Fill tank with throttle in FAST position. ...wide. 2. Replace blown fuse. Drain fuel tank. Faulty spark plug. 4. Dead battery. 6. Engine runs erratic 1. Dirty air cleaner. Engine oil level low. 2. Spark plug gap too close. Connect wire to start Cause 1. cleaner. 11 Crank engine with clean, fresh gasoline. 3....
Operation Manual
Page 12
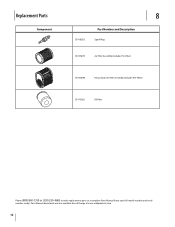
Replacement Parts Component 8 951-10292 Part Number and Description Spark Plug 937-05075 Air Filter Assembly (Includes Pre-Filter) 937-05094 Heavy Duty Air Filter Assembly (Includes Pre-Filter) 951-15362 Oil Filter Phone (800) 800-7310 or (330) 220-4683 to order replacement parts or a complete Parts Manual (have your full model number and serial number ready). Parts Manual downloads are also available free of charge at www.mtdproducts.com. 12
Replacement Parts Component 8 951-10292 Part Number and Description Spark Plug 937-05075 Air Filter Assembly (Includes Pre-Filter) 937-05094 Heavy Duty Air Filter Assembly (Includes Pre-Filter) 951-15362 Oil Filter Phone (800) 800-7310 or (330) 220-4683 to order replacement parts or a complete Parts Manual (have your full model number and serial number ready). Parts Manual downloads are also available free of charge at www.mtdproducts.com. 12
Parts and Warranty
Page 2
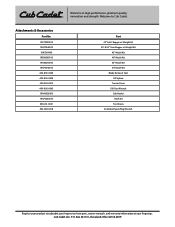
... Bagger w/ Weight Kit 42" Mulch Kit 46" Mulch Kit 50" Mulch Kit 54" Mulch Kit Blade Removal Tool Oil Siphon Tractor Cover Oil Filter Wrench Cub Hauler Hitch Kit Tire Chains Extended Spark Plug Wrench Cub Cadet LLC, P.O. Box 361131, Cleveland, Ohio 44136-0019 Attachments & Accessories Part No. 19C70020100 19A70043100 19A7004100 19B30005100 19A30016100 19A70042100 490-850...
... Bagger w/ Weight Kit 42" Mulch Kit 46" Mulch Kit 50" Mulch Kit 54" Mulch Kit Blade Removal Tool Oil Siphon Tractor Cover Oil Filter Wrench Cub Hauler Hitch Kit Tire Chains Extended Spark Plug Wrench Cub Cadet LLC, P.O. Box 361131, Cleveland, Ohio 44136-0019 Attachments & Accessories Part No. 19C70020100 19A70043100 19A7004100 19B30005100 19A30016100 19A70042100 490-850...
Parts and Warranty
Page 5
...rights, and you and your authorized Cub Cadet dealer, distributor, or retailer or contact Cub Cadet LLC at www.mtdcanada.com. In no event shall recovery of any use thereof Systems and is the only product warranty provided by the 4. specified fuel, oil or lubricants as : grass collectors... altered or modified in a manner not consistent with the original design of the RZT or in a manner not approved by Cub Cadet for this new RZT from an authorized retailer. 3. During the Warranty Period, Cub Cadet LLC will, at www.cubcadet.com. After three (3) months, the battery replacement...
...rights, and you and your authorized Cub Cadet dealer, distributor, or retailer or contact Cub Cadet LLC at www.mtdcanada.com. In no event shall recovery of any use thereof Systems and is the only product warranty provided by the 4. specified fuel, oil or lubricants as : grass collectors... altered or modified in a manner not consistent with the original design of the RZT or in a manner not approved by Cub Cadet for this new RZT from an authorized retailer. 3. During the Warranty Period, Cub Cadet LLC will, at www.cubcadet.com. After three (3) months, the battery replacement...


