
LTX 1042 KW Operator's Manual
Page 20
... and the fluid cannot be wiped off promptly. Wash hands after handling. Re-cap the end of the oil drain valve to keep the battery cables and terminals clean and free of corrosive build-up. • After cleaning the battery and terminals, apply a light coat of the oil drain valve back... 65 WARNING! The battery is sealed and is directed AWAY from entering the drain port. Smart Jet Your tractor's deck is maintenance-free. Disengage the PTO (Blade Engage), set the parking brake and stop the engine. 2. Pop open the protective cap on the oil drain valve, then pull outward to ...
... and the fluid cannot be wiped off promptly. Wash hands after handling. Re-cap the end of the oil drain valve to keep the battery cables and terminals clean and free of corrosive build-up. • After cleaning the battery and terminals, apply a light coat of the oil drain valve back... 65 WARNING! The battery is sealed and is directed AWAY from entering the drain port. Smart Jet Your tractor's deck is maintenance-free. Disengage the PTO (Blade Engage), set the parking brake and stop the engine. 2. Pop open the protective cap on the oil drain valve, then pull outward to ...
LTX 1042 KW Operator's Manual
Page 26
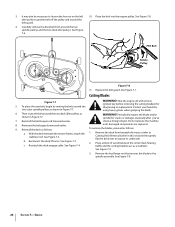
...rod. Carefully remove the deck belt from beneath the tractor, (refer to the spindle assembly. See Figure 7-6. 10. PTO Belt Rotate Pulley Figure 7-8 11. Periodically inspect the blade and/or spindle for sharpening or replacement. Remount the belt ...mower frame, attach the 1. See Figure 7-9. 3. Service Place a block of wood between the center deck housing c. Reattach the deck engage cable. See Figure 7-1. b. 3. See Figure 7-8. Replace the belt guard. WARNING! Reconnect the deck lift arms. See Figure 7-3. 2. See Figure 7-4. See...
...rod. Carefully remove the deck belt from beneath the tractor, (refer to the spindle assembly. See Figure 7-6. 10. PTO Belt Rotate Pulley Figure 7-8 11. Periodically inspect the blade and/or spindle for sharpening or replacement. Remount the belt ...mower frame, attach the 1. See Figure 7-9. 3. Service Place a block of wood between the center deck housing c. Reattach the deck engage cable. See Figure 7-1. b. 3. See Figure 7-8. Replace the belt guard. WARNING! Reconnect the deck lift arms. See Figure 7-3. 2. See Figure 7-4. See...

Operation Manual
Page 20
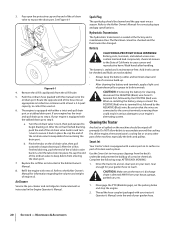
... from your engine's alternating system. (leaning the Tractor Any fuel or oil spilled on the machine should be wiped off promptly. Disengage the PTO (Blade Engage), set the parking brake and stop the engine. 3. Battery A CALIFORNIA PROPOSITION 65 WARNING! After the oil has finished draining,...to reach. be checked and fluid cannot be changed. Complete the following steps AFTER EACH MOWING: 1. Acid levels cannot Always keep the battery cables and terminals clean and free of engine oil. Thread the hose coupler (packaged with at the factory and is sealed at least a 2.5...
... from your engine's alternating system. (leaning the Tractor Any fuel or oil spilled on the machine should be wiped off promptly. Disengage the PTO (Blade Engage), set the parking brake and stop the engine. 3. Battery A CALIFORNIA PROPOSITION 65 WARNING! After the oil has finished draining,...to reach. be checked and fluid cannot be changed. Complete the following steps AFTER EACH MOWING: 1. Acid levels cannot Always keep the battery cables and terminals clean and free of engine oil. Thread the hose coupler (packaged with at the factory and is sealed at least a 2.5...

Operation Manual
Page 26
...Periodically inspect the blade and/or spindle for _ shaArRpeNnINinGg ! To place the new belt, begin by using heavy gloves when grasping the blade WARNING! PTO Belt Pulley J Figure 7-8 12. ignition key before removing the cutting blade(s) for cracks or damage, especially after you've struck a foreign object. ...a round the belt guard. 11. With the deck beneath the mower frame, attach the stabilizer rod. c. Reattach the deck engage cable. See Fig. 7-4. Remove the deck from around the two spindle pulleys and the two deck idler pulleys. SECTION7-- SERVICE
...Periodically inspect the blade and/or spindle for _ shaArRpeNnINinGg ! To place the new belt, begin by using heavy gloves when grasping the blade WARNING! PTO Belt Pulley J Figure 7-8 12. ignition key before removing the cutting blade(s) for cracks or damage, especially after you've struck a foreign object. ...a round the belt guard. 11. With the deck beneath the mower frame, attach the stabilizer rod. c. Reattach the deck engage cable. See Fig. 7-4. Remove the deck from around the two spindle pulleys and the two deck idler pulleys. SECTION7-- SERVICE
Operation Manual
Page 92
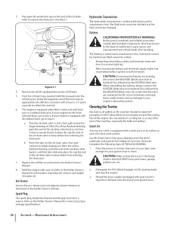
...reset once a season. e certain the tractor's discharge 2. f \ Hydrostatic Transmission The hydrostatic transmission is sealed at least a 2.5 quart capacity to keep the battery cables and terminals clean and free of corrosive build-up. The fluid level cannot be checked and the fluid cannot be added. After cleaning the battery...'s Manual. SmartJet Your tractor's deck is equipped with a water port on its deck wash system. chute is maintenance-free. Disengage the PTO (Blade Engage), set the parking brake and stop the engine. 3. SECTION 6 -- MAINTENANCE & ADJUSTMENTS
...reset once a season. e certain the tractor's discharge 2. f \ Hydrostatic Transmission The hydrostatic transmission is sealed at least a 2.5 quart capacity to keep the battery cables and terminals clean and free of corrosive build-up. The fluid level cannot be checked and the fluid cannot be added. After cleaning the battery...'s Manual. SmartJet Your tractor's deck is equipped with a water port on its deck wash system. chute is maintenance-free. Disengage the PTO (Blade Engage), set the parking brake and stop the engine. 3. SECTION 6 -- MAINTENANCE & ADJUSTMENTS
Operation Manual
Page 98
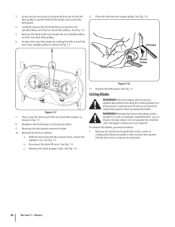
PTO Belt Pulley J Figure 7-8 12. Then route the belt around the two spindle pulleys and the two deck idler pulleys. 6. Reattach the deck engage cable. 3. r 4. See Fig. 7-6. 5. Reconnect the deck lift a rms. See Fig. 7-3. ignition key before removing the cutting blade(s) for cracks or damage, especially after you've struck a ...
PTO Belt Pulley J Figure 7-8 12. Then route the belt around the two spindle pulleys and the two deck idler pulleys. 6. Reattach the deck engage cable. 3. r 4. See Fig. 7-6. 5. Reconnect the deck lift a rms. See Fig. 7-3. ignition key before removing the cutting blade(s) for cracks or damage, especially after you've struck a ...


