

Series 1000 Brochure
Page 1
... instructions in U.S.A. 12/12 © 2013 Cub Cadet Lawn and garden tractors SERIES 1000 LTX 1040 LTX 1042 KW LTX 1045 LTX 1046 LTX 1046 KW LTX 1050 LTX 1050 KW LGT 1050 LGT 1054 LGTX 1050 LGTX... Deck Wash System optional attachments and accessories available ACCURATE EASY-TOREAD FUEL GAUGE 3- MOWer DECK Cutting Width/Blades Deck Cutting Height deck Construction Deck Drive System Anti-scalping ...deck for all -day comfort. Before operating the machine, read, understand and follow all new Cub Cadet Series 1000 Tractors. locate A DEALER AT CUBCADET.COM Innovations no one else can match....
... instructions in U.S.A. 12/12 © 2013 Cub Cadet Lawn and garden tractors SERIES 1000 LTX 1040 LTX 1042 KW LTX 1045 LTX 1046 LTX 1046 KW LTX 1050 LTX 1050 KW LGT 1050 LGT 1054 LGTX 1050 LGTX... Deck Wash System optional attachments and accessories available ACCURATE EASY-TOREAD FUEL GAUGE 3- MOWer DECK Cutting Width/Blades Deck Cutting Height deck Construction Deck Drive System Anti-scalping ...deck for all -day comfort. Before operating the machine, read, understand and follow all new Cub Cadet Series 1000 Tractors. locate A DEALER AT CUBCADET.COM Innovations no one else can match....
LTX 1042 KW Operator's Manual
Page 26
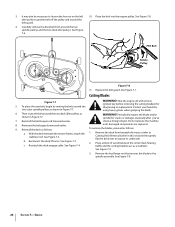
... the deck belt from beneath the tractor, (refer to the spindle assembly. WARNING! Reinstall the belt keeper rod loosened earlier. With the deck beneath the mower frame, attach the 1. b. Place the belt into the engine pulley. Do not operate the machine 8. See Figure 7-9. 26 Section 7- 3. Reattach the deck engage cable. baffle... underside. See Figure 7-1. Then route the belt around the two spindle pulleys and the two deck idler pulleys. See Figure 7-8. See Figure 7-5. To place the new belt, begin by using heavy gloves when grasping the blade 6.
... the deck belt from beneath the tractor, (refer to the spindle assembly. WARNING! Reinstall the belt keeper rod loosened earlier. With the deck beneath the mower frame, attach the 1. b. Place the belt into the engine pulley. Do not operate the machine 8. See Figure 7-9. 26 Section 7- 3. Reattach the deck engage cable. baffle... underside. See Figure 7-1. Then route the belt around the two spindle pulleys and the two deck idler pulleys. See Figure 7-8. See Figure 7-5. To place the new belt, begin by using heavy gloves when grasping the blade 6.
LTX 1042 KW Operator's Manual
Page 27
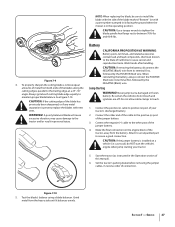
...of the cable to the positive (+) post of the blade has previously been sharpened, or if any metal separation is present, replace the blades with new ones. CAUTION: If the cutting edge of the jumper battery. 3. Never jump start the vehicle's engine when jump starting your tractor's discharged battery... in the operating position. Figure 7-10 5. See Figure 7-10. Grind metal from the heavy side until it ) facing the ground when the mower is installed on the engine block of the blade marked ''Bottom'' (or with the side of the tractor, away from its terminal first, followed...
...of the cable to the positive (+) post of the blade has previously been sharpened, or if any metal separation is present, replace the blades with new ones. CAUTION: If the cutting edge of the jumper battery. 3. Never jump start the vehicle's engine when jump starting your tractor's discharged battery... in the operating position. Figure 7-10 5. See Figure 7-10. Grind metal from the heavy side until it ) facing the ground when the mower is installed on the engine block of the blade marked ''Bottom'' (or with the side of the tractor, away from its terminal first, followed...

Operation Manual
Page 26
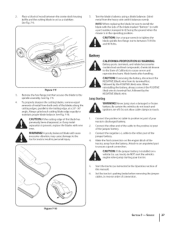
See Fig. 7-8. Remount the belt guards removed earlier. 10. With the deck beneath the mower frame, attach the stabilizer rod. b. See Fig. 7-4. orShreupt latcheementg.ine Proofftaenctd yoreumr ohvaends by routing the belt around the two deck idler pulleys as...arms. See Fig. 7-3. Periodically inspect the blade and/or spindle for _ shaArRpeNnINinGg ! SECTION7-- Place the belt into the engine pulley. r 4. To place the new belt, begin by using heavy gloves when grasping the blade WARNING! ignition key before removing the cutting blade(s) for cracks or damage, especially after you...
See Fig. 7-8. Remount the belt guards removed earlier. 10. With the deck beneath the mower frame, attach the stabilizer rod. b. See Fig. 7-4. orShreupt latcheementg.ine Proofftaenctd yoreumr ohvaends by routing the belt around the two deck idler pulleys as...arms. See Fig. 7-3. Periodically inspect the blade and/or spindle for _ shaArRpeNnINinGg ! SECTION7-- Place the belt into the engine pulley. r 4. To place the new belt, begin by using heavy gloves when grasping the blade WARNING! ignition key before removing the cutting blade(s) for cracks or damage, especially after you...
Operation Manual
Page 27
... a good connection. _hL vehicle (i.e. CAUTION: If removing the battery, disconnect the NEGATIVE (Black) wire from the heavy side until it ) facing the ground when the mower is present, replace the blades with a part number stamped in it balances evenly. Attach to an unpainted part to maintain proper blade balance. car, truck... blade with the side of metal from the battery. To properly sharpen the cutting blades, remove equal amounts of the blade marked "Bottom" (or with new ones.
... a good connection. _hL vehicle (i.e. CAUTION: If removing the battery, disconnect the NEGATIVE (Black) wire from the heavy side until it ) facing the ground when the mower is present, replace the blades with a part number stamped in it balances evenly. Attach to an unpainted part to maintain proper blade balance. car, truck... blade with the side of metal from the battery. To properly sharpen the cutting blades, remove equal amounts of the blade marked "Bottom" (or with new ones.
Operation Manual
Page 98
... deck belt from beneath the tractor, (refer to Cutting Deck Removal earlier in Fig. 7-7. 8. To place the new belt, begin by using heavy gloves when grasping the blade WARNING! With the deck beneath the mower frame, attach the stabilizer rod. See Fig. 7-5. Do not operate the machine until damaged components are replaced...
... deck belt from beneath the tractor, (refer to Cutting Deck Removal earlier in Fig. 7-7. 8. To place the new belt, begin by using heavy gloves when grasping the blade WARNING! With the deck beneath the mower frame, attach the stabilizer rod. See Fig. 7-5. Do not operate the machine until damaged components are replaced...

Operation Manual
Page 99
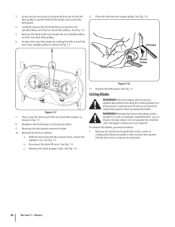
...See Fig. 7-9. 4. To properly sharpen the cutting blades, remove equal amounts of metal from the heavy side until it ) facing the ground when the mower is in the Operation section of connection. WARNING! Set the tractor's parking brake before removing the jumper cables, in reverse order of this manual). 6. ... of California to the trailing edge, at a 25 °- 30 ° angle. Place a block of the blade marked "Bottom" (or with new ones. Connect the positive (+) cable to install the blade with the side of wood between the center deck housing baffle and the cutting blade to...
...See Fig. 7-9. 4. To properly sharpen the cutting blades, remove equal amounts of metal from the heavy side until it ) facing the ground when the mower is in the Operation section of connection. WARNING! Set the tractor's parking brake before removing the jumper cables, in reverse order of this manual). 6. ... of California to the trailing edge, at a 25 °- 30 ° angle. Place a block of the blade marked "Bottom" (or with new ones. Connect the positive (+) cable to install the blade with the side of wood between the center deck housing baffle and the cutting blade to...


