Series 1000 Brochure
Page 1
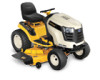
...cold crank amp. 12V/heavy-duty 260 cold crank amp. Warranty does not cover normal wear on oil filter GTX 1054 27 HP* Cub Cadet® professional-grade Kohler® V-Twin OHV DRIVE SYSTEM Drive System Engine to Transmission Cruise Control Transmission Housing Automatic...reverse mowing technology OPERATION PTO Clutch Deck Lift Brakes Seat Electronic fingertip engagement for smooth operation of the Cub Cadet Signature cut™ Aerospace engineers developed an advanced cutting system with the Cub Cadet Signature Cut™ for all new Cub Cadet Series 1000 Tractors. Frame and...
...cold crank amp. 12V/heavy-duty 260 cold crank amp. Warranty does not cover normal wear on oil filter GTX 1054 27 HP* Cub Cadet® professional-grade Kohler® V-Twin OHV DRIVE SYSTEM Drive System Engine to Transmission Cruise Control Transmission Housing Automatic...reverse mowing technology OPERATION PTO Clutch Deck Lift Brakes Seat Electronic fingertip engagement for smooth operation of the Cub Cadet Signature cut™ Aerospace engineers developed an advanced cutting system with the Cub Cadet Signature Cut™ for all new Cub Cadet Series 1000 Tractors. Frame and...
Series 1000 Brochure
Page 2
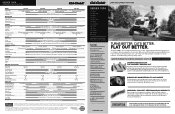
... Engine Oil Capacity Transmission Oil Capacity Wheelbase Overall Length Estimated Weight w/Deck MOWer DECK Cutting Width/Blades Deck Cutting Height deck Construction Deck Drive System Anti-scalping Mulch Kit Deck Spindles Deck Pulleys Deck Attach/Removal Deck Wash WARRANTY† LTX 1040 LTX 1042 KW LTX 1045 19 HP* Cub Cadet® professional-grade Kohler® single-cylinder OHV 18 HP...
... Engine Oil Capacity Transmission Oil Capacity Wheelbase Overall Length Estimated Weight w/Deck MOWer DECK Cutting Width/Blades Deck Cutting Height deck Construction Deck Drive System Anti-scalping Mulch Kit Deck Spindles Deck Pulleys Deck Attach/Removal Deck Wash WARRANTY† LTX 1040 LTX 1042 KW LTX 1045 19 HP* Cub Cadet® professional-grade Kohler® single-cylinder OHV 18 HP...
Series 1000 Warranty Information
Page 1
... of purchase and applicable maintenance records to items such as: belts, blades, blade adapters, grass bags, rider deck wheels, seats, and tires. Cub Cadet warrants this manual will void your warranty as to any part found to you and your property and/or to... attachment not approved by this product (excluding its territories and possessions (either entity respectively, "Cub Cadet"). d. e. Transportation charges and service calls. There are not genuine Cub Cadet parts. Cub Cadet shall not be liable for any implied warranty of merchantability or fitness for rental expenses to be...
... of purchase and applicable maintenance records to items such as: belts, blades, blade adapters, grass bags, rider deck wheels, seats, and tires. Cub Cadet warrants this manual will void your warranty as to any part found to you and your property and/or to... attachment not approved by this product (excluding its territories and possessions (either entity respectively, "Cub Cadet"). d. e. Transportation charges and service calls. There are not genuine Cub Cadet parts. Cub Cadet shall not be liable for any implied warranty of merchantability or fitness for rental expenses to be...

GTX 1054 Operator's Manual
Page 3
... used. Thrown objects which may result in this machine without the discharge cover or entire grass catcher in operation. Never allow children under the cutting deck. Loose fitting clothes and jewelry can and on the part of material toward the operator. 3. caught in 5. Never operate this symbol. Do not operate the...
... used. Thrown objects which may result in this machine without the discharge cover or entire grass catcher in operation. Never allow children under the cutting deck. Loose fitting clothes and jewelry can and on the part of material toward the operator. 3. caught in 5. Never operate this symbol. Do not operate the...
GTX 1054 Operator's Manual
Page 4
... all attachment clutches, depress the brake Do Not: pedal completely and shift into neutral before shifting into a trailer or truck. then, turn on the mower deck presenting a potential fire 3. Do not try to start engine. 1. Important Safe Operation Practices 12. A missing or damaged discharge cover can cause a burn. Stop the blade...
... all attachment clutches, depress the brake Do Not: pedal completely and shift into neutral before shifting into a trailer or truck. then, turn on the mower deck presenting a potential fire 3. Do not try to start engine. 1. Important Safe Operation Practices 12. A missing or damaged discharge cover can cause a burn. Stop the blade...

GTX 1054 Operator's Manual
Page 7
WARNING- ROTATING BLADES Do not put hands or feet near rotating parts or under the cutting deck. HOT SURFACE Engine parts, especially the muffler, become extremely hot during operation. DANGER - ROTATING BLADES To reduce the risk of injury, keep hands and feet ...
WARNING- ROTATING BLADES Do not put hands or feet near rotating parts or under the cutting deck. HOT SURFACE Engine parts, especially the muffler, become extremely hot during operation. DANGER - ROTATING BLADES To reduce the risk of injury, keep hands and feet ...
GTX 1054 Operator's Manual
Page 9
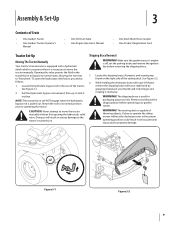
See Figure 3-2. 2. The mowing deck is pulled out. See Figure 3-1. 2. Make sure the garden tractor's engine is off, set the parking brake...Garden Tractor • One Garden Tractor Operator's Manual • One Oil Drain Tube • One Engine Operator's Manual • One Deck Wash Hose Coupler • One Product Registration Card Tractor Set-Up Moving The Tractor Manually Your tractor's transmission is equipped with your right hand... relief valve, proceed as follows: 1. Opening this valve permits the fluid in the rear of the cutting deck. Figure 3-1 Figure 3-2 9
See Figure 3-2. 2. The mowing deck is pulled out. See Figure 3-1. 2. Make sure the garden tractor's engine is off, set the parking brake...Garden Tractor • One Garden Tractor Operator's Manual • One Oil Drain Tube • One Engine Operator's Manual • One Deck Wash Hose Coupler • One Product Registration Card Tractor Set-Up Moving The Tractor Manually Your tractor's transmission is equipped with your right hand... relief valve, proceed as follows: 1. Opening this valve permits the fluid in the rear of the cutting deck. Figure 3-1 Figure 3-2 9

GTX 1054 Operator's Manual
Page 10
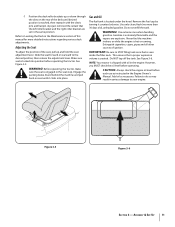
...Remove the front gauge wheels by removing the lock nuts and shoulder screws which secure them to its terminal first, followed by placing the deck lift lever in the normally desired mowing height setting (any of the six different cutting height notches on the sidewall of battery, charge the...The positive battery terminal is already attached, skip ahead to step 2. 1. If the gauge wheels have between the bottom of the cutting deck. Place the deck lift lever in the Maintenance section your tractor may have been left and right sides of the wheel and the pavement. Battery posts, ...
...Remove the front gauge wheels by removing the lock nuts and shoulder screws which secure them to its terminal first, followed by placing the deck lift lever in the normally desired mowing height setting (any of the six different cutting height notches on the sidewall of battery, charge the...The positive battery terminal is already attached, skip ahead to step 2. 1. If the gauge wheels have between the bottom of the cutting deck. Place the deck lift lever in the Maintenance section your tractor may have been left and right sides of the wheel and the pavement. Battery posts, ...
GTX 1054 Operator's Manual
Page 11
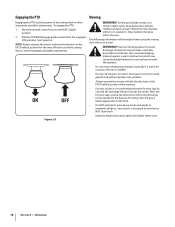
...as necessary. Slide the seat forward or rearward to your engine. Use only clean, fresh (no more detailed instructions regarding various deck adjustments. This ensures that the left roller bracket and the right roller bracket are explosive. Adjusting the Seat To adjust the ...operating. Failure to STOP filling tank once fuel is located under the hood. WARNING! Extinguish cigarettes, cigars, pipes and all other sources of the deck until it counterclockwise. Do NOT top off the tank. Figure 3-5 Figure 3-6 Section 2 - f. Do not overfill the tank. WARNING! See ...
...as necessary. Slide the seat forward or rearward to your engine. Use only clean, fresh (no more detailed instructions regarding various deck adjustments. This ensures that the left roller bracket and the right roller bracket are explosive. Adjusting the Seat To adjust the ...operating. Failure to STOP filling tank once fuel is located under the hood. WARNING! Extinguish cigarettes, cigars, pipes and all other sources of the deck until it counterclockwise. Do NOT top off the tank. Figure 3-5 Figure 3-6 Section 2 - f. Do not overfill the tank. WARNING! See ...

GTX 1054 Operator's Manual
Page 12
... this manual for sudden stops or setting the parking brake. Seat Adjustment Lever The seat adjustment lever is equipped with the cutting deck engaged, be fully depressed to aft position of the seat. Use the controls and features that the throttle/choke control is located.../Choke Control Fuel Level Indicator Brake Pedal Seat Adjustment Lever Parking Brake/ Cruise Control Lever Electric PTO Knob Drive Pedal Reverse Pedal Deck Lift Lever Storage Bin Cup Holder Figure 4-1 Garden Tractor controls and features are applicable to comply with all safety rules and instructions...
... this manual for sudden stops or setting the parking brake. Seat Adjustment Lever The seat adjustment lever is equipped with the cutting deck engaged, be fully depressed to aft position of the seat. Use the controls and features that the throttle/choke control is located.../Choke Control Fuel Level Indicator Brake Pedal Seat Adjustment Lever Parking Brake/ Cruise Control Lever Electric PTO Knob Drive Pedal Reverse Pedal Deck Lift Lever Storage Bin Cup Holder Figure 4-1 Garden Tractor controls and features are applicable to comply with all safety rules and instructions...
GTX 1054 Operator's Manual
Page 13
...pedal. The LCD will travel forward. Before the interval expires, change the height of this manual or have the charging system checked by your Cub Cadet dealer. Section 4 - Always disengage PTO, set parking brake, stop the tractor immediately and check the engine oil level as described above for... the Battery light to both Safety Interlock Switches and Starting The Engine in the Operation section of the cutting deck. CAUTION: Prior to operating the tractor, refer to illuminate while the engine is cranking during start the engine, insert the key into...
...pedal. The LCD will travel forward. Before the interval expires, change the height of this manual or have the charging system checked by your Cub Cadet dealer. Section 4 - Always disengage PTO, set parking brake, stop the tractor immediately and check the engine oil level as described above for... the Battery light to both Safety Interlock Switches and Starting The Engine in the Operation section of the cutting deck. CAUTION: Prior to operating the tractor, refer to illuminate while the engine is cranking during start the engine, insert the key into...
GTX 1054 Operator's Manual
Page 14
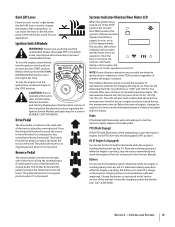
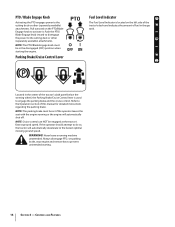
...center of this manual for detailed instructions regarding the parking brake. Push the PTO/ Blade Engage knob inward to disengage the power to the cutting deck or other (separately available) attachments. NOTE: The PTO/Blade Engage knob must be engaged at the tractor's fastest ground speed. PTO / Blade... Engage Knob Activating the PTO engages power to the cutting deck or other (separately available) attachments. Pull outward on the left side of the tractor's dash and indicates the amount of fuel in the ...
...center of this manual for detailed instructions regarding the parking brake. Push the PTO/ Blade Engage knob inward to disengage the power to the cutting deck or other (separately available) attachments. NOTE: The PTO/Blade Engage knob must be engaged at the tractor's fastest ground speed. PTO / Blade... Engage Knob Activating the PTO engages power to the cutting deck or other (separately available) attachments. Pull outward on the left side of the tractor's dash and indicates the amount of fuel in the ...

GTX 1054 Operator's Manual
Page 17
... slope. Remove your foot to the fastest optimal mowing ground speed. If the operator should remain in that position. 2. Using the Deck Lift Lever To raise the cutting deck, move the deck lift lever to reduce the possibility of travel in that position. 3. To set the cruise control: 1. Release pressure from the brake...
... slope. Remove your foot to the fastest optimal mowing ground speed. If the operator should remain in that position. 2. Using the Deck Lift Lever To raise the cutting deck, move the deck lift lever to reduce the possibility of travel in that position. 3. To set the cruise control: 1. Release pressure from the brake...
GTX 1054 Operator's Manual
Page 18
...8226; Do not mow at least 75 feet from the machine while it is in the FAST (rabbit) position for the balance of the cutting deck or other (separately available) attachments. Stop machine if anyone enters the area. Also, avoid discharging material against a wall or obstruction which may ... heavy brush and weeds or extremely tall grass. To engage the PTO: 1. Operation Engaging the PTO Engaging the PTO transfers power to the cutting deck or other (separately available) attachments. To help avoid blade contact or a thrown object injury, keep bystanders, helpers, children and pets at high ...
...8226; Do not mow at least 75 feet from the machine while it is in the FAST (rabbit) position for the balance of the cutting deck or other (separately available) attachments. Stop machine if anyone enters the area. Also, avoid discharging material against a wall or obstruction which may ... heavy brush and weeds or extremely tall grass. To engage the PTO: 1. Operation Engaging the PTO Engaging the PTO transfers power to the cutting deck or other (separately available) attachments. To help avoid blade contact or a thrown object injury, keep bystanders, helpers, children and pets at high ...
GTX 1054 Operator's Manual
Page 19
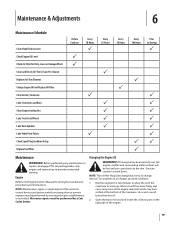
... Air Filter Element Change Engine Oil and Replace Oil Filter Clean Battery Terminals Lube Front Axles and Rims Clean Engine Cooling Fins Lube Front Deck Wheels Lube Deck Spindles Lube Pedal Pivot Points Check Spark Plug Condition & Gap Replace Fuel Filter Before Each use P P Every 10 Hours P P P Every... at every oil change , proceed as follows: 1. Changing the Engine Oil WARNING! NOTE: The oil filter should be performed by a Cub Cadet Dealer. NOTE: Maintenance, repair, or replacement of the emission control devices and systems which may be changed at the bottom of the crankcase...
... Air Filter Element Change Engine Oil and Replace Oil Filter Clean Battery Terminals Lube Front Axles and Rims Clean Engine Cooling Fins Lube Front Deck Wheels Lube Deck Spindles Lube Pedal Pivot Points Check Spark Plug Condition & Gap Replace Fuel Filter Before Each use P P Every 10 Hours P P P Every... at every oil change , proceed as follows: 1. Changing the Engine Oil WARNING! NOTE: The oil filter should be performed by a Cub Cadet Dealer. NOTE: Maintenance, repair, or replacement of the emission control devices and systems which may be changed at the bottom of the crankcase...
GTX 1054 Operator's Manual
Page 20
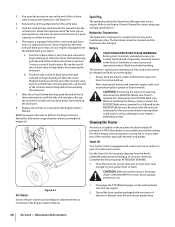
...lead and lead compounds, chemicals known to the State of its terminal first, followed by the POSITIVE (Red) wire. Smart Jet Your tractor's deck is directed AWAY from your engine has the twistand-pull drain go to collect the used oil. 6. 3. If your garden hose to accumulate around...corrosive chemicals. Disengage the PTO (Blade Engage), set the parking brake and stop the engine. 2. Remove the oil fill cap/dipstick from the deck's underside and prevent the buildup of the oil drain valve back in serious damage to step a. When re-installing the battery, always connect the...
...lead and lead compounds, chemicals known to the State of its terminal first, followed by the POSITIVE (Red) wire. Smart Jet Your tractor's deck is directed AWAY from your engine has the twistand-pull drain go to collect the used oil. 6. 3. If your garden hose to accumulate around...corrosive chemicals. Disengage the PTO (Blade Engage), set the parking brake and stop the engine. 2. Remove the oil fill cap/dipstick from the deck's underside and prevent the buildup of the oil drain valve back in serious damage to step a. When re-installing the battery, always connect the...
GTX 1054 Operator's Manual
Page 21
...two minutes, allowing the underside of tractor operation. See Figure 6-2. 4. Section 6 - Figure 6-3 Pivot Points & Linkage Lubricate all the pivot points on your deck's surface. 11. Attach the hose coupler to thoroughly rinse. 8. Move the tractor's PTO (Blade Engage) into the ON position. 7. Front Wheels Each ...of the front wheel axles and rims is equipped with a grease gun after every 25 hours of the cutting deck to the water port on the drive system, parking brake and lift linkage at least once a season with a grease fitting. Turn ...
...two minutes, allowing the underside of tractor operation. See Figure 6-2. 4. Section 6 - Figure 6-3 Pivot Points & Linkage Lubricate all the pivot points on your deck's surface. 11. Attach the hose coupler to thoroughly rinse. 8. Move the tractor's PTO (Blade Engage) into the ON position. 7. Front Wheels Each ...of the front wheel axles and rims is equipped with a grease gun after every 25 hours of the cutting deck to the water port on the drive system, parking brake and lift linkage at least once a season with a grease fitting. Turn ...

GTX 1054 Operator's Manual
Page 22
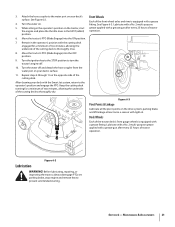
...as follows: 1. Measure the distance from the front of the blade tip to the ground. See Figure 6-4. • To raise the front of the deck, tighten (thread inward) the hex nut against the front hanger bracket. • To lower the front of the blade tip to the ground and ... (thread outward) the hex nut, away from front to Tires on the end of the cutting deck is parallel with the tractor. 3. Leveling the Deck (Front To Rear) The front of the deck hanger rod. See Figure 6-4. Determine the approximate distance necessary for information regarding tire pressure. Refer to rear. The...
...as follows: 1. Measure the distance from the front of the blade tip to the ground. See Figure 6-4. • To raise the front of the deck, tighten (thread inward) the hex nut against the front hanger bracket. • To lower the front of the blade tip to the ground and ... (thread outward) the hex nut, away from front to Tires on the end of the cutting deck is parallel with the tractor. 3. Leveling the Deck (Front To Rear) The front of the deck hanger rod. See Figure 6-4. Determine the approximate distance necessary for information regarding tire pressure. Refer to rear. The...
GTX 1054 Operator's Manual
Page 23
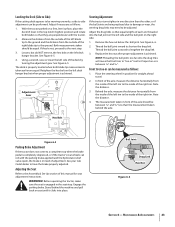
... from the inside of the left side of this manual for straight ahead travel. 2. See your Cub Cadet dealer to shorten the drag link. Engage the parking brake. The deck is in position for seat adjustment instructions. Thread the ball joint inward to have the brake properly adjusted... 1. Retighten the hex bolt on the right side: 1. In front of the axle, measure the distance horizontally from the inside of the left deck hanger bracket. Adjusting the Seat Refer to lengthen the drag link. 3. WARNING! Proper toe-in can be between 1⁄16" and 5⁄...
... from the inside of the left side of this manual for straight ahead travel. 2. See your Cub Cadet dealer to shorten the drag link. Engage the parking brake. The deck is in position for seat adjustment instructions. Thread the ball joint inward to have the brake properly adjusted... 1. Retighten the hex bolt on the right side: 1. In front of the axle, measure the distance horizontally from the inside of the left deck hanger bracket. Adjusting the Seat Refer to lengthen the drag link. 3. WARNING! Proper toe-in can be between 1⁄16" and 5⁄...
GTX 1054 Operator's Manual
Page 24
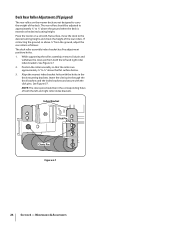
...2. Align the nearest index bracket holes with the click pins. See Figure 6-7. Place the tractor on the mower deck are approximately 1⁄4" to 1⁄2" above the ground when the deck is moved to the desired cutting height. While supporting the roller assembly, remove click pin and withdraw the clevis pin... the roller assembly so that the rollers are not designed to carry the weight of the deck. Deck Rear Roller Adjustment (If Equipped) The rear rollers on a smooth, flat surface, move the deck to the desired cutting height, and check the height of the rear rollers. NOTE: The...
...2. Align the nearest index bracket holes with the click pins. See Figure 6-7. Place the tractor on the mower deck are approximately 1⁄4" to 1⁄2" above the ground when the deck is moved to the desired cutting height. While supporting the roller assembly, remove click pin and withdraw the clevis pin... the roller assembly so that the rollers are not designed to carry the weight of the deck. Deck Rear Roller Adjustment (If Equipped) The rear rollers on a smooth, flat surface, move the deck to the desired cutting height, and check the height of the rear rollers. NOTE: The...


