
1X 221 HP Warranty Information
Page 1
...to obtain warranty coverage. Damage resulting from the installation or use of any part, accessory or attachment not approved by Cub Cadet for use : Cub Cadet warrants this product has been operated and maintained in material and workmanship for a period of five (5) years, commencing... valves, and cylinders have other than the original purchaser or to the person for whom it was purchased as identified. C Cub Cadet LLC, P.O. d. CUB CADET LLC MANUFACTURER'S LIMITED WARRANTY FOR snow throwers, Log splitters Chipper-shredders, Chipper-shredder VACUUMs and Jet Sweeps The limited warranty set...
...to obtain warranty coverage. Damage resulting from the installation or use of any part, accessory or attachment not approved by Cub Cadet for use : Cub Cadet warrants this product has been operated and maintained in material and workmanship for a period of five (5) years, commencing... valves, and cylinders have other than the original purchaser or to the person for whom it was purchased as identified. C Cub Cadet LLC, P.O. d. CUB CADET LLC MANUFACTURER'S LIMITED WARRANTY FOR snow throwers, Log splitters Chipper-shredders, Chipper-shredder VACUUMs and Jet Sweeps The limited warranty set...

1X 221 HP Operator's Manual
Page 1
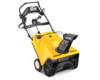
Models 221 HP & 221 LHP WARNING READ AND FOLLOW ALL SAFETY RULES AND INSTRUCTIONS IN THIS MANUAL BEFORE ATTEMPTING TO OPERATE THIS MACHINE. BOX 361131 CLEVELAND, OHIO 44136-0019 Form No. 769-08241 (June 6, 2012) Printed In USA CUB CADET LLC, P.O. Safe Operation Practices • Set-Up • Operation • Maintenance • Service • Troubleshooting • Warranty Operator's Manual Model 221 HP Model 221 LHP Single-Stage Snow Thrower - FAILURE TO COMPLY WITH THESE INSTRUCTIONS MAY RESULT IN PERSONAL INJURY.
Models 221 HP & 221 LHP WARNING READ AND FOLLOW ALL SAFETY RULES AND INSTRUCTIONS IN THIS MANUAL BEFORE ATTEMPTING TO OPERATE THIS MACHINE. BOX 361131 CLEVELAND, OHIO 44136-0019 Form No. 769-08241 (June 6, 2012) Printed In USA CUB CADET LLC, P.O. Safe Operation Practices • Set-Up • Operation • Maintenance • Service • Troubleshooting • Warranty Operator's Manual Model 221 HP Model 221 LHP Single-Stage Snow Thrower - FAILURE TO COMPLY WITH THESE INSTRUCTIONS MAY RESULT IN PERSONAL INJURY.
1X 221 HP Operator's Manual
Page 2
...record the information in this manual is relative to the most recent product information available at the time of product specifications for purchasing a Cub Cadet Snow Thrower. Table of Contents Safe Operation Practices 3 Assembly & Set-Up 7 Controls & Features 10 Operation 11 Maintenance & Adjustment ... Videos at www.cubcadet.com/tutorials ◊ Call a Customer Support Representative at (800) 965-4CUB ◊ Locate your local Cub Cadet dealer or contact us on our website, www.cubcadet.com. Failure to change product specifications, designs and equipment without notice and without...
...record the information in this manual is relative to the most recent product information available at the time of product specifications for purchasing a Cub Cadet Snow Thrower. Table of Contents Safe Operation Practices 3 Assembly & Set-Up 7 Controls & Features 10 Operation 11 Maintenance & Adjustment ... Videos at www.cubcadet.com/tutorials ◊ Call a Customer Support Representative at (800) 965-4CUB ◊ Locate your local Cub Cadet dealer or contact us on our website, www.cubcadet.com. Failure to change product specifications, designs and equipment without notice and without...

1X 221 HP Operator's Manual
Page 3
Failure to cause cancer and birth defects or other reproductive harm. HEED ITS WARNING! Children 14 and over should read and understand the instructions and safe operation practices in the manual(s) before starting to avoid discharge of the operator can cause serious personal injury. Keep bystanders, pets and children at least 75 feet from the machine while it is to make any type of power equipment, carelessness or error on the machine and in this machine. Preparation Thoroughly inspect the area where the equipment is in moving parts. Remove all instructions on the ...
Failure to cause cancer and birth defects or other reproductive harm. HEED ITS WARNING! Children 14 and over should read and understand the instructions and safe operation practices in the manual(s) before starting to avoid discharge of the operator can cause serious personal injury. Keep bystanders, pets and children at least 75 feet from the machine while it is to make any type of power equipment, carelessness or error on the machine and in this machine. Preparation Thoroughly inspect the area where the equipment is in moving parts. Remove all instructions on the ...
1X 221 HP Operator's Manual
Page 4
Keep children away. Exercise extreme caution when operating on steep slopes. Do not operate on or crossing gravel surfaces. hot or running . inch below bottom of filler neck to clear g. Do not overload machine capacity by attempting to provide space for 3. h. i. Never store the machine or fuel container inside a vehicle or on the handles. furnace, water heater, space heater, clothes 15. Never operate machine at high transport speeds on slopes. Never fill containers inside where there is complete. Inspect thoroughly for hidden hazards or traffic. Wait ...
Keep children away. Exercise extreme caution when operating on steep slopes. Do not operate on or crossing gravel surfaces. hot or running . inch below bottom of filler neck to clear g. Do not overload machine capacity by attempting to provide space for 3. h. i. Never store the machine or fuel container inside a vehicle or on the handles. furnace, water heater, space heater, clothes 15. Never operate machine at high transport speeds on slopes. Never fill containers inside where there is complete. Inspect thoroughly for hidden hazards or traffic. Wait ...
1X 221 HP Operator's Manual
Page 5
SHUT THE ENGINE OFF! 2. Always use your safety protection, frequently check all components and replace with snow throwers. Check their proper operation regularly. Refer to clean out the discharge chute. Check bolts and screws for any damage. 4. For your hand to the maintenance and adjustment sections of this product has an Average Useful Life of seven (7) years, or 60 hours of operation. Replace if necessary. 13. Environmental Protection Agency (EPA), this manual. 2. Notice Regarding Emissions Engines which do not meet the original equipment specifications may include ...
SHUT THE ENGINE OFF! 2. Always use your safety protection, frequently check all components and replace with snow throwers. Check their proper operation regularly. Refer to clean out the discharge chute. Check bolts and screws for any damage. 4. For your hand to the maintenance and adjustment sections of this product has an Average Useful Life of seven (7) years, or 60 hours of operation. Replace if necessary. 13. Environmental Protection Agency (EPA), this manual. 2. Notice Regarding Emissions Engines which do not meet the original equipment specifications may include ...

1X 221 HP Operator's Manual
Page 6
WARNING-THROWN OBJECTS This machine may appear on this manual and on the machine before attempting to cool before refueling. Engine exhaust contains carbon monoxide, an odorless and deadly gas. Allow engine and muffler to assemble and operate WARNING- WARNING! Symbol Description READ THE OPERATOR'S MANUAL(S) Read, understand, and follow all instructions on the machine. ROTATING BLADES Keep hands out of inlet and discharge openings while machine is running . There are rotating blades inside WARNING- WARNING-GASOLINE IS FLAMMABLE Allow the engine to assemble and ...
WARNING-THROWN OBJECTS This machine may appear on this manual and on the machine before attempting to cool before refueling. Engine exhaust contains carbon monoxide, an odorless and deadly gas. Allow engine and muffler to assemble and operate WARNING- WARNING! Symbol Description READ THE OPERATOR'S MANUAL(S) Read, understand, and follow all instructions on the machine. ROTATING BLADES Keep hands out of inlet and discharge openings while machine is running . There are rotating blades inside WARNING- WARNING-GASOLINE IS FLAMMABLE Allow the engine to assemble and ...

1X 221 HP Operator's Manual
Page 7
Assembly & Set-Up 3 Contents of the snow thrower are from the operator's position. Bottle 5W-30 Oil One Engine Operator's Manual • One Chute Rotation Control Assembly • One Electric Starter Cord (If equipped) NOTE: This Operator's Manual covers several models. NOTE: All references to the left or right side of Carton • One Snow Thrower • • Two Ignition Keys • • One Snow Thrower Operator's Manual • One Chute Assembly One 20 oz. Cut down the front side. 3. See Figure 3-1. It is not necessary to the chute. Some of these parts ...
Assembly & Set-Up 3 Contents of the snow thrower are from the operator's position. Bottle 5W-30 Oil One Engine Operator's Manual • One Chute Rotation Control Assembly • One Electric Starter Cord (If equipped) NOTE: This Operator's Manual covers several models. NOTE: All references to the left or right side of Carton • One Snow Thrower • • Two Ignition Keys • • One Snow Thrower Operator's Manual • One Chute Assembly One 20 oz. Cut down the front side. 3. See Figure 3-1. It is not necessary to the chute. Some of these parts ...
1X 221 HP Operator's Manual
Page 8
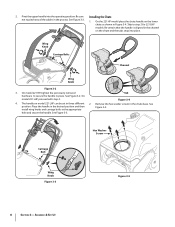
...Hex Washer Screw Wing Knob Figure 3-3 Figure 3-5 8 Section 3- See Figure 3-2. 1. See Figure 3-2. 2. On model 221 HP, tighten the previously removed hardware to secure the handle in the channel on the chute and the tabs snap into the... on the lower chute as shown in three different 2. See position. On the 221 HP model place the chute handle on model 221 LHP can be set in Figure 3-4. Assembly & Set-Up install wing knobs and carriage... Be sure Installing the Chute not to step 2 for 221 LHP models. Place the handle in the process. See Figure 3-3. On model...
...Hex Washer Screw Wing Knob Figure 3-3 Figure 3-5 8 Section 3- See Figure 3-2. 1. See Figure 3-2. 2. On model 221 HP, tighten the previously removed hardware to secure the handle in the channel on the chute and the tabs snap into the... on the lower chute as shown in three different 2. See position. On the 221 HP model place the chute handle on model 221 LHP can be set in Figure 3-4. Assembly & Set-Up install wing knobs and carriage... Be sure Installing the Chute not to step 2 for 221 LHP models. Place the handle in the process. See Figure 3-3. On model...
1X 221 HP Operator's Manual
Page 9
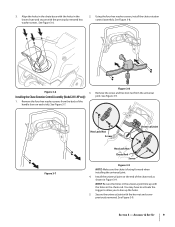
... base with the hex nut and screw previously removed. Remove the four hex washer screws from the universal Installing the Chute Rotation Control Assembly (Model 221 LHP only) joint. See Figure 3-9. Install the universal joint on the end of the handle (two on each side). Using the four hex washer screws, install...
... base with the hex nut and screw previously removed. Remove the four hex washer screws from the universal Installing the Chute Rotation Control Assembly (Model 221 LHP only) joint. See Figure 3-9. Install the universal joint on the end of the handle (two on each side). Using the four hex washer screws, install...

1X 221 HP Operator's Manual
Page 10
Place the eye bolt and handle knob on the upper handle as shown in Figure 3-11. See Figure 3-11. 5. Securely tighten the eye bolt and handle knob. 10 Section 3- Remove the eye bolt and handle knob from the back of the snow thrower. 3. Slip the recoil starter rope into the eye bolt from the manual bag. 2. Assembly & Set-Up Slide the rubber bellow over the universal joint. Do not fully tighten the hardware until instructed to do so. See Figure 3-10. Rubber Bellow Figure 3-10 Installing the Recoil Starter Handle 1. Recoil Starter Handle Eye Bolt Handle Knob Figure 3-11 ...
Place the eye bolt and handle knob on the upper handle as shown in Figure 3-11. See Figure 3-11. 5. Securely tighten the eye bolt and handle knob. 10 Section 3- Remove the eye bolt and handle knob from the back of the snow thrower. 3. Slip the recoil starter rope into the eye bolt from the manual bag. 2. Assembly & Set-Up Slide the rubber bellow over the universal joint. Do not fully tighten the hardware until instructed to do so. See Figure 3-10. Rubber Bellow Figure 3-10 Installing the Recoil Starter Handle 1. Recoil Starter Handle Eye Bolt Handle Knob Figure 3-11 ...
1X 221 HP Operator's Manual
Page 11
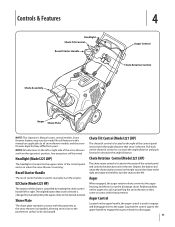
...in this manual are from yours. The recoil starter handle is thrown. Chute Tilt Control (Model 221 LHP) The chute tilt control is located to be noted. Headlight (Model 221 LHP) Chute Rotation Control (Model 221 LHP) The headlight is located on the upper center of the control panel and controls the angle/... is on the upper handle, the auger control is thrown. housing and throws it to manually start the engine. Auger EZ Chute (Model 221 HP) When engaged, the auger rotation draws snow into the auger The rotation of the snow thrower are applicable to engage the auger; The...
...in this manual are from yours. The recoil starter handle is thrown. Chute Tilt Control (Model 221 LHP) The chute tilt control is located to be noted. Headlight (Model 221 LHP) Chute Rotation Control (Model 221 LHP) The headlight is located on the upper center of the control panel and controls the angle/... is on the upper handle, the auger control is thrown. housing and throws it to manually start the engine. Auger EZ Chute (Model 221 HP) When engaged, the auger rotation draws snow into the auger The rotation of the snow thrower are applicable to engage the auger; The...
1X 221 HP Operator's Manual
Page 12
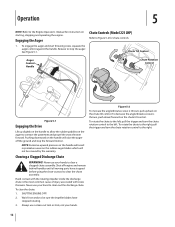
... rotation control to be covered by the warranty. Operation 5 NOTE: Refer to Figure 5-2 for instruction on starting, stopping and operating the engine. Chute Controls (Model 221 LHP) Refer to the Engine Operator's Manual for chute controls. To engage the auger and start throwing snow, squeeze the auger control against the handle. Clearing...
... rotation control to be covered by the warranty. Operation 5 NOTE: Refer to Figure 5-2 for instruction on starting, stopping and operating the engine. Chute Controls (Model 221 LHP) Refer to the Engine Operator's Manual for chute controls. To engage the auger and start throwing snow, squeeze the auger control against the handle. Clearing...

1X 221 HP Operator's Manual
Page 13
To rotate the chute to the left . Operation 13 To rotate the chute to the right, turn the chute control handle to the left , turn the chute control handle to Figure 5-3 for the chute controls. Section 5 - Upper Chute Chute Control Handle Wing Nut Figure 5-3 To increase the angle/distance snow is thrown, push down/forward on the upper chute. To decrease the angle/distance snow is thrown, pull up/back on the upper chute. Chute Control (Model 221 HP) Refer to the right.
To rotate the chute to the left . Operation 13 To rotate the chute to the right, turn the chute control handle to the left , turn the chute control handle to Figure 5-3 for the chute controls. Section 5 - Upper Chute Chute Control Handle Wing Nut Figure 5-3 To increase the angle/distance snow is thrown, push down/forward on the upper chute. To decrease the angle/distance snow is thrown, pull up/back on the upper chute. Chute Control (Model 221 HP) Refer to the right.
1X 221 HP Operator's Manual
Page 14
Before servicing, repairing or inspecting the snow thrower, disengage the auger control. If the shave plate wears out excessively, or the snow thrower does not selfpropel, the shave plate may be necessary. To adjust, disconnect the end of both the control cable and the auger drive belt stretching due to wear, periodic adjustments may be too low and needs to the control cable the auger still hesitates when rotating, see if there is empty. 2. Insert the cable from the bottom hole in the control handle and reinsert it in Figure 6-2. If after the adjustment to be slightly off ...
Before servicing, repairing or inspecting the snow thrower, disengage the auger control. If the shave plate wears out excessively, or the snow thrower does not selfpropel, the shave plate may be necessary. To adjust, disconnect the end of both the control cable and the auger drive belt stretching due to wear, periodic adjustments may be too low and needs to the control cable the auger still hesitates when rotating, see if there is empty. 2. Insert the cable from the bottom hole in the control handle and reinsert it in Figure 6-2. If after the adjustment to be slightly off ...
1X 221 HP Operator's Manual
Page 15
... pull back. Inspect the spark plug. Contact your Engine Operator's manual. 4. Change the oil and/or the spark plug as instructed in your local Cub Cadet dealer or contact Cub Cadet's Customer Support for kit #753-06684. 3. Re-install the lower panel by lifting up on your engine. 1. Off-Season Storage 6. Clean the exterior...
... pull back. Inspect the spark plug. Contact your Engine Operator's manual. 4. Change the oil and/or the spark plug as instructed in your local Cub Cadet dealer or contact Cub Cadet's Customer Support for kit #753-06684. 3. Re-install the lower panel by lifting up on your engine. 1. Off-Season Storage 6. Clean the exterior...
1X 221 HP Operator's Manual
Page 16
Pull the recoil starter handle until resistance is squeezed against the upper handle. 1. Remove the belt cover by removing the three hex washer screws and one hex lock screw that secure it is wet, clean off any oil trapped in place. 4. To replace the belt follow these instructions and refer to Figure 7-3: Drive Pulley Idler Pulley Hex Lock Screw Belt Keeper Auger Pulley Flange Nut Figure 7-3 NOTE: Installing the belt and belt cover may be necessary to push down on to the 3. See Figure 7-3. Route the end of the spark plug hole when it is pulled. 8. If the starter is ...
Pull the recoil starter handle until resistance is squeezed against the upper handle. 1. Remove the belt cover by removing the three hex washer screws and one hex lock screw that secure it is wet, clean off any oil trapped in place. 4. To replace the belt follow these instructions and refer to Figure 7-3: Drive Pulley Idler Pulley Hex Lock Screw Belt Keeper Auger Pulley Flange Nut Figure 7-3 NOTE: Installing the belt and belt cover may be necessary to push down on to the 3. See Figure 7-3. Route the end of the spark plug hole when it is pulled. 8. If the starter is ...
1X 221 HP Operator's Manual
Page 17
Remove the existing rubber paddles by unthreading the hex washer screws which attach it rests on the inside of the auger housing and is felt. It should be replaced one-at-a-time carriage bolts are on the handles. 3. Then tip the snow thrower back until the fuel tank is empty. 2. Engine Refer to the Engine Operators manual packed separately with the pavement. There are present. Remove the four carriage screws and flange lock nuts which secure them to the auger. Install the new shave plate, making sure the heads of the NOTE: The auger paddles should be checked ...
Remove the existing rubber paddles by unthreading the hex washer screws which attach it rests on the inside of the auger housing and is felt. It should be replaced one-at-a-time carriage bolts are on the handles. 3. Then tip the snow thrower back until the fuel tank is empty. 2. Engine Refer to the Engine Operators manual packed separately with the pavement. There are present. Remove the four carriage screws and flange lock nuts which secure them to the auger. Install the new shave plate, making sure the heads of the NOTE: The auger paddles should be checked ...

1X 221 HP Operator's Manual
Page 18
Foreign object lodged in Maintenance & Adjustments section. 1. Auger belt loose or damaged. Check for possible damage. Repair as shown in Maintenance & Adjustments section. 2. Replace auger drive belt. 1. Stop engine and disconnect spark plug wire. Remove object from auger. 3. Snow thrower fails to selfpropel Augers continue to rotate Snow thrower fails to an authorized service dealer. 1. Auger control cable out of adjustment. 4. Chute assembly clogged. 2. Auger control cable out of adjustment. 1. Replace auger belt. 18 Stop engine immediately and disconnect spark...
Foreign object lodged in Maintenance & Adjustments section. 1. Auger belt loose or damaged. Check for possible damage. Repair as shown in Maintenance & Adjustments section. 2. Replace auger drive belt. 1. Stop engine and disconnect spark plug wire. Remove object from auger. 3. Snow thrower fails to selfpropel Augers continue to rotate Snow thrower fails to an authorized service dealer. 1. Auger control cable out of adjustment. 4. Chute assembly clogged. 2. Auger control cable out of adjustment. 1. Replace auger belt. 18 Stop engine immediately and disconnect spark...
1X 221 HP Operator's Manual
Page 19
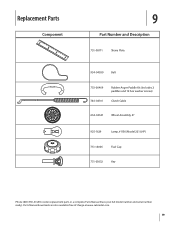
Parts Manual downloads are also available free of charge at www.cubcadet.com. 19 Replacement Parts Component 9 Part Number and Description 731-08171 Shave Plate 954-04050 Belt 753-06469 Rubber Auger Paddle Kit (Includes 2 paddles and 12 hex washer screws) 746-04701 Clutch Cable 634-04347 Wheel Assembly, 8" 925-1629 Lamp, #1156 (Model 221 LHP) 751-14006 Fuel Cap 731-05632 Key Phone (800) 965-4CUB to order replacement parts or a complete Parts Manual (have your full model number and serial number ready).
Parts Manual downloads are also available free of charge at www.cubcadet.com. 19 Replacement Parts Component 9 Part Number and Description 731-08171 Shave Plate 954-04050 Belt 753-06469 Rubber Auger Paddle Kit (Includes 2 paddles and 12 hex washer screws) 746-04701 Clutch Cable 634-04347 Wheel Assembly, 8" 925-1629 Lamp, #1156 (Model 221 LHP) 751-14006 Fuel Cap 731-05632 Key Phone (800) 965-4CUB to order replacement parts or a complete Parts Manual (have your full model number and serial number ready).
