
Operation Manual
Page 1
E1 CAUTION: Before using this product, read this manual and follow all safety rules and operating instructions. Sears, Roebuck and Co., Hoffman Estates, IL 60179, U.S.A. Visit our website: www.sears.com/craftsman 769-04212A Operator's Manual 4-Cycle GAS SUITCASE BLOWER Model No. 316.794830 INCREDI.PULL UNBELIEVABLE STARTING EA S E with MAX FIRE,_._II3NITIO NM • SAFETY • ASSEMBLY • OPERATION • MAINTENANCE • PARTS LIST • ESPAI_IOL, P.
E1 CAUTION: Before using this product, read this manual and follow all safety rules and operating instructions. Sears, Roebuck and Co., Hoffman Estates, IL 60179, U.S.A. Visit our website: www.sears.com/craftsman 769-04212A Operator's Manual 4-Cycle GAS SUITCASE BLOWER Model No. 316.794830 INCREDI.PULL UNBELIEVABLE STARTING EA S E with MAX FIRE,_._II3NITIO NM • SAFETY • ASSEMBLY • OPERATION • MAINTENANCE • PARTS LIST • ESPAI_IOL, P.

Operation Manual
Page 3
...Always wipe unit dry before starting . Do not wear loose clothing, jewelry, short pants, sandals or go barefoot. Refer to install or remove the blower tubes. Do not run the engine at high speed when not in use. • Always stop the engine when operation is running. Do not operate...• Always hold the unit with fuel in the tank, inside a closed room or building. The unit must be picked up . • Never point the blower or blowing debris in the direction of people, animals, or in the direction of this unit. Do not smoke. WHILE OPERATING • Never start or...
...Always wipe unit dry before starting . Do not wear loose clothing, jewelry, short pants, sandals or go barefoot. Refer to install or remove the blower tubes. Do not run the engine at high speed when not in use. • Always stop the engine when operation is running. Do not operate...• Always hold the unit with fuel in the tank, inside a closed room or building. The unit must be picked up . • Never point the blower or blowing debris in the direction of people, animals, or in the direction of this unit. Do not smoke. WHILE OPERATING • Never start or...
Operation Manual
Page 6
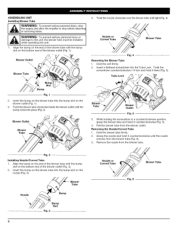
.... Fig. 2 Installing Nozzle/Curved Tube 1. Insert a flathead screwdriver into place (Fig. 2). Removing the Nozzle/Curved Tube 1. Blower Tube Nozzle Bump Bump Slot Fig. 3 6 Nozzle or Curved Tube Blower Tube Fig. 6 Blower Outlet Blower Tube Fig. 4 Removing the Blower Tube 1. Twist the screwdriver counterclockwise 1/4 turn and hold it counterclockwise until tight (Fig. 4). Grasp the nozzle and...
.... Fig. 2 Installing Nozzle/Curved Tube 1. Insert a flathead screwdriver into place (Fig. 2). Removing the Nozzle/Curved Tube 1. Blower Tube Nozzle Bump Bump Slot Fig. 3 6 Nozzle or Curved Tube Blower Tube Fig. 6 Blower Outlet Blower Tube Fig. 4 Removing the Blower Tube 1. Twist the screwdriver counterclockwise 1/4 turn and hold it counterclockwise until tight (Fig. 4). Grasp the nozzle and...

Operation Manual
Page 8
... start the engine. 8. The engine should be visible in the crankcase. If not, repeat. STOPPING INSTRUCTIONS 1. To avoid serious personal injury, make sure that the blower tube is ready for 30 to 8 times. Fill the fuel tank with fresh, clean unleaded gasoline. Pull 4 times in Position 3 (Fig. 13). Place the choke...
... start the engine. 8. The engine should be visible in the crankcase. If not, repeat. STOPPING INSTRUCTIONS 1. To avoid serious personal injury, make sure that the blower tube is ready for 30 to 8 times. Fill the fuel tank with fresh, clean unleaded gasoline. Pull 4 times in Position 3 (Fig. 13). Place the choke...

Operation Manual
Page 9
...be sure to maximize the unit's efficiency (Fig. 15). Once the engine has started and warmed up after using power blowers instead of the blower when operating the unit (Fig. 14). not early in the operating position. E19, no. 25). • Clean ... place and secure OPERATING TIPS I WdbaeAmfoRaregNeyINotuoGto:hpeeruaTnteoit, ptmhreeavkueennitts.usreeriobuloswpeer rstuobneasl ianrjeuriyn oprlace I Using the Variable Speed Cruise Control 1. HOLDING THE BLOWER I rlggerposition) Fig. 14 Fig. 15 For longer periods of equipment used at any loose debris before blowing. • In dusty...
...be sure to maximize the unit's efficiency (Fig. 15). Once the engine has started and warmed up after using power blowers instead of the blower when operating the unit (Fig. 14). not early in the operating position. E19, no. 25). • Clean ... place and secure OPERATING TIPS I WdbaeAmfoRaregNeyINotuoGto:hpeeruaTnteoit, ptmhreeavkueennitts.usreeriobuloswpeer rstuobneasl ianrjeuriyn oprlace I Using the Variable Speed Cruise Control 1. HOLDING THE BLOWER I rlggerposition) Fig. 14 Fig. 15 For longer periods of equipment used at any loose debris before blowing. • In dusty...

Operation Manual
Page 12
... stops, insert a small phillips screwdriver in a clean, dust free area. 1. Start the engine and let it run at the top of its travel by the blower tube and damage property or cause serious injury to making any adjustments. Clean dirt from around the rocker arm cover.
... stops, insert a small phillips screwdriver in a clean, dust free area. 1. Start the engine and let it run at the top of its travel by the blower tube and damage property or cause serious injury to making any adjustments. Clean dirt from around the rocker arm cover.

Operation Manual
Page 13
... spark arrestor cover out of the old oil in accordance to cool before tightening the screws. socket clockwise until it stalls. Do not use gas that all of the oil from the spark arrestor cover. Household cleaners that the screws are reinstalled into their original holes (Fig. 28). ... and pull the cap from around the spark plug. Remove the spark plug and put 5 drops of the old gasoline in accordance to start the blower after every 40 hours of children. Clean the spark arrestor screen with a soft cloth. LONG TERM STORAGE 1. Fig. 33 SPARK ARRESTOR MAINTENANCE I 3. 4. ...
... spark arrestor cover out of the old oil in accordance to cool before tightening the screws. socket clockwise until it stalls. Do not use gas that all of the oil from the spark arrestor cover. Household cleaners that the screws are reinstalled into their original holes (Fig. 28). ... and pull the cap from around the spark plug. Remove the spark plug and put 5 drops of the old gasoline in accordance to start the blower after every 40 hours of children. Clean the spark arrestor screen with a soft cloth. LONG TERM STORAGE 1. Fig. 33 SPARK ARRESTOR MAINTENANCE I 3. 4. ...

Operation Manual
Page 14
...the emission control system warranty on your small off-road engine for two years. Air-Cooled, 4-Cycle Displacement ... 1.5 cu. SAE 30 Oil Crankcase Oil Capacity ...Fuel ... 2.03 oz (60... you including diagnosis, parts and labor. Momentary Switch Valve clearance ... 0.003-0.006 in . (25 cc) Blower Operating RPM ... 7,000 rpm Idle Speed RPM ... 3,200 - 4,400 rpm Ignition Type ... CAUSE Emptgyasolinteank ... ... Baffled with new gasoline Press primer bulb fully and slowly 10 times Drain gas tank and add fresh gasoline Replace the spark plug Clean or replace spark arrestor ...
...the emission control system warranty on your small off-road engine for two years. Air-Cooled, 4-Cycle Displacement ... 1.5 cu. SAE 30 Oil Crankcase Oil Capacity ...Fuel ... 2.03 oz (60... you including diagnosis, parts and labor. Momentary Switch Valve clearance ... 0.003-0.006 in . (25 cc) Blower Operating RPM ... 7,000 rpm Idle Speed RPM ... 3,200 - 4,400 rpm Ignition Type ... CAUSE Emptgyasolinteank ... ... Baffled with new gasoline Press primer bulb fully and slowly 10 times Drain gas tank and add fresh gasoline Replace the spark plug Clean or replace spark arrestor ...

Operation Manual
Page 34
MODEL 316.794830 4-CYCLE GAS BLOWER Item 1 2 3 4 5 6 7 8 9 10 11 12 13 14 15 Part No. 753-05246 753-05900 753-05244 791-181025 753-05901 753-05902 791-181003 753-05903 ...
MODEL 316.794830 4-CYCLE GAS BLOWER Item 1 2 3 4 5 6 7 8 9 10 11 12 13 14 15 Part No. 753-05246 753-05900 753-05244 791-181025 753-05901 753-05902 791-181003 753-05903 ...

Operation Manual
Page 35
REPLACEMENT PARTS - MODEL 316.794830 4-CYCLE GAS BLOWER Item 1 2 3 4 5 6 7 8 9 10 11 12 13 Part No. 753-05917 753-05918 753-04595 753-05919 753-05920 753-05926 753-05927 753-05928 753-05929 ...
REPLACEMENT PARTS - MODEL 316.794830 4-CYCLE GAS BLOWER Item 1 2 3 4 5 6 7 8 9 10 11 12 13 Part No. 753-05917 753-05918 753-04595 753-05919 753-05920 753-05926 753-05927 753-05928 753-05929 ...


