

Operation Manual
Page 1
Operator's Manual ® 4-Cycle WEEDWACKER® GAS TRIMMER Model No. 316.791940 INCREDI.PULL TM RNGEL/EVABLS STARTING EA SE with MAXFIRE@IGNITION _ CAUTION: Before using this product, read this manual and follow all safety rules and operating instructions. • SAFETY • ASSEMBLY • OPERATION • MAINTENANCE • PARTS LIST • ESPANOL, R E1 Sears, Roebuck and Co., Hoffman Estates, IL 60179, U.S.A. Visit our website" www.sears.com/craftsman 769-03539A
Operator's Manual ® 4-Cycle WEEDWACKER® GAS TRIMMER Model No. 316.791940 INCREDI.PULL TM RNGEL/EVABLS STARTING EA SE with MAXFIRE@IGNITION _ CAUTION: Before using this product, read this manual and follow all safety rules and operating instructions. • SAFETY • ASSEMBLY • OPERATION • MAINTENANCE • PARTS LIST • ESPANOL, R E1 Sears, Roebuck and Co., Hoffman Estates, IL 60179, U.S.A. Visit our website" www.sears.com/craftsman 769-03539A
Operation Manual
Page 2
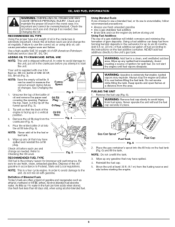
... for regulations pertaining to others . Make sure all warnings and safety instructions. ISYMBOL MEANING A SAFETY ALERT: Indicates danger, warning or caution. FUEL SAFETY WARNINGS FOR GAS UNITS • Read the instructions carefully. Forest Land and in place.
... for regulations pertaining to others . Make sure all warnings and safety instructions. ISYMBOL MEANING A SAFETY ALERT: Indicates danger, warning or caution. FUEL SAFETY WARNINGS FOR GAS UNITS • Read the instructions carefully. Forest Land and in place.
Operation Manual
Page 3
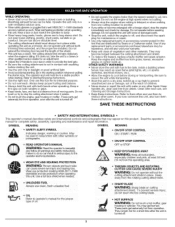
...SAFETY AND INTERNATIONAL SYMBOLS • This operator's manual describes safety and international symbols and pictographs that are marked as a trimmer. Failure to do not touch the line cutting blade. • HOT SURFACE WARNING: Do not touch a hot muffler,...not overreach. Breathinegxhausfut mescanbefatal.Operattehisunitonlyina well-ventilatoeudtdooarrea. • WeasrafetgylasseosrgogglethsatmeeAt NSZI87.1-1989 standards and are distributed by Sears or a Craftsman outlet. The operator and unit must always be hazardous, and will also void your warranty. • Keep unit ...
...SAFETY AND INTERNATIONAL SYMBOLS • This operator's manual describes safety and international symbols and pictographs that are marked as a trimmer. Failure to do not touch the line cutting blade. • HOT SURFACE WARNING: Do not touch a hot muffler,...not overreach. Breathinegxhausfut mescanbefatal.Operattehisunitonlyina well-ventilatoeudtdooarrea. • WeasrafetgylasseosrgogglethsatmeeAt NSZI87.1-1989 standards and are distributed by Sears or a Craftsman outlet. The operator and unit must always be hazardous, and will also void your warranty. • Keep unit ...
Operation Manual
Page 4
Your new Craftsman® product is a risk-free purchase. Here's what the Repair Protection Agreement* includes: [] Expert service by our 10,000 professional repair specialists [] Unlimited service and ...
Your new Craftsman® product is a risk-free purchase. Here's what the Repair Protection Agreement* includes: [] Expert service by our 10,000 professional repair specialists [] Unlimited service and ...
Operation Manual
Page 5
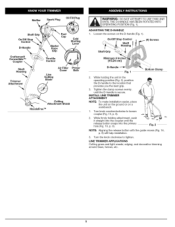
...p. 8) will help installation. 3. Muffler Spark Plug Oil Fill Plug Shaft Grip On/Off Sto Control D-Handle Craftsman® Convertible TM Coupler Shaft Housing Trimmer Attachment Fuel Cap Starter Rope Grip Cold Starting Lever Throttle Control Line Cutting Blade Air Filter Primer Cover Bulb _Att ... position (Fig. 2), position the D-handle to the location that provides you the best grip. 3. edging; LINE TRIMMER APPLICATIONS Cutting grass and light weeds; INSTALL LINE TRIMMER ATTACHMENT NOTE: To make installation easier, place the unit on the ground or on the D-handle (Fig. 1)....
...p. 8) will help installation. 3. Muffler Spark Plug Oil Fill Plug Shaft Grip On/Off Sto Control D-Handle Craftsman® Convertible TM Coupler Shaft Housing Trimmer Attachment Fuel Cap Starter Rope Grip Cold Starting Lever Throttle Control Line Cutting Blade Air Filter Primer Cover Bulb _Att ... position (Fig. 2), position the D-handle to the location that provides you the best grip. 3. edging; LINE TRIMMER APPLICATIONS Cutting grass and light weeds; INSTALL LINE TRIMMER ATTACHMENT NOTE: To make installation easier, place the unit on the ground or on the D-handle (Fig. 1)....
Operation Manual
Page 6
... the tank. WARNING: Gasoline is shipped without oil. Ignited vapors may have spilled and reinstall the oil fill plug. epmNlaeocvveee.r foupeel rcaatep sthloewulynittowiathvoouidt inthjueryfuel Gas Can Spout Fuel Tank Fig. 6 Fuel Cap 2. Reinstall the fuel cap. 5. Next, cut the tip off the funnel spout (Fig. 3). ...as ethanol, methanol or MTBE (ether). NEVER add fuel additives directly to use a blended fuel, or its use is a four cycle engine. It can cause premature engine wear and failure. Using Blended Fuels If you attempt to use fresh unleaded gasoline • Use...
... the tank. WARNING: Gasoline is shipped without oil. Ignited vapors may have spilled and reinstall the oil fill plug. epmNlaeocvveee.r foupeel rcaatep sthloewulynittowiathvoouidt inthjueryfuel Gas Can Spout Fuel Tank Fig. 6 Fuel Cap 2. Reinstall the fuel cap. 5. Next, cut the tip off the funnel spout (Fig. 3). ...as ethanol, methanol or MTBE (ether). NEVER add fuel additives directly to use a blended fuel, or its use is a four cycle engine. It can cause premature engine wear and failure. Using Blended Fuels If you attempt to use fresh unleaded gasoline • Use...
Operation Manual
Page 7
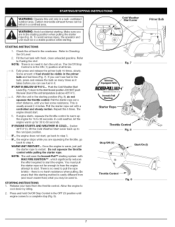
ChectkheoilleveilnthecrankcaseR.efetroChecking the Oil Level. 2. With the unit in the ON ( I ) position at all times. 3. The engine should be used to. In cold weather, let the engine warm up for 15 to the run/open position. ........IF... Once the engine is above 40°F/4°C. STOPPING INSTRUCTIONS 1. Allow the engine to step 3. .........I ) Throttle Control Fig. 9 STARTINIGNSTRUCTIONS 1. Fill the fuel tank with a controlled and steady motion. IF UNIT IS BELOW 40°F/4°0... Pull the starter rope out with fresh, clean unleaded gasoline. the ...
ChectkheoilleveilnthecrankcaseR.efetroChecking the Oil Level. 2. With the unit in the ON ( I ) position at all times. 3. The engine should be used to. In cold weather, let the engine warm up for 15 to the run/open position. ........IF... Once the engine is above 40°F/4°C. STOPPING INSTRUCTIONS 1. Allow the engine to step 3. .........I ) Throttle Control Fig. 9 STARTINIGNSTRUCTIONS 1. Fill the fuel tank with a controlled and steady motion. IF UNIT IS BELOW 40°F/4°0... Pull the starter rope out with fresh, clean unleaded gasoline. the ...
Operation Manual
Page 8
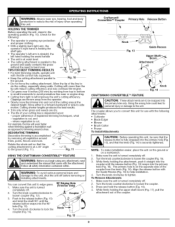
...do the cutting, especially along walls. Rotate the whole unit so that came with more . Fig. 11 USING THE CRAFTSMAN@ CONVERTIBLE TM FEATURE I WpthrioAsutRencNitt.IioNtnoGAr:elwduacytewsheeraiser kyoef,hinejuarrywinhgfoe,onotapnedrbaotidnyg HOLDINTGHETRIMMER Beforeoperatinthgeunit,standinthe operatinpgositio(nFig1. 0)C. NOTE: To make installation ... Turn the knob counterclockwise to lock the coupler (Fig. 14). 90 ° Edging Hole (Trimmer ®hi Knob Fig. 12 Craftsman® Convertible TM Coupler Primary Hole Release Button Knob Fig. 13 Guide Recess Upper _n _oom Attachment...
...do the cutting, especially along walls. Rotate the whole unit so that came with more . Fig. 11 USING THE CRAFTSMAN@ CONVERTIBLE TM FEATURE I WpthrioAsutRencNitt.IioNtnoGAr:elwduacytewsheeraiser kyoef,hinejuarrywinhgfoe,onotapnedrbaotidnyg HOLDINTGHETRIMMER Beforeoperatinthgeunit,standinthe operatinpgositio(nFig1. 0)C. NOTE: To make installation ... Turn the knob counterclockwise to lock the coupler (Fig. 14). 90 ° Edging Hole (Trimmer ®hi Knob Fig. 12 Craftsman® Convertible TM Coupler Primary Hole Release Button Knob Fig. 13 Guide Recess Upper _n _oom Attachment...

Operation Manual
Page 9
... head (Fig. 16). 5. Reinstall line glide plate (Fig. 15). Fig. 15 in need of acceleration, this inspection, refer service to serous persona n ury Always use Craftsman® Hassle-Free TM XTRA QUIET Spiral Line. These procedures should also be reinstalled inserting new line. LINEREPLACEMENT for cutting larger weeds and light brush...
... head (Fig. 16). 5. Reinstall line glide plate (Fig. 15). Fig. 15 in need of acceleration, this inspection, refer service to serous persona n ury Always use Craftsman® Hassle-Free TM XTRA QUIET Spiral Line. These procedures should also be reinstalled inserting new line. LINEREPLACEMENT for cutting larger weeds and light brush...

Operation Manual
Page 10
... position (Fig. 21). Remove the oil fill plug. 3. If the oil level is still warm. Max Oil Fill Line / Fig. 19 Fig. 20 \\ Fill Level L 4-Cycle Motor Oil Fig. 22 6. Dispose of oil to prevent accidental starting. 2.
... position (Fig. 21). Remove the oil fill plug. 3. If the oil level is still warm. Max Oil Fill Line / Fig. 19 Fig. 20 \\ Fill Level L 4-Cycle Motor Oil Fig. 22 6. Dispose of oil to prevent accidental starting. 2.

Operation Manual
Page 11
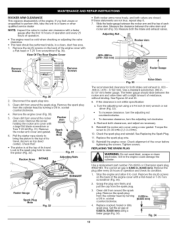
Wash the filter in the slot on acceleration • there is an important item to the operation of the unit. f Fig. 24 Fig. 25 7. Position the Back Plate slots on the under side of adjustment idle. An idle adjustment screw is often mistaken for a minute to warm up . (Fig. 23). Fig. 29 Drain and refill the tank with fresh fuel prior to your engine. 1. This is between the Air Filter Cover and the Engine Cover (Fig. 29). Turn the idle speed screw in, clockwise, 1/8 of a turn at the top of the air filter is usually the reason for { improper unit performance. ...
Wash the filter in the slot on acceleration • there is an important item to the operation of the unit. f Fig. 24 Fig. 25 7. Position the Back Plate slots on the under side of adjustment idle. An idle adjustment screw is often mistaken for a minute to warm up . (Fig. 23). Fig. 29 Drain and refill the tank with fresh fuel prior to your engine. 1. This is between the Air Filter Cover and the Engine Cover (Fig. 29). Turn the idle speed screw in, clockwise, 1/8 of a turn at the top of the air filter is usually the reason for { improper unit performance. ...
Operation Manual
Page 12
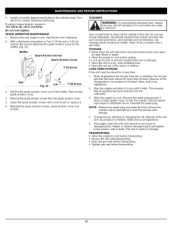
If these statements are closed. Slide the feeler gauge between the valve stem and rocker arm (Fig. 33). Disconnect the spark plug wire. 3. Remove the spark plug from around the spark plug. Remove the screw holding the rocker arm cover with a slight amount of operation and check its travel . Look in the spark plug hole to 20-30 in a clean, dust free area. 1. Turn the adjusting nut using a new gasket. Reinstall the rocker arm cover using a 5/16 inch (8 mm) wrench or nut driver (Fig. 33). • To increase clearance, turn the adjusting nut counterclockwise. • To decrease...
If these statements are closed. Slide the feeler gauge between the valve stem and rocker arm (Fig. 33). Disconnect the spark plug wire. 3. Remove the spark plug from around the spark plug. Remove the screw holding the rocker arm cover with a slight amount of operation and check its travel . Look in the spark plug hole to 20-30 in a clean, dust free area. 1. Turn the adjusting nut using a new gasket. Reinstall the rocker arm cover using a 5/16 inch (8 mm) wrench or nut driver (Fig. 33). • To increase clearance, turn the adjusting nut counterclockwise. • To decrease...
Operation Manual
Page 13
...cylinder before you clean _1 or AseRrNviIcNeG:it . 6. Pull the the spark arrestor cover out of the old gasoline in accordance to start the trimmer after storage. 4. Reinstall the spark arrestor screen, spark arrestor cover and screws. Remove the spark plug and put 5 drops of the old oil... in accordance to run until snug. Household cleaners that all gasoline has been drained from the gas tank into the cylinder. Drain all of children. Dispose of high quality motor oil into a container. Allow the engine to distribute the oil....
...cylinder before you clean _1 or AseRrNviIcNeG:it . 6. Pull the the spark arrestor cover out of the old gasoline in accordance to start the trimmer after storage. 4. Reinstall the spark arrestor screen, spark arrestor cover and screws. Remove the spark plug and put 5 drops of the old oil... in accordance to run until snug. Household cleaners that all gasoline has been drained from the gas tank into the cylinder. Drain all of children. Dispose of high quality motor oil into a container. Allow the engine to distribute the oil....
Operation Manual
Page 14
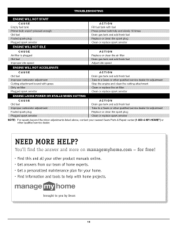
...plugged Improper idle speed CAUSE Old fuel ACTION Fill fuel tank with fuel Drain gas tank and add fresh fuel Clean or replace spark arrestor ACTION Replace or clean the air filter Adjust idle speed ACTION Drain gas tank and add fresh fuel Plugged spark arrestor Clean or replace spark arrestor ...CAUSE Old fuel ACTION Drain gas tank and add fresh fuel Fouled spark plug Replace or clean the spark plug NOTE: For...
...plugged Improper idle speed CAUSE Old fuel ACTION Fill fuel tank with fuel Drain gas tank and add fresh fuel Clean or replace spark arrestor ACTION Replace or clean the air filter Adjust idle speed ACTION Drain gas tank and add fresh fuel Plugged spark arrestor Clean or replace spark arrestor ...CAUSE Old fuel ACTION Drain gas tank and add fresh fuel Fouled spark plug Replace or clean the spark plug NOTE: For...
Operation Manual
Page 15
Steel Tube (Craftsman® Convertible TM) Throttle Control ... Your emission control system may include parts such as required maintenance will be warranted for the period of attachment or ...
Steel Tube (Craftsman® Convertible TM) Throttle Control ... Your emission control system may include parts such as required maintenance will be warranted for the period of attachment or ...

Operation Manual
Page 16
Any replacement part that describe the warranty procedures or policies within five working days of request by the Air Resources Board. (1) Fuel Tank Written instructions for the maintenance engine or equipment. Emission Warranty Parts List: The following components are additionally included if your small off road engine is less than or equal to 80 cc, only the fuel tank is delivered to an ultimate purchaser. (b) General Evaporative Emissions Warranty Coverage. CALIFORNIA EVAPORATIVE EMISSION CONTROL WARRANTY STATEMENT Your Warranty Rights and Obligations The California Air Resources ...
Any replacement part that describe the warranty procedures or policies within five working days of request by the Air Resources Board. (1) Fuel Tank Written instructions for the maintenance engine or equipment. Emission Warranty Parts List: The following components are additionally included if your small off road engine is less than or equal to 80 cc, only the fuel tank is delivered to an ultimate purchaser. (b) General Evaporative Emissions Warranty Coverage. CALIFORNIA EVAPORATIVE EMISSION CONTROL WARRANTY STATEMENT Your Warranty Rights and Obligations The California Air Resources ...

Operation Manual
Page 34
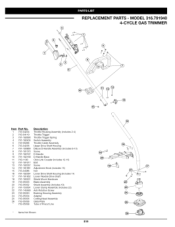
MODEL 316.791940 4-CYCLE GAS TRIMMER Item 1 2 3 4 5 6 7 8 9 10 11 12 13 14 15 16 17 18 19 20 21 22 23 24 25 26 27 28 29 Part No. 753-05206 ...
MODEL 316.791940 4-CYCLE GAS TRIMMER Item 1 2 3 4 5 6 7 8 9 10 11 12 13 14 15 16 17 18 19 20 21 22 23 24 25 26 27 28 29 Part No. 753-05206 ...
Operation Manual
Page 35
MODEL 316.791940 4-CYCLE GAS TRIMMER Item 1 2 3 4 5 6 7 8 9 10 11 12 13 14 15 16 17 18 19 20 21 22 23 24 25 26 Pa_ No. 753-04234 753-04119 791-...
MODEL 316.791940 4-CYCLE GAS TRIMMER Item 1 2 3 4 5 6 7 8 9 10 11 12 13 14 15 16 17 18 19 20 21 22 23 24 25 26 Pa_ No. 753-04234 753-04119 791-...

Operation Manual
Page 36
For Sears professional installation of home appliances and items like vacuums, lawn equipment, and electronics, call anytime for the location of your home- and Canada) www.sears.com www.sears.ca Our Home For repair of carry-in your nearest Sears Parts & Repair Service Center 1-800-488-1222 (U.S.A.) 1-800-469-4663 (Canada) www.sears.com www.sears.ca To purchase a protection agreement on a product serviced by Sears: 1-800-827-6655 (U.S.A.) 1-800-361-6665 (Canada) Para pedir servicio de reparacion a domicilio, y para ordenar piezas: 1-888-SU-HOGAR ® (1-888-784-6427) Au ...
For Sears professional installation of home appliances and items like vacuums, lawn equipment, and electronics, call anytime for the location of your home- and Canada) www.sears.com www.sears.ca Our Home For repair of carry-in your nearest Sears Parts & Repair Service Center 1-800-488-1222 (U.S.A.) 1-800-469-4663 (Canada) www.sears.com www.sears.ca To purchase a protection agreement on a product serviced by Sears: 1-800-827-6655 (U.S.A.) 1-800-361-6665 (Canada) Para pedir servicio de reparacion a domicilio, y para ordenar piezas: 1-888-SU-HOGAR ® (1-888-784-6427) Au ...