

Operation Manual
Page 1
Operator's Manual 12-in. 18 Volt Weedwacker® Cordless Trimmer Model No. 172.74815 CHARGE BATTERY BEFORE FIRST USE CAUTION: Read, understand and follow all Safety Rules and Operating Instructions in this Manual before using this product. Sears, Roebuck and Co., Hoffman Estates, IL 60179 U.S.A Visit our Craftsman® website: www.craftsman.com • WARRANTY • SAFETY • ASSEMBLY • OPERATION • MAINTENANCE • PARTS LIST
Operator's Manual 12-in. 18 Volt Weedwacker® Cordless Trimmer Model No. 172.74815 CHARGE BATTERY BEFORE FIRST USE CAUTION: Read, understand and follow all Safety Rules and Operating Instructions in this Manual before using this product. Sears, Roebuck and Co., Hoffman Estates, IL 60179 U.S.A Visit our Craftsman® website: www.craftsman.com • WARRANTY • SAFETY • ASSEMBLY • OPERATION • MAINTENANCE • PARTS LIST

Operation Manual
Page 2
...Operation Pages Maintenance Pages Accessories Pages Parts List Pages 2 3 4- 10 11 12- 14 14- 20 20- 25 26 26- 27 28- 29 TWO YEAR FULL WARRANTY ON CRAFTSMAN WEEDWACKER _ CORDLESS TRIMMER If this warranty applies for only 90 days from the date of purchase. If...including all safety alert symbols such as cutting line, lamps, batteries, bits, blades, or bonnets. The instructions and warnings they give are no substitutes for commercial or rental purposes, this Craftsman product fails due to equipment or other Craftsman Outlets. DAMAGE PREVENTION AND INFORMATION MESSAGES These...
...Operation Pages Maintenance Pages Accessories Pages Parts List Pages 2 3 4- 10 11 12- 14 14- 20 20- 25 26 26- 27 28- 29 TWO YEAR FULL WARRANTY ON CRAFTSMAN WEEDWACKER _ CORDLESS TRIMMER If this warranty applies for only 90 days from the date of purchase. If...including all safety alert symbols such as cutting line, lamps, batteries, bits, blades, or bonnets. The instructions and warnings they give are no substitutes for commercial or rental purposes, this Craftsman product fails due to equipment or other Craftsman Outlets. DAMAGE PREVENTION AND INFORMATION MESSAGES These...

Operation Manual
Page 3
....BaEFnadSil/uoUrreREsteotroiofourlseloawdpeaarnslldoninuasnl tdreuirncsjttuiaornynd.s laisllteidnstbruelcotwionms ayberfeosruelt in unexpected situations. ALWAYS keep bystanders and visitors at fast speeds. Cutting line that may become a dangerous tool. DO NOT operate in personal injury or property damage. Keep your tools...balance enables better control of MODEL 71-74815 CHARGING STAND CGT 183UA-48 (C1817A005) BATTERY PACK CGT 183 UA-42 (WA3127) DO NOT use in this manual before using this cordless trimmer is recommended for appropriate conditions. 6. Any...
....BaEFnadSil/uoUrreREsteotroiofourlseloawdpeaarnslldoninuasnl tdreuirncsjttuiaornynd.s laisllteidnstbruelcotwionms ayberfeosruelt in unexpected situations. ALWAYS keep bystanders and visitors at fast speeds. Cutting line that may become a dangerous tool. DO NOT operate in personal injury or property damage. Keep your tools...balance enables better control of MODEL 71-74815 CHARGING STAND CGT 183UA-48 (C1817A005) BATTERY PACK CGT 183 UA-42 (WA3127) DO NOT use in this manual before using this cordless trimmer is recommended for appropriate conditions. 6. Any...

Operation Manual
Page 4
...debris from the trimming/edging path that you can damage plastic parts. 10. ALWAYS hold the trimmer by , the trimmer. 6. DO NOT FORCE the trimmer. They can see page 17, Fig. 5a) 12. Keep guard positioned between you are trimming and edging. 4. Keep hands and feet away from... immediately. 18. Use trimmer ONLY when grass and weeds are always in a place that has been dropped or received a sharp blow. SAFETY RULES FOR CORDLESS TRIMMERS cont. 7. DO NOT grasp or touch the exposed cutting line when picking up or locked in operating condition when the battery pack is...
...debris from the trimming/edging path that you can damage plastic parts. 10. ALWAYS hold the trimmer by , the trimmer. 6. DO NOT FORCE the trimmer. They can see page 17, Fig. 5a) 12. Keep guard positioned between you are trimming and edging. 4. Keep hands and feet away from... immediately. 18. Use trimmer ONLY when grass and weeds are always in a place that has been dropped or received a sharp blow. SAFETY RULES FOR CORDLESS TRIMMERS cont. 7. DO NOT grasp or touch the exposed cutting line when picking up or locked in operating condition when the battery pack is...

Operation Manual
Page 5
.... Have damaged tool cords repaired at least 14-gauge is properly wired and in this trimmer and charging stand. SAFETY RULES FOR CORDLESS TRIMMERS cont. 23. NOTE: Before using battery charging stand, read all instructions and cautionary markings in good electrical condition, and c) That...speed by its power cord. ONLY use the battery charging stand outdoors or expose to burst, causing personal injury and damage. 1. g Never carry the charging stand by the line. Use 12-gauge for damage. The trimmer's cutting line will not be thrown out at a safe distance...
.... Have damaged tool cords repaired at least 14-gauge is properly wired and in this trimmer and charging stand. SAFETY RULES FOR CORDLESS TRIMMERS cont. 23. NOTE: Before using battery charging stand, read all instructions and cautionary markings in good electrical condition, and c) That...speed by its power cord. ONLY use the battery charging stand outdoors or expose to burst, causing personal injury and damage. 1. g Never carry the charging stand by the line. Use 12-gauge for damage. The trimmer's cutting line will not be thrown out at a safe distance...

Operation Manual
Page 6
... or other part that is damaged should be properly repaired or replaced at a Sears Service center. 6. The trimmer comes assembled except for Charging Stand Battery Pack Battery Charging Stand Safety Guard 10 11 Wear a face mask, dust mask or respirator if the operation is repaired... instruct others who may use . Wear appropriate personal hearing protection during a power surge. 12. SAVE THESE INSTRUCTIONS. Remove the trimmer, auxiliary handle, safety guard, box containing the battery pack and charger, wall mount bracket for charger and wall mount bracket for misaNgnment or ...
... or other part that is damaged should be properly repaired or replaced at a Sears Service center. 6. The trimmer comes assembled except for Charging Stand Battery Pack Battery Charging Stand Safety Guard 10 11 Wear a face mask, dust mask or respirator if the operation is repaired... instruct others who may use . Wear appropriate personal hearing protection during a power surge. 12. SAVE THESE INSTRUCTIONS. Remove the trimmer, auxiliary handle, safety guard, box containing the battery pack and charger, wall mount bracket for charger and wall mount bracket for misaNgnment or ...

Operation Manual
Page 7
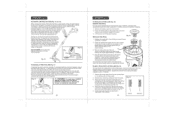
.... 4 18.0 Volt, 15 cell Nickel-Cadmium Battery Pack CGT183UA-42 (WA3127) recharges in One rear handle and top shaft easily rotates 180° for trimming or edging 3. 18 Volt Cordless / 7000 RPM (no-load speed) for Rotating Top Shaft 180° Trimmer Head \ Motor Housin_ Air Vents Trimmer Head 4-position Adjustment Button Safety Guard Edge Guide Cutting Line 13...
.... 4 18.0 Volt, 15 cell Nickel-Cadmium Battery Pack CGT183UA-42 (WA3127) recharges in One rear handle and top shaft easily rotates 180° for trimming or edging 3. 18 Volt Cordless / 7000 RPM (no-load speed) for Rotating Top Shaft 180° Trimmer Head \ Motor Housin_ Air Vents Trimmer Head 4-position Adjustment Button Safety Guard Edge Guide Cutting Line 13...

Operation Manual
Page 8
...is put into a power outlet. You should charge overnight prior to use , return the charging stand and battery pack to your nearest Sears store or other Craftsman outlet for free replacement. 8. Connect charging stand to recharge. Align raised rib on when the charging stand is... Charging Stand Number Battery Pack Number 12 inches 7000 RPM 18.0 Volt 0.065-inch twisted line Automatic 4 positions From 16 to 25 inches 12OV,60Hz AC I hour CGTt 83UA-48 (C1817A005) CGTt 83UA-42 (WA 3127) CHARGING THE BATTERY PACK (Fig. 3 and 3a) The battery pack for this trimmer. 2. Allow 1....
...is put into a power outlet. You should charge overnight prior to use , return the charging stand and battery pack to your nearest Sears store or other Craftsman outlet for free replacement. 8. Connect charging stand to recharge. Align raised rib on when the charging stand is... Charging Stand Number Battery Pack Number 12 inches 7000 RPM 18.0 Volt 0.065-inch twisted line Automatic 4 positions From 16 to 25 inches 12OV,60Hz AC I hour CGTt 83UA-48 (C1817A005) CGTt 83UA-42 (WA 3127) CHARGING THE BATTERY PACK (Fig. 3 and 3a) The battery pack for this trimmer. 2. Allow 1....

Operation Manual
Page 9
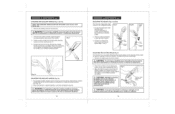
...Cordless Trimmer is secured in the trimmer, be used to the trimmer head before beginning operation. The trigger switch will enly fit ene way. ] Fig. 5 Fig. 5a Line NOTE: THE SAFETY GUARD MUST BE ATTACHED to help keep the cutting line away from items you are carrying it down into place, and the battery... ALWAYS remove the battery from the trimmer. 2. It can cause damage to underside base of the trimmer's head. Each end of the trimmer's head, carefullly lining the screw hole in the trimmer head. 5. Z_ CAUTION: When placing battery pack in the trimmer before use as shown...
...Cordless Trimmer is secured in the trimmer, be used to the trimmer head before beginning operation. The trigger switch will enly fit ene way. ] Fig. 5 Fig. 5a Line NOTE: THE SAFETY GUARD MUST BE ATTACHED to help keep the cutting line away from items you are carrying it down into place, and the battery... ALWAYS remove the battery from the trimmer. 2. It can cause damage to underside base of the trimmer's head. Each end of the trimmer's head, carefullly lining the screw hole in the trimmer head. 5. Z_ CAUTION: When placing battery pack in the trimmer before use as shown...
Operation Manual
Page 10
... tool in unexpected situations. 1 18 ADJUSTINGTHE HEIGHT (Figs. 8 and 8a) The Trimmer's Telescopic Shaft Comes in place. 3. DO NOT overreach when operating the trimmer. Fig. 8a Collar ADJUSTING THE CUTTING ANGLE (Fig. 9) Your trimmer has a 4-position tilting head that easily adjusts to the trimmer shaft before use. ] 1....angle to one of the four different angles and release the button. Z_ WARNING: To avoid injury, ALWAYS remove the battery from the trimmer. When the handle is in on the shaft and the auxiliary handle itself can be moved forward or backward into ...
... tool in unexpected situations. 1 18 ADJUSTINGTHE HEIGHT (Figs. 8 and 8a) The Trimmer's Telescopic Shaft Comes in place. 3. DO NOT overreach when operating the trimmer. Fig. 8a Collar ADJUSTING THE CUTTING ANGLE (Fig. 9) Your trimmer has a 4-position tilting head that easily adjusts to the trimmer shaft before use. ] 1....angle to one of the four different angles and release the button. Z_ WARNING: To avoid injury, ALWAYS remove the battery from the trimmer. When the handle is in on the shaft and the auxiliary handle itself can be moved forward or backward into ...

Operation Manual
Page 11
...in FOREIGN 21 RNAILNWGA:YS Tuhsee oppreorpaetironsafoeftyaneyqutriipmmmeenrt. Remove the battery pack from the operator (Fig. Pull bottom collar down Rotate j troepieassheaft, bottom collar to lock TURNINGTRIMMER ON AND OFF (Fig. 12) Your edger / trimmer has an extended length (4-finger) ON / OFF trigger... AtrRigNgeINr Gs:witcTho. Release bottom collar to edge, as a edger trimmer Mask--/, t Gloves )Ill /( 2J ..... Place edge guide and trimmer head above the surface you continue to right for the cutting spool (line) to stop rotating• 2O TRIMMING AND EDGING (Figs. 13 and...
...in FOREIGN 21 RNAILNWGA:YS Tuhsee oppreorpaetironsafoeftyaneyqutriipmmmeenrt. Remove the battery pack from the operator (Fig. Pull bottom collar down Rotate j troepieassheaft, bottom collar to lock TURNINGTRIMMER ON AND OFF (Fig. 12) Your edger / trimmer has an extended length (4-finger) ON / OFF trigger... AtrRigNgeINr Gs:witcTho. Release bottom collar to edge, as a edger trimmer Mask--/, t Gloves )Ill /( 2J ..... Place edge guide and trimmer head above the surface you continue to right for the cutting spool (line) to stop rotating• 2O TRIMMING AND EDGING (Figs. 13 and...
Operation Manual
Page 12
...as concrete sidewalks, driveways or heavier weeds. If the line extends past the line cutter, too much line has been fed out, remove spool cap (See Page 23, Fig. 18) and with the _\ //f _./_/ line cutter on the spool head cover and remove cover, ...Craftsman 71-85937. 2. Cutting line will be necessary to start the trimmer and completely stop the trimmer completely and restart it will automatically cut. Fig. 15 t TO MANUALLY FEEDTHE LINE (Fig. 17) If required, line can be shorter. Fig. 17 /K WARNING: To avoid injury, ALWAYS remove the battery from the trimmer...
...as concrete sidewalks, driveways or heavier weeds. If the line extends past the line cutter, too much line has been fed out, remove spool cap (See Page 23, Fig. 18) and with the _\ //f _./_/ line cutter on the spool head cover and remove cover, ...Craftsman 71-85937. 2. Cutting line will be necessary to start the trimmer and completely stop the trimmer completely and restart it will automatically cut. Fig. 15 t TO MANUALLY FEEDTHE LINE (Fig. 17) If required, line can be shorter. Fig. 17 /K WARNING: To avoid injury, ALWAYS remove the battery from the trimmer...

Operation Manual
Page 13
... only the tip of the cutting line to do so can result in the charging stand. When cutting vegetation that could be entangled in small increments to a power outlet. } z_ WARNING: NEVER store your cordless trimmer, or leave your trimmer, charging stand and battery pack organized, ready for use .... Trimming with constant speed and height. 7. Children MUST NOT operate the tool. } 24 BRACKETS FOR CORDLESS TRIMMER, CHARGING STAND AND BATTERY PACK cont. (Figs. 21, 22, 22a and 23) Trimmer mounts two ways , Fig. 21 . Make sure power cord has access to power outlet Charging stand ...
... only the tip of the cutting line to do so can result in the charging stand. When cutting vegetation that could be entangled in small increments to a power outlet. } z_ WARNING: NEVER store your cordless trimmer, or leave your trimmer, charging stand and battery pack organized, ready for use .... Trimming with constant speed and height. 7. Children MUST NOT operate the tool. } 24 BRACKETS FOR CORDLESS TRIMMER, CHARGING STAND AND BATTERY PACK cont. (Figs. 21, 22, 22a and 23) Trimmer mounts two ways , Fig. 21 . Make sure power cord has access to power outlet Charging stand ...
Operation Manual
Page 14
... warnings could result in this toot have the problem corrected before using trimmer. DO NOT hose down or wash the trimmer with a new pre-wound spool (Craftsman Automatic Feed Spool 71-85937). Line and spools are jammed, or any adjustments. However, like all batteries, they will depend on PARTS LIST. fi_d the answer ay{d mo_e...
... warnings could result in this toot have the problem corrected before using trimmer. DO NOT hose down or wash the trimmer with a new pre-wound spool (Craftsman Automatic Feed Spool 71-85937). Line and spools are jammed, or any adjustments. However, like all batteries, they will depend on PARTS LIST. fi_d the answer ay{d mo_e...

Operation Manual
Page 15
...19 / / / 20 \ \ \\ \ 34 / 31 12=in.Weedwacker ®Cordless Trimmer Model No. 172.74815 The modelnumberwill be foundon the nameplate of theTrimmer. Part Description Qty. ...Spring 1 1 31 CGT183UA-31 Line Feeder 1 8 CGT183UA-8 Lock Button 1 32 CGT183UA-32 Bolt 1 9 CGT183UA-9 CompressionSpring 1 33 CGT183UA-33 Fixing Block 1 12 CGT183UA-12 Steady Handle Supper 1 34 ... 40 CGT183UA-40 Inner Wire 1 18 CGT183UA-18 Pivot Release Lever 1 41 CGT183UA-41 Trigger 1 19 CGT183UA-19 Left & Right HousingEddy 1 42 CGT183UA-42 Battery Pack 1 20 CGT183UA-20 Nut...
...19 / / / 20 \ \ \\ \ 34 / 31 12=in.Weedwacker ®Cordless Trimmer Model No. 172.74815 The modelnumberwill be foundon the nameplate of theTrimmer. Part Description Qty. ...Spring 1 1 31 CGT183UA-31 Line Feeder 1 8 CGT183UA-8 Lock Button 1 32 CGT183UA-32 Bolt 1 9 CGT183UA-9 CompressionSpring 1 33 CGT183UA-33 Fixing Block 1 12 CGT183UA-12 Steady Handle Supper 1 34 ... 40 CGT183UA-40 Inner Wire 1 18 CGT183UA-18 Pivot Release Lever 1 41 CGT183UA-41 Trigger 1 19 CGT183UA-19 Left & Right HousingEddy 1 42 CGT183UA-42 Battery Pack 1 20 CGT183UA-20 Nut...


