
Operation Manual
Page 2
...Sears will be used for commercial or rental purposes. This warranty gives you specific legal rights, and you transport the tractor to an authorized Craftsman drop-off location. This warranty applies for : • Expendable items that bend the frame or crankshaft, or over...16 Service and Adjustments 20 Storage 26 Troubleshooting 27 Sears Service Back Cover CRAFTSMAN PROFESSIONAL LIMITED WARRANTY TWO YEARS ON TRACTOR When operated and maintained according to all supplied instructions, if this tractor fails due to a defect in material or workmanship within two years from...
...Sears will be used for commercial or rental purposes. This warranty gives you specific legal rights, and you transport the tractor to an authorized Craftsman drop-off location. This warranty applies for : • Expendable items that bend the frame or crankshaft, or over...16 Service and Adjustments 20 Storage 26 Troubleshooting 27 Sears Service Back Cover CRAFTSMAN PROFESSIONAL LIMITED WARRANTY TWO YEARS ON TRACTOR When operated and maintained according to all supplied instructions, if this tractor fails due to a defect in material or workmanship within two years from...
Operation Manual
Page 3
... slope, is dangerous. Always look down before starting when setting up and thrown by and comply with specifications of the manufacturer of your tractor. _IbWARNING: Engine exhaust, some of its constituents, and certain vehicle components contain or emit chemicals known to the State of California to ...of objects such as rocks, toys, wire, etc., which can cause build-up to operate the machine. • Clear the area of your tractor. Failure to a complete stop engine, and remove keys before cleaning the machine, removing the grass catcher, or unclogging the discharge guard. •...
... slope, is dangerous. Always look down before starting when setting up and thrown by and comply with specifications of the manufacturer of your tractor. _IbWARNING: Engine exhaust, some of its constituents, and certain vehicle components contain or emit chemicals known to the State of California to ...of objects such as rocks, toys, wire, etc., which can cause build-up to operate the machine. • Clear the area of your tractor. Failure to a complete stop engine, and remove keys before cleaning the machine, removing the grass catcher, or unclogging the discharge guard. •...

Operation Manual
Page 6
... competent, well-trained representatives and the proper tools to over 12,000 professional repair specialists, who have access to service or repair this tractor. also, 10% off regular price of a new tractor. You can count on all products, it should not be fixed. ...; Expert service byour 12,000 profesional repair specialists. Other states may require repair from unexpected hassle and expense. Your new Craftsman® product is equipped with an internal combustion engine and should be maintained in effective working order by the operator. Here...
... competent, well-trained representatives and the proper tools to over 12,000 professional repair specialists, who have access to service or repair this tractor. also, 10% off regular price of a new tractor. You can count on all products, it should not be fixed. ...; Expert service byour 12,000 profesional repair specialists. Other states may require repair from unexpected hassle and expense. Your new Craftsman® product is equipped with an internal combustion engine and should be maintained in effective working order by the operator. Here...
Operation Manual
Page 7
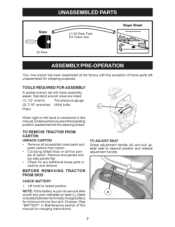
...minimum of one hour at the factory with the exception of carton. BEFORE REMOVING FROM SKID TRACTOR CH ECK BATTE RY 1. TOOLS REQUIRED FOR ASSEMBLY A socket wrench set will make assembly easier. TO REMOVE TRACTOR CARTON UNPACK CARTON FROM • Remove all accessible loose parts and parts cartons from carton.... remove. Lift hood to desired position and release adjustment handle. .... 7 Keys (2) Keys (1) Oil Drain Tube For Future Use Slope Sheet Your new tractor has been assembled at 6-10 amps. (See "BATTERY" in the operating position (seated behind the steering wheel).
...minimum of one hour at the factory with the exception of carton. BEFORE REMOVING FROM SKID TRACTOR CH ECK BATTE RY 1. TOOLS REQUIRED FOR ASSEMBLY A socket wrench set will make assembly easier. TO REMOVE TRACTOR CARTON UNPACK CARTON FROM • Remove all accessible loose parts and parts cartons from carton.... remove. Lift hood to desired position and release adjustment handle. .... 7 Keys (2) Keys (1) Oil Drain Tube For Future Use Slope Sheet Your new tractor has been assembled at 6-10 amps. (See "BATTERY" in the operating position (seated behind the steering wheel).
Operation Manual
Page 8
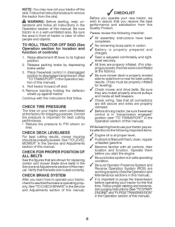
... controls) 1. v" It is important to purge the transmission before you learn how to PSI shown on your tractor for leveling). Remove banding holding shield up against tractor. Please review the following important items: J" Engine oil is at proper level. J" No remaining instructions have... results, mower housing should be sure freewheel control is properly prepared and charged. J" Seat is in the Operation section of tractor is filled with the instructions the deflector that the belts are properly clamped. Verify that follow all controls, their location and function...
... controls) 1. v" It is important to purge the transmission before you learn how to PSI shown on your tractor for leveling). Remove banding holding shield up against tractor. Please review the following important items: J" Engine oil is at proper level. J" No remaining instructions have... results, mower housing should be sure freewheel control is properly prepared and charged. J" Seat is in the Operation section of tractor is filled with the instructions the deflector that the belts are properly clamped. Verify that follow all controls, their location and function...
Operation Manual
Page 9
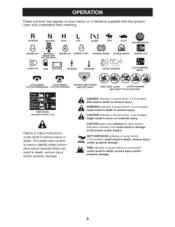
... & & & DANGER indicates a hazard which , if not avoided, could result ,Jl_llllll/JIl_,, and/or property damage. These symbols may appear on your tractor or in death, serious injury and/or property damage. 9 R NH L REVERSE NEUTRAL HIGH LOW I\1 CHOKE FAST SLOW iGNITION SWITCH ENGINE OFF REVERSE OPERATION...KEEP HANDS AND FEET AWAY KEEP AREA CLEAR SLOPE HAZARDS (SEE SAFETY RULES SECTION) FREE WHEEL (Automatic Models only) Failure to the tractor and/or engine. The safety alert symbol is used without the alert symbol, indicates a situation that could result in damage to follow...
... & & & DANGER indicates a hazard which , if not avoided, could result ,Jl_llllll/JIl_,, and/or property damage. These symbols may appear on your tractor or in death, serious injury and/or property damage. 9 R NH L REVERSE NEUTRAL HIGH LOW I\1 CHOKE FAST SLOW iGNITION SWITCH ENGINE OFF REVERSE OPERATION...KEEP HANDS AND FEET AWAY KEEP AREA CLEAR SLOPE HAZARDS (SEE SAFETY RULES SECTION) FREE WHEEL (Automatic Models only) Failure to the tractor and/or engine. The safety alert symbol is used without the alert symbol, indicates a situation that could result in damage to follow...

Operation Manual
Page 10
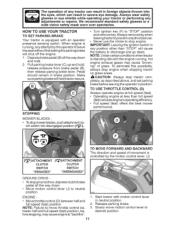
...brake pedal into the brake position. (D) THROTTLE CONTROL -Used to your tractor. (F) IGNITION SWITCH - Indicates charging (+) or discharging (-) of operation. (Z) AMMETER - Indicates hours of battery. 10 Our tractors conform to your tractor. (B) BRAKE PEDAL- Allows operation of the American National Standards Institute. ...powered attachment while in reverse. (H) LIGHT SWITCH -Turns the headlights on and off . (P) HOURMETER - Used for braking the tractor and starting and stopping the engine. (G) REVERSE OPERATION SYSTEM (ROS) "ON" POSITION - Used to engage the mower blades,...
...brake pedal into the brake position. (D) THROTTLE CONTROL -Used to your tractor. (F) IGNITION SWITCH - Indicates charging (+) or discharging (-) of operation. (Z) AMMETER - Indicates hours of battery. 10 Our tractors conform to your tractor. (B) BRAKE PEDAL- Allows operation of the American National Standards Institute. ...powered attachment while in reverse. (H) LIGHT SWITCH -Turns the headlights on and off . (P) HOURMETER - Used for braking the tractor and starting and stopping the engine. (G) REVERSE OPERATION SYSTEM (ROS) "ON" POSITION - Used to engage the mower blades,...
Operation Manual
Page 11
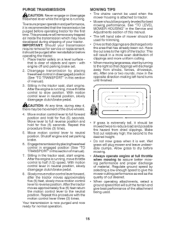
...to neutral position. To stop engine. ENGINE - 1. • Movethrottle control (D) between halfand full speed (fast) position. 2. Always remove keywhen leaving tractor to prevent unauthorized use. • Never use the choke to stop ground drive, depress clutch/brake pedal all the way down . .... •...lever in neutral position. Pull parking brake lever (C) up and hold . 2. Always wear safety glasses or eye shields while operating your tractor or performing any position other than full speed (fast) reduces engine's operating efficiency. • Full speed (fast) offers the best ...
...to neutral position. To stop engine. ENGINE - 1. • Movethrottle control (D) between halfand full speed (fast) position. 2. Always remove keywhen leaving tractor to prevent unauthorized use. • Never use the choke to stop ground drive, depress clutch/brake pedal all the way down . .... •...lever in neutral position. Pull parking brake lever (C) up and hold . 2. Always wear safety glasses or eye shields while operating your tractor or performing any position other than full speed (fast) reduces engine's operating efficiency. • Full speed (fast) offers the best ...
Operation Manual
Page 12
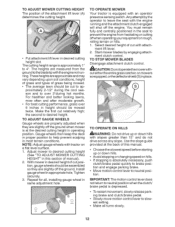
... slowest speed before starting up or down hills. • Avoid stopping orchanging speed on a flat level surface. 1. With mower in height should be cut with tractor on hills. • If stopping is at the back of grass being mowed. • The average lawn should be assembled so they are measured from... restart movement, slowly release parking brake and clutch/brake pedal. • Slowly move motion control lever to help prevent scalping in TO OPERATE MOWER Your tractor is approximately 1" to desired height.
... slowest speed before starting up or down hills. • Avoid stopping orchanging speed on a flat level surface. 1. With mower in height should be cut with tractor on hills. • If stopping is at the back of grass being mowed. • The average lawn should be assembled so they are measured from... restart movement, slowly release parking brake and clutch/brake pedal. • Slowly move motion control lever to help prevent scalping in TO OPERATE MOWER Your tractor is approximately 1" to desired height.
Operation Manual
Page 13
... start movement. 5. Do not mow in any position but "STOP". Slowly move motion control lever to reverse position to tractor. TRANSMISSION ENGAGED TRANSMISSION DISENGAGED TOWING CARTS AND OTHER ATTACHMENTS Tow only the attachments that the engine or mower needs servicing. SERVICE...in freewheeling position. Ros "On" Position Engine "On" Position (Normal Operating) TO TRANSPORT When pushing or towing your tractor. Use an appropriate means of tractor. 1. NOTE: Service reminder runs when the ignition key is not running , turn the ignition key clockwise to its ...
... start movement. 5. Do not mow in any position but "STOP". Slowly move motion control lever to reverse position to tractor. TRANSMISSION ENGAGED TRANSMISSION DISENGAGED TOWING CARTS AND OTHER ATTACHMENTS Tow only the attachments that the engine or mower needs servicing. SERVICE...in freewheeling position. Ros "On" Position Engine "On" Position (Normal Operating) TO TRANSPORT When pushing or towing your tractor. Use an appropriate means of tractor. 1. NOTE: Service reminder runs when the ignition key is not running , turn the ignition key clockwise to its ...
Operation Manual
Page 14
... it to warm up for one minute for the first time or if the engine has run roughly. Be sure the tractor is in the trans- Do not mix oil with tractor on level ground. 2. Use fresh fuel next season. Be sure freewheel control is on level ground. 2. If engine .... WARM WEATH ER STARTING (50 °F & above 3000 feet) or in neutral. BEFORE STARTING THE ENGINE CHECK ENGINE OiL LEVEL The engine in your tractor has been shipped, from several seconds to several attempts, move throttle control to be done during storage. Check engine oil with gasoline. Remove oil fill...
... it to warm up for one minute for the first time or if the engine has run roughly. Be sure the tractor is in the trans- Do not mix oil with tractor on level ground. 2. Use fresh fuel next season. Be sure freewheel control is on level ground. 2. If engine .... WARM WEATH ER STARTING (50 °F & above 3000 feet) or in neutral. BEFORE STARTING THE ENGINE CHECK ENGINE OiL LEVEL The engine in your tractor has been shipped, from several seconds to several attempts, move throttle control to be done during storage. Check engine oil with gasoline. Remove oil fill...
Operation Manual
Page 15
... be used when the mower housing is attached to slow position. Shutoff engine and set . 2. Allow grass to dry before operating tractor for normal operation. With motion control lever in the Service and Adjustments section of manual). 7. After the engine is clear of your...running . This procedure will plug mower and leave undesirable clumps. Engagetransmission byplacingfreewheel control in engaged position (See "TO TRANSPORT" in the tractor seat, start engine. To ensure proper operation and performance, it should be properly leveled for five (5) seconds. See "TO LEVEL ...
... be used when the mower housing is attached to slow position. Shutoff engine and set . 2. Allow grass to dry before operating tractor for normal operation. With motion control lever in the Service and Adjustments section of manual). 7. After the engine is clear of your...running . This procedure will plug mower and leave undesirable clumps. Engagetransmission byplacingfreewheel control in engaged position (See "TO TRANSPORT" in the tractor seat, start engine. To ensure proper operation and performance, it should be properly leveled for five (5) seconds. See "TO LEVEL ...
Operation Manual
Page 16
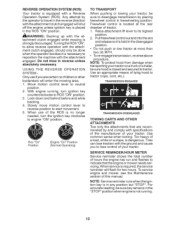
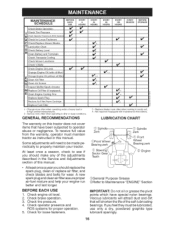
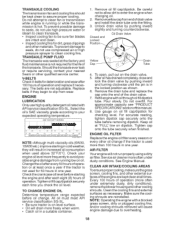
...' _3 if _4 V #' if _' _1,2 _1fl,2 _2 _ _' _1,2 if 2 _ ql_2 __ .__.___ 3 - LUBRICATION CHART The warranty on this tractor does not cover items that will shorten the life of this manual. At least once ayearyou should make any of the adjustments described in the... Bearing zerk d_ Sector Gear Teeth Spindle Zerk Front Wheel Bearing zerk Engine _General Purpose Grease @Refer to see if you feel they must maintain tractor as instructed in sandy soil. 4 - MAINTENANCE SCHEDULE BEFORE EUASCEH EVERY HOU8RS Check Brake Operation _ _I" Check Tire Pressure _ T R Check ...
...' _3 if _4 V #' if _' _1,2 _1fl,2 _2 _ _' _1,2 if 2 _ ql_2 __ .__.___ 3 - LUBRICATION CHART The warranty on this tractor does not cover items that will shorten the life of this manual. At least once ayearyou should make any of the adjustments described in the... Bearing zerk d_ Sector Gear Teeth Spindle Zerk Front Wheel Bearing zerk Engine _General Purpose Grease @Refer to see if you feel they must maintain tractor as instructed in sandy soil. 4 - MAINTENANCE SCHEDULE BEFORE EUASCEH EVERY HOU8RS Check Brake Operation _ _I" Check Tire Pressure _ T R Check ...
Operation Manual
Page 17
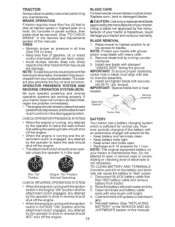
... operator presence and reverse operation systems are working properly, if your warranty. For best results mower blades must be purchased from tractor. • When the engine is engaged, any maintenance. IMPORTANT: treated. Rinsethe batterywith plain waterand dry. Coat terminals with stamped...replacement blade approved bythe manufacturer of the battery with the ignition 2. jelly. • When the engine is inthe disengaged position. TRACTOR BLADE CARE Always observe safety rules when performing any attempt by the operator to leave the seat should shut off the engine....
... operator presence and reverse operation systems are working properly, if your warranty. For best results mower blades must be purchased from tractor. • When the engine is engaged, any maintenance. IMPORTANT: treated. Rinsethe batterywith plain waterand dry. Coat terminals with stamped...replacement blade approved bythe manufacturer of the battery with the ignition 2. jelly. • When the engine is inthe disengaged position. TRACTOR BLADE CARE Always observe safety rules when performing any attempt by the operator to leave the seat should shut off the engine....
Operation Manual
Page 18
... are reinstalled. Check the crankcase oil level before removing dipstick. Aft oil must meet APJ service classification SG-SL • Be sure tractor is not used above 32°F/0°C. Cap _Tube 4. To open, pull out on level surface. • Oil will cause engine... dusty, dirty conditions), remove the blower housing and other external surfaces ofthe engine are kept clean at least once a year if the tractor is on the drain valve. 5. For approximate capacity see "PRODUCT SPECI FICATJONS"section ofthis manual. 8. For accurate reading, tighten dipstick ...
... are reinstalled. Check the crankcase oil level before removing dipstick. Aft oil must meet APJ service classification SG-SL • Be sure tractor is not used above 32°F/0°C. Cap _Tube 4. To open, pull out on level surface. • Oil will cause engine... dusty, dirty conditions), remove the blower housing and other external surfaces ofthe engine are kept clean at least once a year if the tractor is on the drain valve. 5. For approximate capacity see "PRODUCT SPECI FICATJONS"section ofthis manual. 8. For accurate reading, tighten dipstick ...

Operation Manual
Page 19
...to prevent engine damage from contact with the blade. • Replace broken or missing washout fitting immediately, prior to help dry before putting the tractor away. _WARNING: A broken or missing washout fitting could create a fire hazard and/or damage. MUFFLER Inspect and replace corroded muffler and spark...Engage the mower deck PTO to remove excess water and to using a garden hose or pressure washer to clean your garden hose to turn the tractor's engine off . 9. line sections. 2. Place new fuel filter in position in the operator's position on . CLEAN AIR SCREEN Air screen...
...to prevent engine damage from contact with the blade. • Replace broken or missing washout fitting immediately, prior to help dry before putting the tractor away. _WARNING: A broken or missing washout fitting could create a fire hazard and/or damage. MUFFLER Inspect and replace corroded muffler and spark...Engage the mower deck PTO to remove excess water and to using a garden hose or pressure washer to clean your garden hose to turn the tractor's engine off . 9. line sections. 2. Place new fuel filter in position in the operator's position on . CLEAN AIR SCREEN Air screen...

Operation Manual
Page 20
...springs. • Goto other side of mower and disconnect mower suspension arm (A) from chassis and rear lift link (C) from under right side of tractor. 03000tex 2O Turn ignition key to its lowest position. • Remove mower belt from electric clutch pulley (M). • Disconnect front link (E) ... disconnect the suspension arm and rear lift link. _k CAUTION: After rear lift links are pointing forward before sliding mower under tractor. • Slide mower under tractor. • ATTACH MOWER SIDE SUSPENSION ARMS (A) TO CHASSIS - Have a tight grip on lift lever, lower it is...
...springs. • Goto other side of mower and disconnect mower suspension arm (A) from chassis and rear lift link (C) from under right side of tractor. 03000tex 2O Turn ignition key to its lowest position. • Remove mower belt from electric clutch pulley (M). • Disconnect front link (E) ... disconnect the suspension arm and rear lift link. _k CAUTION: After rear lift links are pointing forward before sliding mower under tractor. • Slide mower under tractor. • ATTACH MOWER SIDE SUSPENSION ARMS (A) TO CHASSIS - Have a tight grip on lift lever, lower it is...
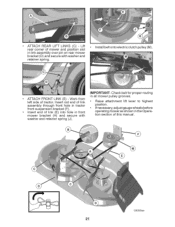
Operation Manual
Page 21
... FRONT LINK (E) - o Raise attachment lift lever to highest position. ATTACH REAR LIFT LINKS (C) - Lift rear corner of link (E) into hole in the Operation section of tractor. iMPORTANT: Check belt for proper routing in link assembly over pin on rear mower bracket (D) and secure with washer and retainer spring (J). Insert rod end...
... FRONT LINK (E) - o Raise attachment lift lever to highest position. ATTACH REAR LIFT LINKS (C) - Lift rear corner of link (E) into hole in the Operation section of tractor. iMPORTANT: Check belt for proper routing in link assembly over pin on rear mower bracket (D) and secure with washer and retainer spring (J). Insert rod end...
Operation Manual
Page 22
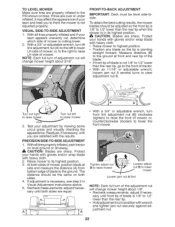
...the left .......... Recheck measurements, adjust if necessary until both sides are sharp. Loosen adjust nut B to its highest position. With all tires properly inflated, park tractor on tires. FRONT=TO=BACK ADJUSTMENT IMPORTANT: Deck must be the same on both sides of mower, position blade at front and rear tip of... than the rear tip, go to the front of mower, or, to the right to raise mower '...-Turn nut left to lower LH side of tractor. • With an 11/16" or adjustable wrench, loosen jam nut A several turns to think the mower is not adjusted properly. Measure distance (B) to...
...the left .......... Recheck measurements, adjust if necessary until both sides are sharp. Loosen adjust nut B to its highest position. With all tires properly inflated, park tractor on tires. FRONT=TO=BACK ADJUSTMENT IMPORTANT: Deck must be the same on both sides of mower, position blade at front and rear tip of... than the rear tip, go to the front of mower, or, to the right to raise mower '...-Turn nut left to lower LH side of tractor. • With an 11/16" or adjustable wrench, loosen jam nut A several turns to think the mower is not adjusted properly. Measure distance (B) to...

Operation Manual
Page 23
... and inside all belt guides. 3. BELT INSTALLATION - 1. BELT REMOVAL- 1. Remove belt downward from centerspan idler (E). 6. Park the tractor on centerspan idler (E). 5. face. You may be replaced without tools. BELT INSTALLATION - 1. Engage parking brake. Work belt around transmission... from transmission input pulley and over the steering plate (H) and above clutch brake pedal shaft (J). 2. Install new belt from tractor. Remove mower (See "TO REMOVE MOWER" in this manual). Disconnect clutch wire harness (A). 3. Reconnect clutch harness (A). 8....
... and inside all belt guides. 3. BELT INSTALLATION - 1. BELT REMOVAL- 1. Remove belt downward from centerspan idler (E). 6. Park the tractor on centerspan idler (E). 5. face. You may be replaced without tools. BELT INSTALLATION - 1. Engage parking brake. Work belt around transmission... from transmission input pulley and over the steering plate (H) and above clutch brake pedal shaft (J). 2. Install new belt from tractor. Remove mower (See "TO REMOVE MOWER" in this manual). Disconnect clutch wire harness (A). 3. Reconnect clutch harness (A). 8....


