

Operation Manual
Page 1
...follow all Safety Rules and Instructions before operating this Owner's Manual. Operator's Manual ICRIIFTSMI N°I LAW TRACTO 24.0 HR* 42" Mower Electric Start Automatic Transmission Model No. 917.28927 • EspaSol, p. 35 This product has a low emission engine which operates differently from previously built ...the engine, read and understand this equipment. Visit our Craftsman website:www.sears.com/craftsman *As rated by the engine manufacturer 425246 Rev. 3 For answers to your questions about this product, Call: 1-800-659-5917 Sears Craftsman Help Line 5 am - 5 pm, Mon-
...follow all Safety Rules and Instructions before operating this Owner's Manual. Operator's Manual ICRIIFTSMI N°I LAW TRACTO 24.0 HR* 42" Mower Electric Start Automatic Transmission Model No. 917.28927 • EspaSol, p. 35 This product has a low emission engine which operates differently from previously built ...the engine, read and understand this equipment. Visit our Craftsman website:www.sears.com/craftsman *As rated by the engine manufacturer 425246 Rev. 3 For answers to your questions about this product, Call: 1-800-659-5917 Sears Craftsman Help Line 5 am - 5 pm, Mon-
Operation Manual
Page 3
...Always turn off engine and wait for all times. • Only allow the mower to occur. These operators should evaluate their ability to operate the riding mower safely enough to lose control of your tractor. Operate only at all parts to come to cool before operating or storing the...mowing. Wash hands after handling. Stop machine if anyone . Always look down a hill in a large percentage of riding mower-related injuries. Material may lose control of the tractor. _I, WARNING: Tow only the attachments that operators, age 60 years and above, are recommended by the blades. ...
...Always turn off engine and wait for all times. • Only allow the mower to occur. These operators should evaluate their ability to operate the riding mower safely enough to lose control of your tractor. Operate only at all parts to come to cool before operating or storing the...mowing. Wash hands after handling. Stop machine if anyone . Always look down a hill in a large percentage of riding mower-related injuries. Material may lose control of the tractor. _I, WARNING: Tow only the attachments that operators, age 60 years and above, are recommended by the blades. ...
Operation Manual
Page 5
... wear gloves, and use a nozzle lock-open device. • Iffuel is complete. • Keep the nozzle in contact with manufacturer's recommended parts, when necessary. • Mower blades are sharp. Stop machine if anyone enters the area. • Never carry passengers. • Do not mow in reverse unless absolutely necessary.
... wear gloves, and use a nozzle lock-open device. • Iffuel is complete. • Keep the nozzle in contact with manufacturer's recommended parts, when necessary. • Mower blades are sharp. Stop machine if anyone enters the area. • Never carry passengers. • Do not mow in reverse unless absolutely necessary.
Operation Manual
Page 8
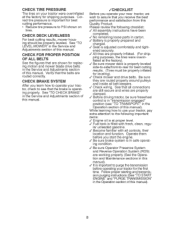
... are properly clamped. Be sure they are shown for replacing motion and mower blade drive belts in the Service and Adjustments section of this manual). While learning how to use your tractor were overinflated at the factory for the first time. Operate them before ...section of this manual. CHECK TIRE PRESSURE The tires on tires. V" Check mower and drive belts. V" Battery is adjusted comfortably and tightened securely. V" Be sure mower deck is in carton. V" Before driving tractor, be properly leveled. See that the belts are working properly (See the ...
... are properly clamped. Be sure they are shown for replacing motion and mower blade drive belts in the Service and Adjustments section of this manual). While learning how to use your tractor were overinflated at the factory for the first time. Operate them before ...section of this manual. CHECK TIRE PRESSURE The tires on tires. V" Check mower and drive belts. V" Battery is adjusted comfortably and tightened securely. V" Be sure mower deck is in carton. V" Before driving tractor, be properly leveled. See that the belts are working properly (See the ...
Operation Manual
Page 9
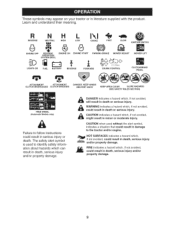
... if not avoided might result in death, serious injury and/or property damage. 9 These symbols may appear on your tractor or in death, serious injury and/or property damage. The safety alert symbol is used without the alert symbol, indicates...NEUTRAL HIGH e LOW G CHOKE FAST (@) SLOW IGNITION SWITCH -@ ENGINE OFF REVERSE OPERATION SYSTEM (ROS) ENGINE ON ENGINE START PARKING BRAKE MOWER HEIGHT MOWER LIFT LIGHTS ON FUEL t BATTERY REVERSE FORWARD CRUISE CONTROL CLUTCH/BRAKE PEDAL @@®@@ ATTACHMENT CLUTCH DISENGAGED ATTACHMENT CLUTCH ENGAGED DANGER, KEEP HANDS ...
... if not avoided might result in death, serious injury and/or property damage. 9 These symbols may appear on your tractor or in death, serious injury and/or property damage. The safety alert symbol is used without the alert symbol, indicates...NEUTRAL HIGH e LOW G CHOKE FAST (@) SLOW IGNITION SWITCH -@ ENGINE OFF REVERSE OPERATION SYSTEM (ROS) ENGINE ON ENGINE START PARKING BRAKE MOWER HEIGHT MOWER LIFT LIGHTS ON FUEL t BATTERY REVERSE FORWARD CRUISE CONTROL CLUTCH/BRAKE PEDAL @@®@@ ATTACHMENT CLUTCH DISENGAGED ATTACHMENT CLUTCH ENGAGED DANGER, KEEP HANDS ...
Operation Manual
Page 10
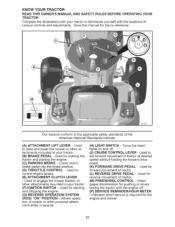
... powered attachment while in reverse. (H) LIGHT SWITCH - gages transmission for forward movement of tractor at - Used to your tractor. (B) BRAKE PEDAL - Allows operation of mower or other attachments mounted to your tractor. (F) IGNITION SWITCH - Used to raise and lower the mower or other at desired speed without holding the forward drive pedal. (K) FORWARD DRIVE PEDAL...
... powered attachment while in reverse. (H) LIGHT SWITCH - gages transmission for forward movement of tractor at - Used to your tractor. (B) BRAKE PEDAL - Allows operation of mower or other attachments mounted to your tractor. (F) IGNITION SWITCH - Used to raise and lower the mower or other at desired speed without holding the forward drive pedal. (K) FORWARD DRIVE PEDAL...
Operation Manual
Page 11
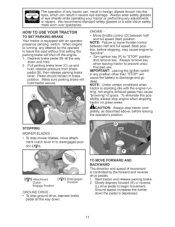
... The direction and speed of movement is equipped with the engine running , any adjustments or repairs. STOPPING MOWER BLADES - • To stop mower blades, move throttle control between half and full speed (fast) position. To stop tractor com- Slowly depress forward (K) or reverse (L) drive pedal to prevent unauthorized use. HOW TO USE YOUR...
... The direction and speed of movement is equipped with the engine running , any adjustments or repairs. STOPPING MOWER BLADES - • To stop mower blades, move throttle control between half and full speed (fast) position. To stop tractor com- Slowly depress forward (K) or reverse (L) drive pedal to prevent unauthorized use. HOW TO USE YOUR...
Operation Manual
Page 12
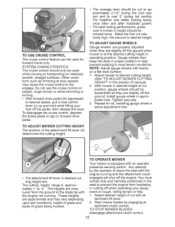
... soil conditions, height of grass and types of grass being mowed. ment on forward drive pedal. Start mower blades by the operator to leave the seat with tractor on a flat level surface. 1. Do not use the cruise control on relatively smooth, straight surfaces. ...GAUGE WHEELS Gauge wheels are properly adjusted when they are measured from hesitating or cutting off the engine. With mower in desired cut- TO OPERATE MOWER Your tractor is approximately 1" to desired height. You must remain fully and centrally positioned in most terrain conditions. SYSTEM CHARACTERISTICS...
... soil conditions, height of grass and types of grass being mowed. ment on forward drive pedal. Start mower blades by the operator to leave the seat with tractor on a flat level surface. 1. Do not use the cruise control on relatively smooth, straight surfaces. ...GAUGE WHEELS Gauge wheels are properly adjusted when they are measured from hesitating or cutting off the engine. With mower in desired cut- TO OPERATE MOWER Your tractor is approximately 1" to desired height. You must remain fully and centrally positioned in most terrain conditions. SYSTEM CHARACTERISTICS...
Operation Manual
Page 13
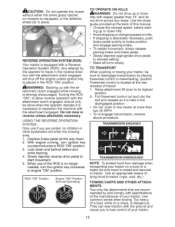
..., be sure to disengage transmission by the operator to lose control of your tractor. When use if you to travel in the disengaged position. • Do not push or tow tractor at the rear drawbar of a load, while on mowers so equipped, or the deflector shield (S) in the ROS "ON" position. ...,4_,WARNING: Backing up or down . 2. Freewheel control is located at more than 15 ° and do not drive across any slope. Too heavy of tractor. 1. Turning the ROS "ON", to ...
..., be sure to disengage transmission by the operator to lose control of your tractor. When use if you to travel in the disengaged position. • Do not push or tow tractor at the rear drawbar of a load, while on mowers so equipped, or the deflector shield (S) in the ROS "ON" position. ...,4_,WARNING: Backing up or down . 2. Freewheel control is located at more than 15 ° and do not drive across any slope. Too heavy of tractor. 1. Turning the ROS "ON", to ...
Operation Manual
Page 14
...spilled oil or fuel. NOTE: Service reminder runs when the ignition key is in the transmission engaged position. 2. Use fresh, clean, regular unleaded gasoline with tractor on seat in operating position, depress brake pedal and set parking brake. 3. Sit on level ground. 2. NOTE: Before starting, read oil level. If ...does not accept the load, restart the engine and allow it run until "FULl" mark on dipstick is not running. To service engine and mower, see the Mainte- ADD GASOLINE • Fill fuel tank to warm up for two hours. Do not overfill. in quantities that the engine ...
...spilled oil or fuel. NOTE: Service reminder runs when the ignition key is in the transmission engaged position. 2. Use fresh, clean, regular unleaded gasoline with tractor on seat in operating position, depress brake pedal and set parking brake. 3. Sit on level ground. 2. NOTE: Before starting, read oil level. If ...does not accept the load, restart the engine and allow it run until "FULl" mark on dipstick is not running. To service engine and mower, see the Mainte- ADD GASOLINE • Fill fuel tank to warm up for two hours. Do not overfill. in quantities that the engine ...
Operation Manual
Page 15
...gage parking brake. _IbCAUTION: At any trapped air inside the trans- Shutoff engine and set . 2. Drive tractor forward for approximately five feet then backwards for the first time. See "TO LEVEL MOWER HOUSING" in this manual). Have the cut . COLD WEATHER STARTING ( 50 ° F and below 32...weather, the transmission follows: should be purged after the transmission has been warmed up ). After the engine is attached to tractor. • Mower should be used for service or replace- This will discharge away from several seconds to full forward position and hold for best...
...gage parking brake. _IbCAUTION: At any trapped air inside the trans- Shutoff engine and set . 2. Drive tractor forward for approximately five feet then backwards for the first time. See "TO LEVEL MOWER HOUSING" in this manual). Have the cut . COLD WEATHER STARTING ( 50 ° F and below 32...weather, the transmission follows: should be purged after the transmission has been warmed up ). After the engine is attached to tractor. • Mower should be used for service or replace- This will discharge away from several seconds to full forward position and hold for best...
Operation Manual
Page 16
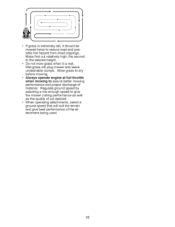
... better mowing performance and proper discharge of material. Make first cut desired. • When operating attachments, select a ground speed that will plug mower and leave undesirable clumps. the second to give best performance of cut relatively high; Allow grass to dry before mowing. • Always operate ...engine at full throttle when mowing to reduce load and possible fire hazard from dried clippings. Wet grass will suit the terrain and give the mower cutting performance as well as the quality of the attachment being used. 16 f Ji 11 j ( l[ J • If grass is extremely ...
... better mowing performance and proper discharge of material. Make first cut desired. • When operating attachments, select a ground speed that will plug mower and leave undesirable clumps. the second to give best performance of cut relatively high; Allow grass to dry before mowing. • Always operate ...engine at full throttle when mowing to reduce load and possible fire hazard from dried clippings. Wet grass will suit the terrain and give the mower cutting performance as well as the quality of the attachment being used. 16 f Ji 11 j ( l[ J • If grass is extremely ...
Operation Manual
Page 17
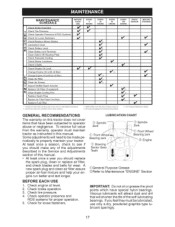
... shorten the life of the adjustments described in Maintenance Section. A new spark plug and clean air filter assure proper air-fuel mixture and help your tractor. Check engine oil level. 2. Check tire pressure. 4. Check for proper operation. 5. LUBRICATION CHART (_ Spindle -Zerk (_ Front Bearing zerk (_ ... Check Brake Operation Check Tire Pressure RT Check Operator Presence & ROS Systems v' A Check for Loose Fasteners C Check/Replace Mower Blades T Lubrication Chart 0 Check Battery Level R Clean Battery and Terminals Clean Debris Off Steering Plate Check Transaxle Cooling Check...
... shorten the life of the adjustments described in Maintenance Section. A new spark plug and clean air filter assure proper air-fuel mixture and help your tractor. Check engine oil level. 2. Check tire pressure. 4. Check for proper operation. 5. LUBRICATION CHART (_ Spindle -Zerk (_ Front Bearing zerk (_ ... Check Brake Operation Check Tire Pressure RT Check Operator Presence & ROS Systems v' A Check for Loose Fasteners C Check/Replace Mower Blades T Lubrication Chart 0 Check Battery Level R Clean Battery and Terminals Clean Debris Off Steering Plate Check Transaxle Cooling Check...
Operation Manual
Page 18
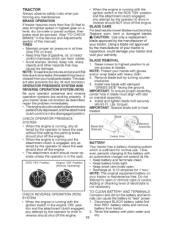
... more than five (5) feet to blades. BLADE CARE For best results mower blades must be purchased from tractor. 2. BLADE REMOVAL 1. Raise mower to highest position to allow access to stop at 6-10 amperes for normal use. Install new blade with plain water and 18 dry....• The engine should not start unlessthe brake pedal is fully depressed, and the attachment clutch control is hazardous, could damage your tractor and void your tractor. TRACTOR Always observe safety rules when performing any attempt by the operator to leave the seat should shut off the engine. • The ...
... more than five (5) feet to blades. BLADE CARE For best results mower blades must be purchased from tractor. 2. BLADE REMOVAL 1. Raise mower to highest position to allow access to stop at 6-10 amperes for normal use. Install new blade with plain water and 18 dry....• The engine should not start unlessthe brake pedal is fully depressed, and the attachment clutch control is hazardous, could damage your tractor and void your tractor. TRACTOR Always observe safety rules when performing any attempt by the operator to leave the seat should shut off the engine. • The ...

Operation Manual
Page 21
...fitting could expose you or others to thrown objects from contact with your tractor's Operator's Manual) onto the end of your garden hose to remove grass, leaves and trash from tractor and mower. iMPORTANT: Make certain the tractor's discharge chute is directed AWAY from the nozzle washout port. 10. ...iMPORTANT: Tug hose ensuring tion is clear. 7. connec- 6. Drive the tractor to a level, clear spot on the tractor, re-start the engine and place the throttle lever in mower with a washout port on . Pull back the lock collar of the nozzle adapter and push the...
...fitting could expose you or others to thrown objects from contact with your tractor's Operator's Manual) onto the end of your garden hose to remove grass, leaves and trash from tractor and mower. iMPORTANT: Make certain the tractor's discharge chute is directed AWAY from the nozzle washout port. 10. ...iMPORTANT: Tug hose ensuring tion is clear. 7. connec- 6. Drive the tractor to a level, clear spot on the tractor, re-start the engine and place the throttle lever in mower with a washout port on . Pull back the lock collar of the nozzle adapter and push the...
Operation Manual
Page 22
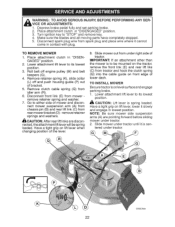
...and set parking brake. 2. Have a tight grip on front edge of bracket. 5. TO INSTALL MOWER Be sure tractor is cen- Turn ignition key to its lowest position. nect mower suspension arm (A) from chassis pin (B) and rear lift link (C) from idler arm (R). 6. nected..."DISEN- Remove clutch cable spring (Q) from rear mower bracket (D) - tered under right side of tractor. Remove retainer spring (K), slide collar (L) off engine pulley (M) and belt keepers (G). 4. remove retainer springs and washers. Slide mower under tractor. 2. Make sure the blades and all moving ...
...and set parking brake. 2. Have a tight grip on front edge of bracket. 5. TO INSTALL MOWER Be sure tractor is cen- Turn ignition key to its lowest position. nect mower suspension arm (A) from chassis pin (B) and rear lift link (C) from idler arm (R). 6. nected..."DISEN- Remove clutch cable spring (Q) from rear mower bracket (D) - tered under right side of tractor. Remove retainer spring (K), slide collar (L) off engine pulley (M) and belt keepers (G). 4. remove retainer springs and washers. Slide mower under tractor. 2. Make sure the blades and all moving ...
Operation Manual
Page 23
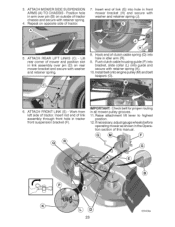
...retainer spring. 4. If necessary, adjust gauge wheels before operating mower as shown in arm over pin (D) on opposite side of mower and position slot in tractor front suspension bracket (F). Position hole in the Operation section of tractor chassis and secure with retainer spring (K). 10. Work from ...through front hole in rink assembly over pin (B) on outside of this manual. 03042tex 23 Insert rod end of tractor. Repeat on rear mower bracket and secure with washer and retainer spring (J). . Raise attachment lift lever to highest position. 12. ATTACH FRONT LINK (E) -...
...retainer spring. 4. If necessary, adjust gauge wheels before operating mower as shown in arm over pin (D) on opposite side of mower and position slot in tractor front suspension bracket (F). Position hole in the Operation section of tractor chassis and secure with retainer spring (K). 10. Work from ...through front hole in rink assembly over pin (B) on outside of this manual. 03042tex 23 Insert rod end of tractor. Repeat on rear mower bracket and secure with washer and retainer spring (J). . Raise attachment lift lever to highest position. 12. ATTACH FRONT LINK (E) -...
Operation Manual
Page 24
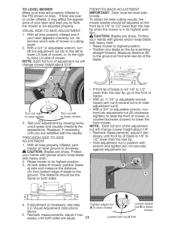
...front link adjustment nut (B) clockwise (tighten) to 1/2" lower than the rear tip when the mower is in position with heavy cloth. • Raise mower to the PSI shown on tires. With all tires properly inflated, park tractor on both sides are satisfied with heavy cloth. 2. Turn nut rig to raise...side and measure the distance (A) from bottom edge of the blade. With all tires properly inflated and if your lawn and lead you are equal. 24 Loosen jam nut A first essary until both sides. • If front tip of blade is cutting lower. 2. Recheck measurements, adjust if nec...
...front link adjustment nut (B) clockwise (tighten) to 1/2" lower than the rear tip when the mower is in position with heavy cloth. • Raise mower to the PSI shown on tires. With all tires properly inflated, park tractor on both sides are satisfied with heavy cloth. 2. Turn nut rig to raise...side and measure the distance (A) from bottom edge of the blade. With all tires properly inflated and if your lawn and lead you are equal. 24 Loosen jam nut A first essary until both sides. • If front tip of blade is cutting lower. 2. Recheck measurements, adjust if nec...

Operation Manual
Page 25
...INSTALLATION - 1. Pull belt toward rear of tractor and roll belt onto engine pulley (E). 3. Be sure belt is a guide decal on level surface. Install mower (See "TO INSTALL MOWER" in all idler pulleys (S). belt installation of all mower pulley grooves. 3. Install belt on a ...lowest position. 3. TO REPLACE MOTION DRIVE BELT Park the tractor parking brake. Engage parking brake. 2. Carefully remove belt upwards from tractor rear to front, over cooling fan blades (D). 5. Remove mower (See "TO REMOVE MOWER" in all belt guides and keepers. 2. Remove belt ...
...INSTALLATION - 1. Pull belt toward rear of tractor and roll belt onto engine pulley (E). 3. Be sure belt is a guide decal on level surface. Install mower (See "TO INSTALL MOWER" in all idler pulleys (S). belt installation of all mower pulley grooves. 3. Install belt on a ...lowest position. 3. TO REPLACE MOTION DRIVE BELT Park the tractor parking brake. Engage parking brake. 2. Carefully remove belt upwards from tractor rear to front, over cooling fan blades (D). 5. Remove mower (See "TO REMOVE MOWER" in all belt guides and keepers. 2. Remove belt ...
Operation Manual
Page 31
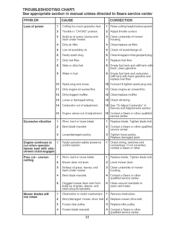
... qualified service center. Contact a Sears or other Poor cut = uneven cutting 1 Worn, bent or loose blade. 2 Mower deck not level. 1 Replace blade. chment clutch engaged Faulty operator-safety control system. Engine continues to open vent holes.... Mower blades will not rotate 1 Obstruction in clutch mechanism. 1 Remove obstruction. 2 Worn/damaged mower drive belt. 2 Replace mower drive belt. 3 Frozen idler pulley. 4 Frozen blade mandrel. 31 3 Replace idler pulley. ...
... qualified service center. Contact a Sears or other Poor cut = uneven cutting 1 Worn, bent or loose blade. 2 Mower deck not level. 1 Replace blade. chment clutch engaged Faulty operator-safety control system. Engine continues to open vent holes.... Mower blades will not rotate 1 Obstruction in clutch mechanism. 1 Remove obstruction. 2 Worn/damaged mower drive belt. 2 Replace mower drive belt. 3 Frozen idler pulley. 4 Frozen blade mandrel. 31 3 Replace idler pulley. ...


