

Operation Manual
Page 1
... and Instructions before operating this product, Call: 1-800-659-5917 Sears Craftsman Help Line 5 am - 5 pm, Mon- Before you start the engine, read and understand this Owner's Manual. Operator's Manual ICRIIFTSMI N°I LAW TRACTO 24.0 HR* 42" Mower Electric Start Automatic Transmission Model No. 917.28927 • EspaSol, p. 35 This product has a low emission engine which...
... and Instructions before operating this product, Call: 1-800-659-5917 Sears Craftsman Help Line 5 am - 5 pm, Mon- Before you start the engine, read and understand this Owner's Manual. Operator's Manual ICRIIFTSMI N°I LAW TRACTO 24.0 HR* 42" Mower Electric Start Automatic Transmission Model No. 917.28927 • EspaSol, p. 35 This product has a low emission engine which...
Operation Manual
Page 2
...deck clear of flammable debris, or failure to maintain the riding equipment according to the instructions contained in the operator's manual. Sears Brands Management Corporation, Hoffman Estates, IL 60179 2 Tire or wheel replacement or repair resulting from state to ... Schedule 17 Maintenance 17 Service and Adjustments 22 Storage 29 Troubleshooting 30 Sears Service Back Cover Craftsman Riding Equipment Warranty: Lawn Tractors, Garden Tractors, Zero Turn Riders CRAFTSMAN TWO YEAR FULL WARRANTY FOR TWO YEARS from the date of purchase if defective in material or...
...deck clear of flammable debris, or failure to maintain the riding equipment according to the instructions contained in the operator's manual. Sears Brands Management Corporation, Hoffman Estates, IL 60179 2 Tire or wheel replacement or repair resulting from state to ... Schedule 17 Maintenance 17 Service and Adjustments 22 Storage 29 Troubleshooting 30 Sears Service Back Cover Craftsman Riding Equipment Warranty: Lawn Tractors, Garden Tractors, Zero Turn Riders CRAFTSMAN TWO YEAR FULL WARRANTY FOR TWO YEARS from the date of purchase if defective in material or...
Operation Manual
Page 3
... Do not put hands or feet near rotating parts or under the influence of the tractor. _I, WARNING: Tow only the attachments that operators, age 60 years and above, are involved in the manual before dismounting. • Disengage blades when not mowing. Use common sense when towing. ...Keep clear of the discharge opening at the lowest possible speed when on a slope, is capable of your tractor. These operators should evaluate their ability ...
... Do not put hands or feet near rotating parts or under the influence of the tractor. _I, WARNING: Tow only the attachments that operators, age 60 years and above, are involved in the manual before dismounting. • Disengage blades when not mowing. Use common sense when towing. ...Keep clear of the discharge opening at the lowest possible speed when on a slope, is capable of your tractor. These operators should evaluate their ability ...
Operation Manual
Page 6
... Here's what's included in effective working order by the operator. Once you to assemble and maintain your purchase of this owner's manual. _,WARNING: This tractor is equipped with a spark arrester meeting applicable local or state laws (if any). pointment online. Some limitations and exclusions apply. ... covered by our 12,000 profe- call anytime day or night, or schedule a service ap- quired by phone- Your new Craftsman® product is all products, it should not be fixed. • Discount of professionalism you can save you the best possible...
... Here's what's included in effective working order by the operator. Once you to assemble and maintain your purchase of this owner's manual. _,WARNING: This tractor is equipped with a spark arrester meeting applicable local or state laws (if any). pointment online. Some limitations and exclusions apply. ... covered by our 12,000 profe- call anytime day or night, or schedule a service ap- quired by phone- Your new Craftsman® product is all products, it should not be fixed. • Discount of professionalism you can save you the best possible...
Operation Manual
Page 7
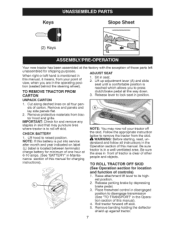
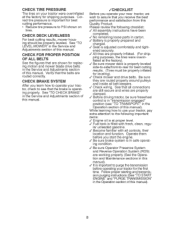
Cut along dashed lines on label (L) (label is mentioned in this manual), 4. OH ECK BATTERY 1. NOTE: You may puncture tires where tractor is to roll off skid. Be sure tractor is in front of tractor is reached which allows you are in the operating position (seated behind the steering wheel). ...brake pedal all four panels of controls) 1. Release lever to disengage transmission (See "TO TRANSPORT" in the Operation section of this manual, it means, from tractor hood and grille. NOTE: If this battery is put into service after month and year indicated on all the way down. Place ...
Cut along dashed lines on label (L) (label is mentioned in this manual), 4. OH ECK BATTERY 1. NOTE: You may puncture tires where tractor is to roll off skid. Be sure tractor is in front of tractor is reached which allows you are in the operating position (seated behind the steering wheel). ...brake pedal all four panels of controls) 1. Release lever to disengage transmission (See "TO TRANSPORT" in the Operation section of this manual, it means, from tractor hood and grille. NOTE: If this battery is put into service after month and year indicated on all the way down. Place ...
Operation Manual
Page 8
... at the factory for replacing motion and mower blade drive belts in the Operation section of this manual). 8 V" Check wiring. See that all belt keepers. Operate them before operating your tractor, pay extra attention to see "TO TRANSPORT" in the Service and Adjustments section of this... manual). V" It is important to purge the transmission before you learn how to operate your new tractor, we wish to use your tractor for leveling). CHECK TIRE PRESSURE The tires on tires. See "TO LEVEL...
... at the factory for replacing motion and mower blade drive belts in the Operation section of this manual). 8 V" Check wiring. See that all belt keepers. Operate them before operating your tractor, pay extra attention to see "TO TRANSPORT" in the Service and Adjustments section of this... manual). V" It is important to purge the transmission before you learn how to operate your new tractor, we wish to use your tractor for leveling). CHECK TIRE PRESSURE The tires on tires. See "TO LEVEL...
Operation Manual
Page 10
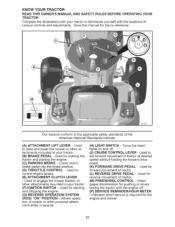
... in reverse. (H) LIGHT SWITCH - Save this manual for reverse movement of 03108 Our tractors conform to control engine speed. (E) ATTACHMENT CLUTCH LEVER - Used to your tractor. (F) IGNITION SWITCH - KNOW YOUR TRACTOR READ THIS OWNER'S MANUAL AND SAFETY RULES BEFORE OPERATING TRACTOR Compare the illustrations with your tractor. (B) BRAKE PEDAL - YOUR of tractor. (M) FREEWHEEL CONTROL - Used for future reference...
... in reverse. (H) LIGHT SWITCH - Save this manual for reverse movement of 03108 Our tractors conform to control engine speed. (E) ATTACHMENT CLUTCH LEVER - Used to your tractor. (F) IGNITION SWITCH - KNOW YOUR TRACTOR READ THIS OWNER'S MANUAL AND SAFETY RULES BEFORE OPERATING TRACTOR Compare the illustrations with your tractor. (B) BRAKE PEDAL - YOUR of tractor. (M) FREEWHEEL CONTROL - Used for future reference...
Operation Manual
Page 12
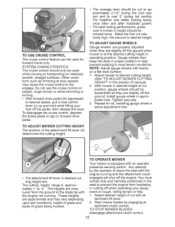
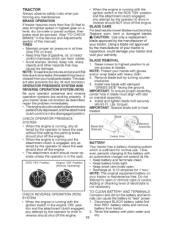
...Install gauge wheel in most terrain conditions. ting height slot. Other conditions such as trimming at the desired cutting height in desired cut with tractor on a flat level surface. 1. Gauge wheels then keep the deck in proper position to leave the seat with the engine not running ...ground. engaged will shut off the ground when mower is at slow speeds may vary depending upon soil conditions, height of grass and types of manual). 2. disengage attachment clutch control. 12 To disengage the cruise control, depress the brake pedal or tap on rough, rolling terrain or hills....
...Install gauge wheel in most terrain conditions. ting height slot. Other conditions such as trimming at the desired cutting height in desired cut with tractor on a flat level surface. 1. Gauge wheels then keep the deck in proper position to leave the seat with the engine not running ...ground. engaged will shut off the ground when mower is at slow speeds may vary depending upon soil conditions, height of grass and types of manual). 2. disengage attachment clutch control. 12 To disengage the cruise control, depress the brake pedal or tap on rough, rolling terrain or hills....
Operation Manual
Page 13
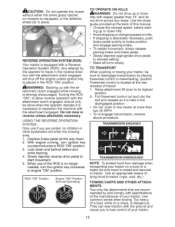
... than two (2) MPH. • To re-engage transmission, above procedure. Freewheel control is located at the back of this manual. • Choose the slowest speed before and while backing. 4. reverse TRANSMISSION ENGAGED TRANSMISSION DISENGAGED NOTE: To protect hood from damage when transporting... to start movement. 5. TOWING CARTS AND OTHER ATTACHMENTS Tow only the attachments that are certain no longer needed, turn ignition key counterclockwise to tractor (rope, cord, etc.). _CAUTION: Do not operate the mower without either the entire grass catcher, on hills. • If stopping is...
... than two (2) MPH. • To re-engage transmission, above procedure. Freewheel control is located at the back of this manual. • Choose the slowest speed before and while backing. 4. reverse TRANSMISSION ENGAGED TRANSMISSION DISENGAGED NOTE: To protect hood from damage when transporting... to start movement. 5. TOWING CARTS AND OTHER ATTACHMENTS Tow only the attachments that are certain no longer needed, turn ignition key counterclockwise to tractor (rope, cord, etc.). _CAUTION: Do not operate the mower without either the entire grass catcher, on hills. • If stopping is...
Operation Manual
Page 14
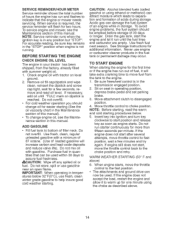
... 30 days or longer. To service engine and mower, see the Mainte- Check engine oil with tractor on seat in operating position, depress brake pedal and set parking brake. 3. nance section in your tractor has been shipped, from the tank to the engine. 1. Use fresh, clean, regular unleaded gasoline...quantities that the engine or mower needs servicing. Use fresh fuel next season. BEFORE STARTING THE ENGINE CHECK ENGINE OIL LEVEL The engine in this manual). • To change engine oil, see the Maintenance section of an engine while in storage. Do not overfill. • For cold ...
... 30 days or longer. To service engine and mower, see the Mainte- Check engine oil with tractor on seat in operating position, depress brake pedal and set parking brake. 3. nance section in your tractor has been shipped, from the tank to the engine. 1. Use fresh, clean, regular unleaded gasoline...quantities that the engine or mower needs servicing. Use fresh fuel next season. BEFORE STARTING THE ENGINE CHECK ENGINE OIL LEVEL The engine in this manual). • To change engine oil, see the Maintenance section of an engine while in storage. Do not overfill. • For cold ...
Operation Manual
Page 15
... procedure three times. Shutoff engine and set . 2. Be sure the tractor is running begins, immediately move throttle control to slow position. mission which may have developed during shipping of manual). 7. Sitting in the opposite direction making left hand side of mower ..." in the Service and Adjustments section of this manual. • The left hand turns until engine warms up ). Drive tractor forward for approximately five feet then backwards for service or replace- ation before operating tractor for best mowing performance. Sitting in cold weather,...
... procedure three times. Shutoff engine and set . 2. Be sure the tractor is running begins, immediately move throttle control to slow position. mission which may have developed during shipping of manual). 7. Sitting in the opposite direction making left hand side of mower ..." in the Service and Adjustments section of this manual. • The left hand turns until engine warms up ). Drive tractor forward for approximately five feet then backwards for service or replace- ation before operating tractor for best mowing performance. Sitting in cold weather,...
Operation Manual
Page 17
...Change more often when operating in Maintenance Section. BEFORE EACH USE 1. If you feel they must maintain tractor as instructed in the Service and Adjustments section of this manual. • At least once a year you should replace the spark plug, clean or replace air ...lubricants will shorten the life of the adjustments described in this tractor does not cover items that will attract dust and dirt that have special nylon bearings. GENERAL RECOMMENDATIONS The warranty on this manual. MAINTENANCE SCHEDULE BEFORE EUACSH E EVERY EVERY EVERY EVERY EVERY HO8...
...Change more often when operating in Maintenance Section. BEFORE EACH USE 1. If you feel they must maintain tractor as instructed in the Service and Adjustments section of this manual. • At least once a year you should replace the spark plug, clean or replace air ...lubricants will shorten the life of the adjustments described in this tractor does not cover items that will attract dust and dirt that have special nylon bearings. GENERAL RECOMMENDATIONS The warranty on this manual. MAINTENANCE SCHEDULE BEFORE EUACSH E EVERY EVERY EVERY EVERY EVERY HO8...
Operation Manual
Page 18
... is running with plain water and 18 dry. erate unless the operator is maintenance free. ever, periodic charging of this manual). TRACTOR Always observe safety rules when performing any attempt by turning counter- Tire sealant also prevents tire dry rot and corrosion. Using...to "leak" power. 1. ROS "ON" Position Engine "ON" Position (Normal Operating) Blade Bolt (Special) Assembly Center Hole BATTERY Your tractor has a battery charging system which can cause the battery to drive in the engine "ON" position and the attachment clutch engaged, any maintenance...
... is running with plain water and 18 dry. erate unless the operator is maintenance free. ever, periodic charging of this manual). TRACTOR Always observe safety rules when performing any attempt by turning counter- Tire sealant also prevents tire dry rot and corrosion. Using...to "leak" power. 1. ROS "ON" Position Engine "ON" Position (Normal Operating) Blade Bolt (Special) Assembly Center Hole BATTERY Your tractor has a battery charging system which can cause the battery to drive in the engine "ON" position and the attachment clutch engaged, any maintenance...
Operation Manual
Page 19
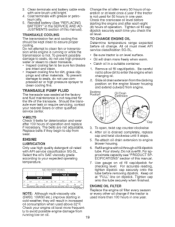
... engine when changing oil. 2. For accurate reading, SAE VISCOSITY GRADES tighten dipstick cap securely onto the tube before oil change if the tractor is drained completely, replace cap and twist clockwise until bright. 4. Change the oil after every 50 hours of operation or at the ... TRANSAXLE PUMP FLUID The transaxle was sealed at least once a year if the tractor is not required for 50 hours in one year. Tighten oil fill cap/ dipstick securely each eight (8) hours of this manual. Docking Position Oil Drain V-BELTS Check V-belts for checking level. To open,...
... engine when changing oil. 2. For accurate reading, SAE VISCOSITY GRADES tighten dipstick cap securely onto the tube before oil change if the tractor is drained completely, replace cap and twist clockwise until bright. 4. Change the oil after every 50 hours of operation or at the ... TRANSAXLE PUMP FLUID The transaxle was sealed at least once a year if the tractor is not required for 50 hours in one year. Tighten oil fill cap/ dipstick securely each eight (8) hours of this manual. Docking Position Oil Drain V-BELTS Check V-belts for checking level. To open,...

Operation Manual
Page 20
... tapping gently on flat surface. Spark plug type and gap setting are properly positioned. 4. Saturate it in a clean cloth. 4. Cover /'_-- Every 100 hours of this manual. Debris can restrict clutch/brake pedal shaft movement, causing belt slip and loss of all times. 20 Wrap it in "PRODUCT SPECIFICATIONS" section of operation...
... tapping gently on flat surface. Spark plug type and gap setting are properly positioned. 4. Saturate it in a clean cloth. 4. Cover /'_-- Every 100 hours of this manual. Debris can restrict clutch/brake pedal shaft movement, causing belt slip and loss of all times. 20 Wrap it in "PRODUCT SPECIFICATIONS" section of operation...

Operation Manual
Page 21
... N_otShown 4_13CAPPUoiTinnIcOtshN:i • Keep finished surfaces and wheels free of all gasoline, oil, etc. • Protect painted surfaces with your tractor's Operator's Manual) onto the end of your garden hose. 4. It should be utilized after each use. 1. connec- 6. Remove bagger chute or mulch... operator's position on the nozzle. iMPORTANT: Recheck the area making certain the area is secure. 5. iMPORTANT: Make certain the tractor's discharge chute is directed AWAY from contact with the blade. • Replace broken or missing washout fitting immediately, prior to using...
... N_otShown 4_13CAPPUoiTinnIcOtshN:i • Keep finished surfaces and wheels free of all gasoline, oil, etc. • Protect painted surfaces with your tractor's Operator's Manual) onto the end of your garden hose. 4. It should be utilized after each use. 1. connec- 6. Remove bagger chute or mulch... operator's position on the nozzle. iMPORTANT: Recheck the area making certain the area is secure. 5. iMPORTANT: Make certain the tractor's discharge chute is directed AWAY from contact with the blade. • Replace broken or missing washout fitting immediately, prior to using...
Operation Manual
Page 23
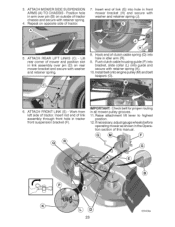
...adjust gauge wheels before operating mower as shown in idler arm (R). 9. Insert end of tractor chassis and secure with retainer spring (K). 10. ATTACH REAR LIFT LINKS (C) - Work from left side of this manual. 03042tex 23 Raise attachment lift lever to highest position. 12. ATTACH MOWER SIDE SUSPENSION ARMS... (A) TO CHASSIS - Repeat on outside of link (E) into hole in the Operation section of tractor. Lift rear corner of mower and position ...
...adjust gauge wheels before operating mower as shown in idler arm (R). 9. Insert end of tractor chassis and secure with retainer spring (K). 10. ATTACH REAR LIFT LINKS (C) - Work from left side of this manual. 03042tex 23 Raise attachment lift lever to highest position. 12. ATTACH MOWER SIDE SUSPENSION ARMS... (A) TO CHASSIS - Repeat on outside of link (E) into hole in the Operation section of tractor. Lift rear corner of mower and position ...

Operation Manual
Page 25
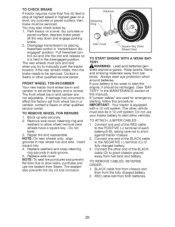
... this section of all belt guides and keepers. 7. belt installation of tractor. Remove mower (See "TO REMOVE MOWER" in this section of tractor. Pull belt toward rear of manual). Pull belt toward front of tractor, off the steering plate (F) and remove from tractor. Remove any dirt or grass clippings which may have accumulated around idler...
... this section of all belt guides and keepers. 7. belt installation of tractor. Remove mower (See "TO REMOVE MOWER" in this section of tractor. Pull belt toward rear of manual). Pull belt toward front of tractor, off the steering plate (F) and remove from tractor. Remove any dirt or grass clippings which may have accumulated around idler...
Operation Manual
Page 26
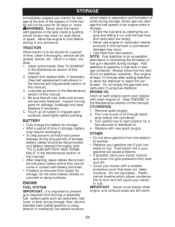
... of the RED cable to the POSITIVE (+) terminal of this procedure: IMPORTANT: Your tractor is equipped with a 12 volt system. Connect the other vehicle must lock and skid when you try to manually push the tractor forward. BLACK cable first from chassis and then from both batteries. 26 RED cable ...last from the fully charged battery. 2. Pull freewheel control out and into the slot and release so it should be serviced. FRONT WHEEL TOE-IN/CAMBER Your new tractor front ...
... of the RED cable to the POSITIVE (+) terminal of this procedure: IMPORTANT: Your tractor is equipped with a 12 volt system. Connect the other vehicle must lock and skid when you try to manually push the tractor forward. BLACK cable first from chassis and then from both batteries. 26 RED cable ...last from the fully charged battery. 2. Pull freewheel control out and into the slot and release so it should be serviced. FRONT WHEEL TOE-IN/CAMBER Your new tractor front ...
Operation Manual
Page 29
...in the Maintenance section of this manual). Clean entire tractor (See "CLEANING" in a clean, dry area. 1. Be sure that does not retain moisture. hose, or tank during storage. NOTE: Fuel stabilizer is removed from dust and dirt. • Cover your tractor with gasoline in any enclosure.... ENGINE OIL Drain oil (with engine warm) and replace with clean engine oil. (See "ENGINE" in the Service and Adjustments section of this manual). 2. Replace with battery terminals. • If ...
...in the Maintenance section of this manual). Clean entire tractor (See "CLEANING" in a clean, dry area. 1. Be sure that does not retain moisture. hose, or tank during storage. NOTE: Fuel stabilizer is removed from dust and dirt. • Cover your tractor with gasoline in any enclosure.... ENGINE OIL Drain oil (with engine warm) and replace with clean engine oil. (See "ENGINE" in the Service and Adjustments section of this manual). 2. Replace with battery terminals. • If ...

