

Operation Manual
Page 1
For answers to your questions about this Owner's Manual. Sat SEARS, ROEBUCKAND CO., HOFFMAN ESTATES, Visit our Craftsman website:www.sears.com/craftsman IL 60179 U.S.A. *As rated by the engine manufacturer 425706 Rev. 3 Operator's Manual CRRFf$14RH° LAW TRACTO 20.0 HP,*42" Mower Electric Start Automatic Transmission Model No. 917.28910 • EspaSol, p. 34 03131 This product has...
For answers to your questions about this Owner's Manual. Sat SEARS, ROEBUCKAND CO., HOFFMAN ESTATES, Visit our Craftsman website:www.sears.com/craftsman IL 60179 U.S.A. *As rated by the engine manufacturer 425706 Rev. 3 Operator's Manual CRRFf$14RH° LAW TRACTO 20.0 HP,*42" Mower Electric Start Automatic Transmission Model No. 917.28910 • EspaSol, p. 34 03131 This product has...

Operation Manual
Page 2
...Pre-Operation 8 Operation 11 Maintenance Schedule 18 Maintenance 18 Service and Adjustments 22 Storage 28 Troubleshooting 29 Sears Service Back Cover CRAFTSMAN FULL WARRANTY TWO YEARS ON RiDiNG EQUIPMENT When operated and maintained according to all supplied instructions, if this riding equipment fails ... clear of flammable debris, or failure to maintain the riding equipment according to the instructions contained in the operator's manual. • Engine (fuel system) cleaning or repairs caused byfuel determined to state. This warranty applies only while this product...
...Pre-Operation 8 Operation 11 Maintenance Schedule 18 Maintenance 18 Service and Adjustments 22 Storage 28 Troubleshooting 29 Sears Service Back Cover CRAFTSMAN FULL WARRANTY TWO YEARS ON RiDiNG EQUIPMENT When operated and maintained according to all supplied instructions, if this riding equipment fails ... clear of flammable debris, or failure to maintain the riding equipment according to the instructions contained in the operator's manual. • Engine (fuel system) cleaning or repairs caused byfuel determined to state. This warranty applies only while this product...

Operation Manual
Page 3
...accessories contain lead and lead compounds, chemicals known to the State of California to operate the machine. • Clear the area of your tractor. Allow machine to protect themselves and others from serious injury. • Follow the manufacturer's recommen- Failure to observe the following safety ... in place and working. • Slow down and behind before storage. 3 Too heavy of a load, while on the machine and in the manual before starting when setting up which could result in serious injury or death. _,WARNING: In order to prevent accidental starting . • Do not...
...accessories contain lead and lead compounds, chemicals known to the State of California to operate the machine. • Clear the area of your tractor. Allow machine to protect themselves and others from serious injury. • Follow the manufacturer's recommen- Failure to observe the following safety ... in place and working. • Slow down and behind before storage. 3 Too heavy of a load, while on the machine and in the manual before starting when setting up which could result in serious injury or death. _,WARNING: In order to prevent accidental starting . • Do not...
Operation Manual
Page 6
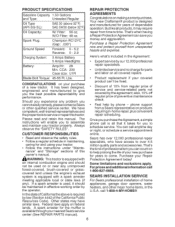
...Charging System: Battery: 1.50 Gallons Unleaded Regular SAE 30 (above is required by law (Section 4442 of this owner's manual. _,WARNING: This tractor is equipped with a spark arrester Sears has over 12,000 professional repair specialists, who have access to over 4.5 million ... water heaters, and other qualified service center. Purchase your tractor properly. It has been designed, engineered and manufactured to come. You can save you the best possible dependability and performance. Your new Craftsman® product is all products, it should not be ...
...Charging System: Battery: 1.50 Gallons Unleaded Regular SAE 30 (above is required by law (Section 4442 of this owner's manual. _,WARNING: This tractor is equipped with a spark arrester Sears has over 12,000 professional repair specialists, who have access to over 4.5 million ... water heaters, and other qualified service center. Purchase your tractor properly. It has been designed, engineered and manufactured to come. You can save you the best possible dependability and performance. Your new Craftsman® product is all products, it should not be ...
Operation Manual
Page 8
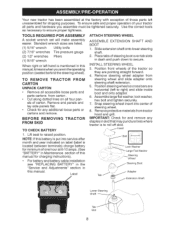
...Extension Shaft Lower Steering Shaft Tab Slot 8 BEFORE REMOVING FROM SKID TRACTOR TO CHECK BATTERY 1. INSTALL STEERING WHEEL 3. Your new tractor has been assembled at 6-10 amps. (See "BATTERY" in Maintenance section of this manual for charging instructions). * For batteryand battery cable installation see "...REPLACING BATTERY" in the "Service and Adjustments" this manual. TO REMOVE TRACTOR CARTON UNPACK CARTON FROM * Remove all accessible loose parts and parts cartons from carton. * Cut along dotted...
...Extension Shaft Lower Steering Shaft Tab Slot 8 BEFORE REMOVING FROM SKID TRACTOR TO CHECK BATTERY 1. INSTALL STEERING WHEEL 3. Your new tractor has been assembled at 6-10 amps. (See "BATTERY" in Maintenance section of this manual for charging instructions). * For batteryand battery cable installation see "...REPLACING BATTERY" in the "Service and Adjustments" this manual. TO REMOVE TRACTOR CARTON UNPACK CARTON FROM * Remove all accessible loose parts and parts cartons from carton. * Cut along dotted...
Operation Manual
Page 9
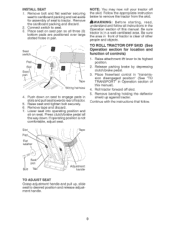
... to engage pads in slots and pull seat towards rear of this manual. Lower seat into operating position and sit on seat to tractor. Be sure tractor is not comfortable, adjust seat. TO ROLL TRACTOR OFF SKID Operation section for assembly of this manual). 4. Place freewheel control in "transmission disengaged position" (See "TO TRANSPORT" in...
... to engage pads in slots and pull seat towards rear of this manual. Lower seat into operating position and sit on seat to tractor. Be sure tractor is not comfortable, adjust seat. TO ROLL TRACTOR OFF SKID Operation section for assembly of this manual). 4. Place freewheel control in "transmission disengaged position" (See "TO TRANSPORT" in...
Operation Manual
Page 10
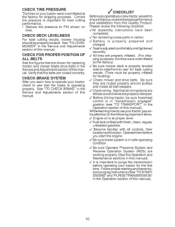
... unleaded gasoline. ,/ Become familiar with all belt keepers. ,/Check wiring. See that the brake is in the Operation section of this manual). 10 Follow proper starting and transmission purging instructions (See "TO START ENGINE"and "PU RGETRANSMISSION" in "transmission engaged" position (see...-side/front-to ensure that the belts are properly clamped. ,/Before driving tractor, be sure freewheel control is operating properly. See "TO LEVEL MOWER" in the Service and Adjustments manual. CHECK BRAKE SYSTEM After you receive the best performance and satisfaction from this...
... unleaded gasoline. ,/ Become familiar with all belt keepers. ,/Check wiring. See that the brake is in the Operation section of this manual). 10 Follow proper starting and transmission purging instructions (See "TO START ENGINE"and "PU RGETRANSMISSION" in "transmission engaged" position (see...-side/front-to ensure that the belts are properly clamped. ,/Before driving tractor, be sure freewheel control is operating properly. See "TO LEVEL MOWER" in the Service and Adjustments manual. CHECK BRAKE SYSTEM After you receive the best performance and satisfaction from this...
Operation Manual
Page 12
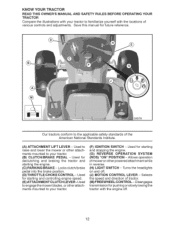
...) "ON" POSITION - Turns the headlights on and off . 12 Used for future reference. KNOW YOUR TRACTOR READ THIS OWNER'S MANUAL AND SAFETY RULES BEFORE OPERATING TRACTOR Compare the illustrations with your tractor. (F) IGNITION SWITCH - YOUR of 03078 Our tractors conform to raise and lower the mower or other powered attachment while in reverse. (H) LIGHT SWITCH -
...) "ON" POSITION - Turns the headlights on and off . 12 Used for future reference. KNOW YOUR TRACTOR READ THIS OWNER'S MANUAL AND SAFETY RULES BEFORE OPERATING TRACTOR Compare the illustrations with your tractor. (F) IGNITION SWITCH - YOUR of 03078 Our tractors conform to raise and lower the mower or other powered attachment while in reverse. (H) LIGHT SWITCH -
Operation Manual
Page 14
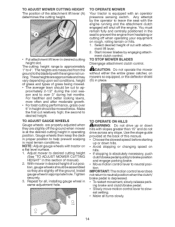
...the ground to the blade tip with attach- Install gauge wheel in desired cutting height slot. TO OPERATE MOWER Your tractor is at the back of manual). 2. You must remain fully and centrally positioned in height should be assembled so they are slightly offthe ground. ment...; Avoid stopping or changing speed on mowers so equipped, or the deflector shield (S) in most terrain conditions. For healthier and better looking lawns, mow often and after moderate growth. • For best cutting performance, grass over 3" during the cool season and to help prevent scalping...
...the ground to the blade tip with attach- Install gauge wheel in desired cutting height slot. TO OPERATE MOWER Your tractor is at the back of manual). 2. You must remain fully and centrally positioned in height should be assembled so they are slightly offthe ground. ment...; Avoid stopping or changing speed on mowers so equipped, or the deflector shield (S) in most terrain conditions. For healthier and better looking lawns, mow often and after moderate growth. • For best cutting performance, grass over 3" during the cool season and to help prevent scalping...
Operation Manual
Page 16
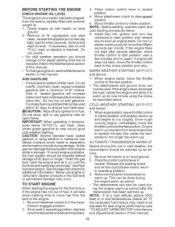
...rough running begins, immediately move the throttle control back to warm up as described above ) 7. Usefresh, clean, regular unleaded gasoline with tractor on seat in the trans- lines and carburetor are empty. See Storage Instructions for one minute fortransmission to the choke position and retry...need to separation and formation of fuel, it run roughly. NOTE: If at a high altitude (above 3000 feet) or in this manual). 16 To avoid engine problems, the fuel system should be used. Usefresh fuel next season. When engine starts, leave throttle control in...
...rough running begins, immediately move the throttle control back to warm up as described above ) 7. Usefresh, clean, regular unleaded gasoline with tractor on seat in the trans- lines and carburetor are empty. See Storage Instructions for one minute fortransmission to the choke position and retry...need to separation and formation of fuel, it run roughly. NOTE: If at a high altitude (above 3000 feet) or in this manual). 16 To avoid engine problems, the fuel system should be used. Usefresh fuel next season. When engine starts, leave throttle control in...
Operation Manual
Page 17
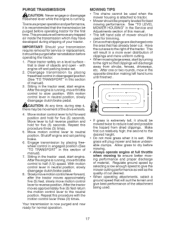
...area that is extremely tall, it is attached to ensure better mowing performance and proper discharge of manual). 3. Move motion control lever to the right ofthe tractor. Engage transmission by placing freewheel control in disengaged position (See "TO TRANSPORT" in a more ...uniform cutting. After the tractor moves approximately five (5) feet return the motion control lever to dry before operating the tractor. 1. Wet grass will result in this manual. Shutoff engine and set . 2. Repeat this procedure three (3) times. ...
...area that is extremely tall, it is attached to ensure better mowing performance and proper discharge of manual). 3. Move motion control lever to the right ofthe tractor. Engage transmission by placing freewheel control in disengaged position (See "TO TRANSPORT" in a more ...uniform cutting. After the tractor moves approximately five (5) feet return the motion control lever to dry before operating the tractor. 1. Wet grass will result in this manual. Shutoff engine and set . 2. Repeat this procedure three (3) times. ...
Operation Manual
Page 18
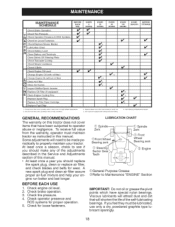
...Cooling Fins Replace Spark Plug Replace Air Filter Paper Cartridge RReplace Fuel Filter I[_ if _ 1 - Some adjustments will shorten the life of this tractor does not cover items that will need to be lubricated, use only a dry, powdered graphite type lubricant sparingly. 18 At least once a season... Replace blades more often when operating under a heavy load or in high ambient in Maintenance Section. GENERAL RECOMMENDATIONS The warranty on this manual. • At least once a year you should make any of the adjustments described in the Service and Adjustments section of the...
...Cooling Fins Replace Spark Plug Replace Air Filter Paper Cartridge RReplace Fuel Filter I[_ if _ 1 - Some adjustments will shorten the life of this tractor does not cover items that will need to be lubricated, use only a dry, powdered graphite type lubricant sparingly. 18 At least once a season... Replace blades more often when operating under a heavy load or in high ambient in Maintenance Section. GENERAL RECOMMENDATIONS The warranty on this manual. • At least once a year you should make any of the adjustments described in the Service and Adjustments section of the...
Operation Manual
Page 19
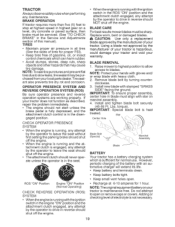
... CARE For best results mower blades must be puF chased from your warranty. Using a blade not approved by the manufacturer of this manual). BLADE REMOVAL 1. Install and tighten blade bolt securely (45-55 Ft. Tire sealant also prevents tire dry rot and corrosion. IMPORTANT...ate unless the operator is heat treated. Do not attempt to open . • Recharge at highest speed in highest gear on your tractor is in reverse should NOT shut off the engine. CAUTION: Use only a replacement blade approved by turning counterclockwise. 3. Adding or checking ...
... CARE For best results mower blades must be puF chased from your warranty. Using a blade not approved by the manufacturer of this manual). BLADE REMOVAL 1. Install and tighten blade bolt securely (45-55 Ft. Tire sealant also prevents tire dry rot and corrosion. IMPORTANT...ate unless the operator is heat treated. Do not attempt to open . • Recharge at highest speed in highest gear on your tractor is in reverse should NOT shut off the engine. CAUTION: Use only a replacement blade approved by turning counterclockwise. 3. Adding or checking ...
Operation Manual
Page 20
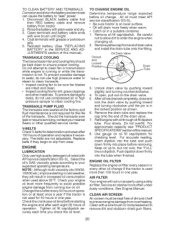
... more frequently to seals, do not use high quality detergent oil rated with a wire brush or compressed airto remove dirt and stubborn dried gum fibers. 20 Do not attempt to clean cooling fins. Oil Drain Valve and f CLolocskeedd -" Position_ __ Yellow Cap'_"_ _ w Dru_n 3. To open, pull out ... , but not over, the "FULl" line on oil. Be careful not to allow dirt to slip from tractor. 2. Refill engine with grease or petroleum jelly. 5. See Engine Manual. Remove the drain tube and replace the cap onto the end of operation or at the factory and fluid maintenance...
... more frequently to seals, do not use high quality detergent oil rated with a wire brush or compressed airto remove dirt and stubborn dried gum fibers. 20 Do not attempt to clean cooling fins. Oil Drain Valve and f CLolocskeedd -" Position_ __ Yellow Cap'_"_ _ w Dru_n 3. To open, pull out ... , but not over, the "FULl" line on oil. Be careful not to allow dirt to slip from tractor. 2. Refill engine with grease or petroleum jelly. 5. See Engine Manual. Remove the drain tube and replace the cap onto the end of operation or at the factory and fluid maintenance...
Operation Manual
Page 21
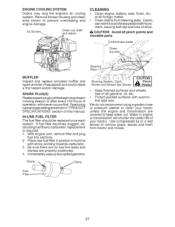
... chaff and debris CLEANING • Clean engine, battery, seat, finish, etc. of your tractor unless the engine and transmission are covered to remove grass, leaves and trash from tractor and mower. Debris can restrict clutch/brake pedal shaft movement, causing belt slip and loss of...foreign matter. • Clean debrisfrom steering plate. C_UTPIOinNc:h Fender and Mower Not Shown Points • Keep finished surfaces and wheels free of this manual. Use compressed air or a leaf blower to keep water out. Water in "PRODUCT SPECIFICATIONS" section of all gasoline, oil, etc. •...
... chaff and debris CLEANING • Clean engine, battery, seat, finish, etc. of your tractor unless the engine and transmission are covered to remove grass, leaves and trash from tractor and mower. Debris can restrict clutch/brake pedal shaft movement, causing belt slip and loss of...foreign matter. • Clean debrisfrom steering plate. C_UTPIOinNc:h Fender and Mower Not Shown Points • Keep finished surfaces and wheels free of this manual. Use compressed air or a leaf blower to keep water out. Water in "PRODUCT SPECIFICATIONS" section of all gasoline, oil, etc. •...
Operation Manual
Page 23
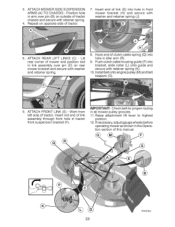
... mower pulley grooves. 11. Repeat on rear mower bracket and secure with retainer spring. 4. Work from left side of tractor chassis and secure with washer and retainer spring. 8. Insert end of this manual. 03042tex 23 ATTACH REAR LIFT LINKS (C) - Push clutch cable housing guide (P) into hole in the Operation section of link...
... mower pulley grooves. 11. Repeat on rear mower bracket and secure with retainer spring. 4. Work from left side of tractor chassis and secure with washer and retainer spring. 8. Insert end of this manual. 03042tex 23 ATTACH REAR LIFT LINKS (C) - Push clutch cable housing guide (P) into hole in the Operation section of link...
Operation Manual
Page 25
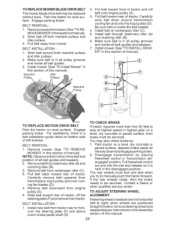
...in all pulley grooves and inside all belt guides and keepers. 7. NOTE: Observe entire motion drive belt and position of manual). Carefully remove belt upwards from tractor rear to front, over cooling fan blades (D). 4. Install new belt from transmission input pulley and over the steering plate ...work belt down and engage parking brake. 2. straight forward, remove steering wheel and reassemble per instructions in this section of this manual). Park the tractor on a level, dry concrete or paved surface, then brake must lock and skid when you try to stop at highest speed...
...in all pulley grooves and inside all belt guides and keepers. 7. NOTE: Observe entire motion drive belt and position of manual). Carefully remove belt upwards from tractor rear to front, over cooling fan blades (D). 4. Install new belt from transmission input pulley and over the steering plate ...work belt down and engage parking brake. 2. straight forward, remove steering wheel and reassemble per instructions in this section of this manual). Park the tractor on a level, dry concrete or paved surface, then brake must lock and skid when you try to stop at highest speed...
Operation Manual
Page 26
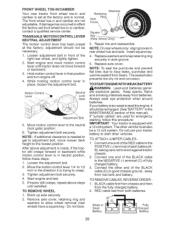
...a qualified service center. Move the motion control lever 1/4 to start other end of this procedure: IMPORTANT: Your tractor is equipped with a 12 volt system. Connect one end of the BLACK cable to affect the factory set at... in rear wheel hub and axle. Loosen the adjustment bolt. 2. ate explosive gases. After above steps until tractor does not move mower deck height to good chassis ground, away from both batteries. The front wheel toe-in...off. 4. Hold motion control lever in neutral position, follow this manual). Motion Control Lever Neutral Lock Gate 02_9 ;
...a qualified service center. Move the motion control lever 1/4 to start other end of this procedure: IMPORTANT: Your tractor is equipped with a 12 volt system. Connect one end of the BLACK cable to affect the factory set at... in rear wheel hub and axle. Loosen the adjustment bolt. 2. ate explosive gases. After above steps until tractor does not move mower deck height to good chassis ground, away from both batteries. The front wheel toe-in...off. 4. Hold motion control lever in neutral position, follow this manual). Motion Control Lever Neutral Lock Gate 02_9 ;

Operation Manual
Page 27
...holder securely back into the hole in fuse. If adjustment is necessary, see engine manual. TO REPLACE FUSE Replace with 20 amp automotive-type plug-in the backside of tractor. Raise hood. 2. TO ADJUST CHOKE CONTROL The choke control has been preset at... batterywithterminals in fuel, temperature, altitude or load. Unsnap headlight wire connector. 3. See "PURGE TRANSMISSION" in the backside of this manual. Remove bulb holder from tractor. 3. If adjustment is located behind the dash. Keps . _fNut Hex Bolt Positive (Red) Cable Negative (Black) Cable TO ...
...holder securely back into the hole in fuse. If adjustment is necessary, see engine manual. TO REPLACE FUSE Replace with 20 amp automotive-type plug-in the backside of tractor. Raise hood. 2. TO ADJUST CHOKE CONTROL The choke control has been preset at... batterywithterminals in fuel, temperature, altitude or load. Unsnap headlight wire connector. 3. See "PURGE TRANSMISSION" in the backside of this manual. Remove bulb holder from tractor. 3. If adjustment is located behind the dash. Keps . _fNut Hex Bolt Positive (Red) Cable Negative (Black) Cable TO ...
Operation Manual
Page 28
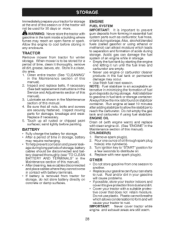
.... • After a period of time in the Maintenance section of this manual. 4. Run engine at the end of time, clean it to give protection from tractor for winter storage. IMPORTANT: Never cover tractor while engine and exhaust areas are empty. • Never use plastic. WARNING... concrete or damp surfaces. Pour one season to separation and formation of acids during long periods of this manual). 2. OTHER • Do not store gasoline from tractor for storage, do not store battery directly on stabilizer container. sand lightly before storing in storage. •...
.... • After a period of time in the Maintenance section of this manual. 4. Run engine at the end of time, clean it to give protection from tractor for winter storage. IMPORTANT: Never cover tractor while engine and exhaust areas are empty. • Never use plastic. WARNING... concrete or damp surfaces. Pour one season to separation and formation of acids during long periods of this manual). 2. OTHER • Do not store gasoline from tractor for storage, do not store battery directly on stabilizer container. sand lightly before storing in storage. •...

