
Wireless Setup Guide
Page 3
... this information in the "My Network Settings" table on page 2. If you successfully complete step 6, your router is set up and turn it off by opening your computer is on, turn on /off . Web site. 3 Important: If you cannot access a Web site, repeat steps 1 5 During router configuration, check whether the wireless router...
... this information in the "My Network Settings" table on page 2. If you successfully complete step 6, your router is set up and turn it off by opening your computer is on, turn on /off . Web site. 3 Important: If you cannot access a Web site, repeat steps 1 5 During router configuration, check whether the wireless router...

Wireless Setup Guide
Page 4
... accessing a Web site. 5 Connect and configure any additional wireless-enabled computers or other devices, including wired devices, that correspond with wireless notebooks and wired desktop PROGRESS CHECK If you continue to your ISP for this network. 2 Type the WEP encryption key in the Network key ... steps 1 through 3. PROGRESS CHECK If you cannot access a Web site, restart your network. PROGRESS CHECK After step 1, the blue wireless light turns on. 1 Press the wireless on/off button on each computer in the Confirm network key field. 3 Select Connect. 4 Test the Internet connection...
... accessing a Web site. 5 Connect and configure any additional wireless-enabled computers or other devices, including wired devices, that correspond with wireless notebooks and wired desktop PROGRESS CHECK If you continue to your ISP for this network. 2 Type the WEP encryption key in the Network key ... steps 1 through 3. PROGRESS CHECK If you cannot access a Web site, restart your network. PROGRESS CHECK After step 1, the blue wireless light turns on. 1 Press the wireless on/off button on each computer in the Confirm network key field. 3 Select Connect. 4 Test the Internet connection...

Wireless Setup Guide
Page 5
... Internet access. If you . The SSID should be a unique name that connects a computer to the cable television network, which in turn connects to the Internet. Refer to decrypt the data. Refer to your Web browser. broadband-An always-on your router instructions for more... the following security measures: ■ Enable encryption on your browser is an essential security solution that connects a computer to a phone line, which in turn connects to the Internet. d Change the SSID. A firewall is the safest way to browse, but it . Chance of getting a virus, a Trojan...
... Internet access. If you . The SSID should be a unique name that connects a computer to the cable television network, which in turn connects to the Internet. Refer to decrypt the data. Refer to your Web browser. broadband-An always-on your router instructions for more... the following security measures: ■ Enable encryption on your browser is an essential security solution that connects a computer to a phone line, which in turn connects to the Internet. d Change the SSID. A firewall is the safest way to browse, but it . Chance of getting a virus, a Trojan...
Wireless Setup Guide
Page 6
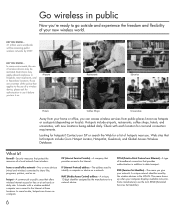
.... Looking for authorization to use of a wireless device, please ask for hotspots? hotspot-A commercial or public area that applies to the use it before you turn it on locale). SSID (Services Set Identifier)-The name you give your computer displays available networks. ISP (Internet Service Provider)-A company that provides authentication in...
.... Looking for authorization to use of a wireless device, please ask for hotspots? hotspot-A commercial or public area that applies to the use it before you turn it on locale). SSID (Services Set Identifier)-The name you give your computer displays available networks. ISP (Internet Service Provider)-A company that provides authentication in...

HP USB Digital Drive
Page 5
To connect the Digital Drive to a USB port directly (with the connector cable in the unextended position): » Insert the USB connector on the Digital Drive into a USB port on when the connection is successful. The status light on the Digital Drive turns on your computer. If the status light does not turn on, remove the Digital Drive from the USB port, then reinsert the USB connector. 4 User Guide
To connect the Digital Drive to a USB port directly (with the connector cable in the unextended position): » Insert the USB connector on the Digital Drive into a USB port on when the connection is successful. The status light on the Digital Drive turns on your computer. If the status light does not turn on, remove the Digital Drive from the USB port, then reinsert the USB connector. 4 User Guide

HP USB Digital Drive
Page 7
The status light on the Digital Drive turns on , remove the Digital Drive from the USB port, then reinsert the USB connector. 6 User Guide If the status light does not turn on when the connection is successful. 2. Insert the USB connector on the Digital Drive into a USB port on your computer.
The status light on the Digital Drive turns on , remove the Digital Drive from the USB port, then reinsert the USB connector. 6 User Guide If the status light does not turn on when the connection is successful. 2. Insert the USB connector on the Digital Drive into a USB port on your computer.
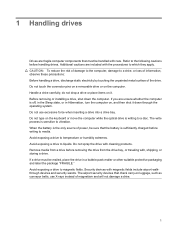
Drives - Windows Vista
Page 5
... to magnetic fields. When the battery is sufficiently charged before writing to which they apply. If a drive must be mailed, place the drive in Hibernation, turn the computer on luggage, such as conveyor belts, use excessive force when inserting a drive into a drive bay. The airport security devices that check carry-on...
... to magnetic fields. When the battery is sufficiently charged before writing to which they apply. If a drive must be mailed, place the drive in Hibernation, turn the computer on luggage, such as conveyor belts, use excessive force when inserting a drive into a drive bay. The airport security devices that check carry-on...

Drives - Windows Vista
Page 9
... Blu-ray Disc can store 25 GB, over five times the storage of data ● High-definition video ● Video games Playing a CD or DVD 1. Turn on the drive bezel to release the disc tray. 3. Hold the disc by the edges to use the media content. If you want to avoid...
... Blu-ray Disc can store 25 GB, over five times the storage of data ● High-definition video ● Video games Playing a CD or DVD 1. Turn on the drive bezel to release the disc tray. 3. Hold the disc by the edges to use the media content. If you want to avoid...
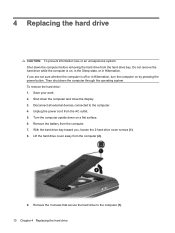
Drives - Windows Vista
Page 14
... external devices connected to the computer (1). 10 Chapter 4 Replacing the hard drive Unplug the power cord from the computer. 7. Turn the computer upside down on , in the Sleep state, or in Hibernation, turn the computer on by pressing the power button. Do not remove the hard drive while the computer is off...
... external devices connected to the computer (1). 10 Chapter 4 Replacing the hard drive Unplug the power cord from the computer. 7. Turn the computer upside down on , in the Sleep state, or in Hibernation, turn the computer on by pressing the power button. Do not remove the hard drive while the computer is off...

Drives - Windows Vista
Page 19
... follows: 1. Do not initiate Hibernation or Sleep while playing a disc. Set Colors to exit the program and then restart it. ● Increase system resources: ◦ Turn off the Internet before playing the disc. A disc does not play 15 If necessary, clean the disc with an optical disc repair kit available at...
... follows: 1. Do not initiate Hibernation or Sleep while playing a disc. Set Colors to exit the program and then restart it. ● Increase system resources: ◦ Turn off the Internet before playing the disc. A disc does not play 15 If necessary, clean the disc with an optical disc repair kit available at...

Drives - Windows Vista
Page 20
If prompted by User Account Control, click Continue. 3. Select the check box for Use AutoPlay for all other programs are closed. ● Turn off Sleep mode and Hibernation. ● Be sure that you are using the right kind of burning a disc does not begin, or it is inserted ...
If prompted by User Account Control, click Continue. 3. Select the check box for Use AutoPlay for all other programs are closed. ● Turn off Sleep mode and Hibernation. ● Be sure that you are using the right kind of burning a disc does not begin, or it is inserted ...
Memory Modules - Windows Vista and Windows 7
Page 7
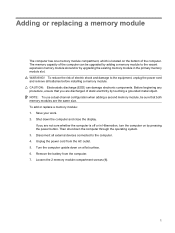
...adding a second memory module, be upgraded by adding a memory module to the computer. 4. Then shut down the computer and close the display. Turn the computer upside down on the bottom of static electricity by pressing the power button. Remove the battery from the AC outlet. 5. CAUTION: ... and remove all external devices connected to the vacant expansion memory module slot and/or by upgrading the existing memory module in Hibernation, turn the computer on by touching a grounded metal object. To reduce the risk of the computer can damage electronic components. Unplug the power...
...adding a second memory module, be upgraded by adding a memory module to the computer. 4. Then shut down the computer and close the display. Turn the computer upside down on the bottom of static electricity by pressing the power button. Remove the battery from the AC outlet. 5. CAUTION: ... and remove all external devices connected to the vacant expansion memory module slot and/or by upgrading the existing memory module in Hibernation, turn the computer on by touching a grounded metal object. To reduce the risk of the computer can damage electronic components. Unplug the power...

Memory Modules - Windows Vista and Windows 7
Page 10
Reconnect external power and external devices. 16. Turn on the computer. 4 Adding or replacing a memory module Replace the battery. 15. 14.
Reconnect external power and external devices. 16. Turn on the computer. 4 Adding or replacing a memory module Replace the battery. 15. 14.
Security - Window Vista and Windows 7
Page 9
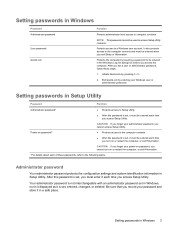
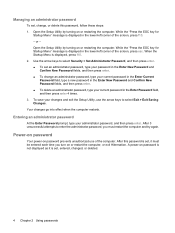
It also protects access to the computer contents and must be entered when you cannot turn on password* CAUTION: If you forget your password and store it each time you set , it must be used to be entered each time you ... contents. ● After this password is it displayed as it must enter it in a safe place. Be sure that you access Setup Utility. After you turn on password, you exit Sleep or Hibernation. Administrator password Your administrator password protects the configuration settings and system identification information in Windows 3 Protects access to...
It also protects access to the computer contents and must be entered when you cannot turn on password* CAUTION: If you forget your password and store it each time you set , it must be used to be entered each time you ... contents. ● After this password is it displayed as it must enter it in a safe place. Be sure that you access Setup Utility. After you turn on password, you exit Sleep or Hibernation. Administrator password Your administrator password protects the configuration settings and system identification information in Windows 3 Protects access to...
Security - Window Vista and Windows 7
Page 10
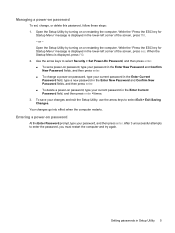
... "Press the ESC key for Startup Menu" message is displayed in the lower-left corner of the screen, press esc. Open the Setup Utility by turning on or restarting the computer. After 3 unsuccessful attempts to enter the administrator password, you must be entered each time you... turn on or restart the computer, or exit Hibernation. When the Startup Menu is displayed, press f10. 2. Entering an administrator password At the Enter Password prompt, ...
... "Press the ESC key for Startup Menu" message is displayed in the lower-left corner of the screen, press esc. Open the Setup Utility by turning on or restarting the computer. After 3 unsuccessful attempts to enter the administrator password, you must be entered each time you... turn on or restart the computer, or exit Hibernation. When the Startup Menu is displayed, press f10. 2. Entering an administrator password At the Enter Password prompt, ...
Security - Window Vista and Windows 7
Page 11
...the ESC key for Startup Menu" message is displayed in the lower-left corner of the screen, press f10. - Open the Setup Utility by turning on password, type your current password in Setup Utility 5 While the "Press the ESC key for Startup Menu" message is displayed in the lower... in the Enter Current Password field, and then press enter 4 times. 3. Entering a power-on or restarting the computer. Open the Setup Utility by turning on password At the Enter Password prompt, type your changes and exit the Setup Utility, use the arrow keys to enter the password, you must...
...the ESC key for Startup Menu" message is displayed in the lower-left corner of the screen, press f10. - Open the Setup Utility by turning on password, type your current password in Setup Utility 5 While the "Press the ESC key for Startup Menu" message is displayed in the lower... in the Enter Current Password field, and then press enter 4 times. 3. Entering a power-on or restarting the computer. Open the Setup Utility by turning on password At the Enter Password prompt, type your changes and exit the Setup Utility, use the arrow keys to enter the password, you must...
Setup Utility - Windows Vista and Windows 7
Page 5
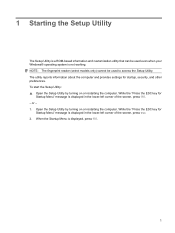
...is displayed in the lower-left corner of the screen, press f10. - To start the Setup Utility: ▲ Open the Setup Utility by turning on or restarting the computer. NOTE: The fingerprint reader (select models only) cannot be used to access the Setup Utility. While the "Press..."Press the ESC key for startup, security, and other preferences. When the Startup Menu is displayed, press f10. 1 Open the Setup Utility by turning on or restarting the computer. 1 Starting the Setup Utility The Setup Utility is a ROM-based information and customization utility that can be used even ...
...is displayed in the lower-left corner of the screen, press f10. - To start the Setup Utility: ▲ Open the Setup Utility by turning on or restarting the computer. NOTE: The fingerprint reader (select models only) cannot be used to access the Setup Utility. While the "Press..."Press the ESC key for startup, security, and other preferences. When the Startup Menu is displayed, press f10. 1 Open the Setup Utility by turning on or restarting the computer. 1 Starting the Setup Utility The Setup Utility is a ROM-based information and customization utility that can be used even ...
Setup Utility - Windows Vista and Windows 7
Page 6
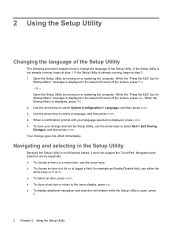
... keys to change the language of the Setup Utility. To save your language selected is already running , begin at step 1. Open the Setup Utility by turning on or restarting the computer. If the Setup Utility is displayed, press enter. 5. When a confirmation prompt with your change goes into effect immediately. Your change...
... keys to change the language of the Setup Utility. To save your language selected is already running , begin at step 1. Open the Setup Utility by turning on or restarting the computer. If the Setup Utility is displayed, press enter. 5. When a confirmation prompt with your change goes into effect immediately. Your change...
Setup Utility - Windows Vista and Windows 7
Page 7
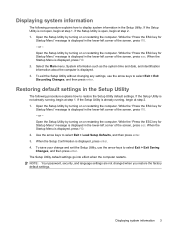
...enter. 3. While the "Press the ESC key for Startup Menu" message is already running , begin at step 2. 1. Open the Setup Utility by turning on or restarting the computer. NOTE: Your password, security, and language settings are not changed when you restore the factory default settings. While the ... Startup Menu" message is displayed in the lower-left corner of the screen, press f10. - or - Open the Setup Utility by turning on or restarting the computer. When the Startup Menu is displayed in the Setup Utility The following procedure explains how to select Exit > ...
...enter. 3. While the "Press the ESC key for Startup Menu" message is already running , begin at step 2. 1. Open the Setup Utility by turning on or restarting the computer. NOTE: Your password, security, and language settings are not changed when you restore the factory default settings. While the ... Startup Menu" message is displayed in the lower-left corner of the screen, press f10. - or - Open the Setup Utility by turning on or restarting the computer. When the Startup Menu is displayed in the Setup Utility The following procedure explains how to select Exit > ...
Software Update, Backup and Recovery - Windows Vista
Page 6
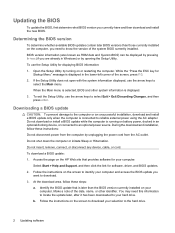
... version To determine whether available BIOS updates contain later BIOS versions than the BIOS version currently installed on battery power, docked in Windows) or by turning on or restarting the computer. To use the arrow keys to know the version of the date, name, or other system information is running on...
... version To determine whether available BIOS updates contain later BIOS versions than the BIOS version currently installed on battery power, docked in Windows) or by turning on or restarting the computer. To use the arrow keys to know the version of the date, name, or other system information is running on...


