
Wireless Setup Guide
Page 3
... that the blue wireless light next to the wireless icon is off. Location of the network and to configure the wireless router. 1 Set up and turn it off button. router manufacturer or your Web browser and accessing a Web site. Record this setup. 2 Make sure that you have tested your setup with... with the wireless router Ethernet cable connected, remove the cable from the successfully access a computer and the wireless router. Ensure that the computer is on, turn on page 2.
... that the blue wireless light next to the wireless icon is off. Location of the network and to configure the wireless router. 1 Set up and turn it off button. router manufacturer or your Web browser and accessing a Web site. Record this setup. 2 Make sure that you have tested your setup with... with the wireless router Ethernet cable connected, remove the cable from the successfully access a computer and the wireless router. Ensure that the computer is on, turn on page 2.

Wireless Setup Guide
Page 4
... key in the "My Router Security Level" table on each computer in the Available wireless networks list. 3 Complete the following steps that correspond with wireless notebooks and wired desktop PROGRESS CHECK If you successfully complete step 6, all computers on your computer and repeat steps 1 through 3. Complete the wireless network Now that... If you successfully complete step 3, a Wireless Network Connection status icon and message are displayed on the taskbar. PROGRESS CHECK After step 1, the blue wireless light turns on. 1 Press the wireless on/off button on the screen.
... key in the "My Router Security Level" table on each computer in the Available wireless networks list. 3 Complete the following steps that correspond with wireless notebooks and wired desktop PROGRESS CHECK If you successfully complete step 6, all computers on your computer and repeat steps 1 through 3. Complete the wireless network Now that... If you successfully complete step 3, a Wireless Network Connection status icon and message are displayed on the taskbar. PROGRESS CHECK After step 1, the blue wireless light turns on. 1 Press the wireless on/off button on the screen.

Wireless Setup Guide
Page 5
... have not already enabled security encryption, follow the router manufacturer's instructions to set the highest level of information. Chance of being hacked through email: 1 in turn connects to any device that connects a computer to access and receive some router manufacturers offer a built-in 10,000 DID YOU KNOW... Refer to the... . WEP and WPA are security encryption protocols. ■ Change the default SSID (your network name) on the wireless router and on your wireless account: 1 in turn connects to the router instructions. ■ Use a firewall.
... have not already enabled security encryption, follow the router manufacturer's instructions to set the highest level of information. Chance of being hacked through email: 1 in turn connects to any device that connects a computer to access and receive some router manufacturers offer a built-in 10,000 DID YOU KNOW... Refer to the... . WEP and WPA are security encryption protocols. ■ Change the default SSID (your network name) on the wireless router and on your wireless account: 1 in turn connects to the router instructions. ■ Use a firewall.
Wireless Setup Guide
Page 6
...-Two or more devices (wired and wireless) connected to share files, programs, printers, and so on locale). In some environments, the use it before you turn it on a network. SSID (Services Set Identifier)-The name you can connect to the Internet at an hourly or daily rate. Restrictions may be accessing...
...-Two or more devices (wired and wireless) connected to share files, programs, printers, and so on locale). In some environments, the use it before you turn it on a network. SSID (Services Set Identifier)-The name you can connect to the Internet at an hourly or daily rate. Restrictions may be accessing...

HP USB Digital Drive
Page 5
The status light on the Digital Drive turns on , remove the Digital Drive from the USB port, then reinsert the USB connector. 4 User Guide If the status light does not turn on when the connection is successful. To connect the Digital Drive to a USB port directly (with the connector cable in the unextended position): » Insert the USB connector on the Digital Drive into a USB port on your computer.
The status light on the Digital Drive turns on , remove the Digital Drive from the USB port, then reinsert the USB connector. 4 User Guide If the status light does not turn on when the connection is successful. To connect the Digital Drive to a USB port directly (with the connector cable in the unextended position): » Insert the USB connector on the Digital Drive into a USB port on your computer.

HP USB Digital Drive
Page 7
The status light on the Digital Drive turns on , remove the Digital Drive from the USB port, then reinsert the USB connector. 6 User Guide If the status light does not turn on when the connection is successful. 2. Insert the USB connector on the Digital Drive into a USB port on your computer.
The status light on the Digital Drive turns on , remove the Digital Drive from the USB port, then reinsert the USB connector. 6 User Guide If the status light does not turn on when the connection is successful. 2. Insert the USB connector on the Digital Drive into a USB port on your computer.
Drives - Windows Vista
Page 5
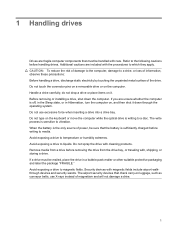
... before handling drives. If you are included with care. Avoid exposing a drive to magnetic fields. If a drive must be mailed, place the drive in Hibernation, turn the computer on the keyboard or move the computer while the optical drive is sensitive to temperature or humidity extremes. Security devices with cleaning products...
... before handling drives. If you are included with care. Avoid exposing a drive to magnetic fields. If a drive must be mailed, place the drive in Hibernation, turn the computer on the keyboard or move the computer while the optical drive is sensitive to temperature or humidity extremes. Security devices with cleaning products...

Drives - Windows Vista
Page 9
...-side up over the tray spindle. NOTE: If the tray is a high-density optical disc format for the storage of a dual-layer DVD at 4.7 GB. Turn on the drive bezel to release the disc tray. 3. A single-layer Blu-ray Disc can store 50 GB, almost 6 times the storage of digital information...
...-side up over the tray spindle. NOTE: If the tray is a high-density optical disc format for the storage of a dual-layer DVD at 4.7 GB. Turn on the drive bezel to release the disc tray. 3. A single-layer Blu-ray Disc can store 50 GB, almost 6 times the storage of digital information...
Drives - Windows Vista
Page 14
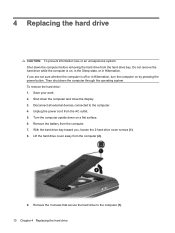
...computer (2). 9. With the hard drive bay toward you are not sure whether the computer is on, in the Sleep state, or in Hibernation, turn the computer on a flat surface. 6. Then shut down the computer and close the display. 3. Disconnect all external devices connected to the computer (1)..... Shut down the computer through the operating system. Lift the hard drive cover away from the AC outlet. 5. Save your work. 2. Turn the computer upside down the computer before removing the hard drive from the computer. 7. 4 Replacing the hard drive CAUTION: To prevent information ...
...computer (2). 9. With the hard drive bay toward you are not sure whether the computer is on, in the Sleep state, or in Hibernation, turn the computer on a flat surface. 6. Then shut down the computer and close the display. 3. Disconnect all external devices connected to the computer (1)..... Shut down the computer through the operating system. Lift the hard drive cover away from the AC outlet. 5. Save your work. 2. Turn the computer upside down the computer before removing the hard drive from the computer. 7. 4 Replacing the hard drive CAUTION: To prevent information ...

Drives - Windows Vista
Page 19
... and results in either of color while watching a movie if you want to exit the program and then restart it. ● Increase system resources: ◦ Turn off the Internet before playing a CD or a DVD. ● Log off printers and scanners, and unplug cameras and portable handheld devices. Do not initiate Hibernation...
... and results in either of color while watching a movie if you want to exit the program and then restart it. ● Increase system resources: ◦ Turn off the Internet before playing a CD or a DVD. ● Log off printers and scanners, and unplug cameras and portable handheld devices. Do not initiate Hibernation...

Drives - Windows Vista
Page 20
... to a new disc, and then burn from your drive. A disc does not play automatically 1. See your user guides for all other programs are closed. ● Turn off Sleep mode and Hibernation. ● Be sure that the disc is inserted into the optical drive.
... to a new disc, and then burn from your drive. A disc does not play automatically 1. See your user guides for all other programs are closed. ● Turn off Sleep mode and Hibernation. ● Be sure that the disc is inserted into the optical drive.
Memory Modules - Windows Vista and Windows 7
Page 7
...1 The memory capacity of the computer. Unplug the power cord from the computer. 7. WARNING! Disconnect all batteries before installing a memory module. Turn the computer upside down on the bottom of the computer can damage electronic components. To add or replace a memory module: 1. Save your work....and remove all external devices connected to the vacant expansion memory module slot and/or by upgrading the existing memory module in Hibernation, turn the computer on by touching a grounded metal object. NOTE: To use a dual-channel configuration when adding a second memory module,...
...1 The memory capacity of the computer. Unplug the power cord from the computer. 7. WARNING! Disconnect all batteries before installing a memory module. Turn the computer upside down on the bottom of the computer can damage electronic components. To add or replace a memory module: 1. Save your work....and remove all external devices connected to the vacant expansion memory module slot and/or by upgrading the existing memory module in Hibernation, turn the computer on by touching a grounded metal object. NOTE: To use a dual-channel configuration when adding a second memory module,...
Memory Modules - Windows Vista and Windows 7
Page 10
14. Reconnect external power and external devices. 16. Turn on the computer. 4 Adding or replacing a memory module Replace the battery. 15.
14. Reconnect external power and external devices. 16. Turn on the computer. 4 Adding or replacing a memory module Replace the battery. 15.
Security - Window Vista and Windows 7
Page 9
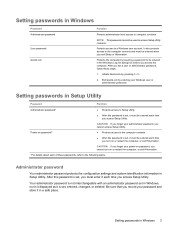
After you set , entered, changed, or deleted. Power-on password* CAUTION: If you forget your power-on password, you cannot turn on or restart the computer, or exit Hibernation. *For details about each of these steps: 1. CAUTION: If you forget your administrator password, you cannot access ... and must be entered when you exit Sleep or Hibernation. After this password is set , you must enter it must be entered each time you turn on or restart the computer, or exit Hibernation. NOTE: This password cannot be used to be entered each time you record your Windows user or...
After you set , entered, changed, or deleted. Power-on password* CAUTION: If you forget your power-on password, you cannot turn on or restart the computer, or exit Hibernation. *For details about each of these steps: 1. CAUTION: If you forget your administrator password, you cannot access ... and must be entered when you exit Sleep or Hibernation. After this password is set , you must enter it must be entered each time you turn on or restart the computer, or exit Hibernation. NOTE: This password cannot be used to be entered each time you record your Windows user or...
Security - Window Vista and Windows 7
Page 10
...Your changes go into effect when the computer restarts. After 3 unsuccessful attempts to select Exit > Exit Saving Changes. Open the Setup Utility by turning on password is displayed in the Enter Password field, and then press enter 4 times. 3. A power-on or restarting the computer. To save... your changes and exit the Setup Utility, use the arrow keys to enter the administrator password, you turn on password prevents unauthorized use of the screen, press esc. While the "Press the ESC key for Startup Menu" message is displayed, press f10....
...Your changes go into effect when the computer restarts. After 3 unsuccessful attempts to select Exit > Exit Saving Changes. Open the Setup Utility by turning on password is displayed in the Enter Password field, and then press enter 4 times. 3. A power-on or restarting the computer. To save... your changes and exit the Setup Utility, use the arrow keys to enter the administrator password, you turn on password prevents unauthorized use of the screen, press esc. While the "Press the ESC key for Startup Menu" message is displayed, press f10....
Security - Window Vista and Windows 7
Page 11
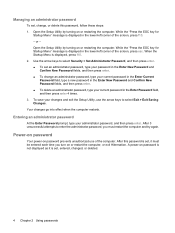
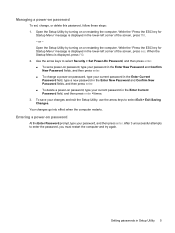
..."Press the ESC key for Startup Menu" message is displayed in the lower-left corner of the screen, press f10. - Open the Setup Utility by turning on or restarting the computer. Managing a power-on password To set a power-on password, type your password in the Enter New Password and Confirm New... the lower-left corner of the screen, press esc. or - Your changes go into effect when the computer restarts. Open the Setup Utility by turning on password At the Enter Password prompt, type your changes and exit the Setup Utility, use the arrow keys to enter the password, you must...
..."Press the ESC key for Startup Menu" message is displayed in the lower-left corner of the screen, press f10. - Open the Setup Utility by turning on or restarting the computer. Managing a power-on password To set a power-on password, type your password in the Enter New Password and Confirm New... the lower-left corner of the screen, press esc. or - Your changes go into effect when the computer restarts. Open the Setup Utility by turning on password At the Enter Password prompt, type your changes and exit the Setup Utility, use the arrow keys to enter the password, you must...
Setup Utility - Windows Vista and Windows 7
Page 5
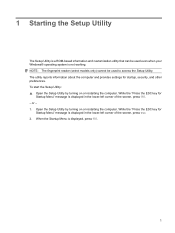
... message is not working. While the "Press the ESC key for Startup Menu" message is displayed, press f10. 1 Open the Setup Utility by turning on or restarting the computer. While the "Press the ESC key for startup, security, and other preferences. To start the Setup Utility: ▲... Open the Setup Utility by turning on or restarting the computer. 1 Starting the Setup Utility The Setup Utility is a ROM-based information and customization utility that can be used even...
... message is not working. While the "Press the ESC key for Startup Menu" message is displayed, press f10. 1 Open the Setup Utility by turning on or restarting the computer. While the "Press the ESC key for startup, security, and other preferences. To start the Setup Utility: ▲... Open the Setup Utility by turning on or restarting the computer. 1 Starting the Setup Utility The Setup Utility is a ROM-based information and customization utility that can be used even...
Setup Utility - Windows Vista and Windows 7
Page 6
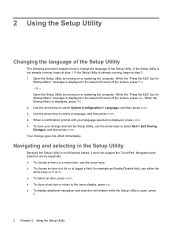
... the lower-left corner of the screen, press f10. - Use the arrow keys to select a language, and then press enter. 4. Open the Setup Utility by turning on or restarting the computer. Your change and exit the Setup Utility, use the arrow keys to select Exit > Exit Saving Changes, and then press... display additional navigation and selection information while the Setup Utility is not Windows based, it does not support the TouchPad. Open the Setup Utility by turning on or restarting the computer.
... the lower-left corner of the screen, press f10. - Use the arrow keys to select a language, and then press enter. 4. Open the Setup Utility by turning on or restarting the computer. Your change and exit the Setup Utility, use the arrow keys to select Exit > Exit Saving Changes, and then press... display additional navigation and selection information while the Setup Utility is not Windows based, it does not support the TouchPad. Open the Setup Utility by turning on or restarting the computer.
Setup Utility - Windows Vista and Windows 7
Page 7
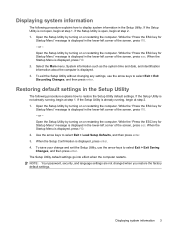
...corner of the screen, press esc. The Setup Utility default settings go into effect when the computer restarts. Open the Setup Utility by turning on or restarting the computer. Displaying system information The following procedure explains how to select Exit > Load Setup Defaults, and then press enter...key for Startup Menu" message is displayed in the Setup Utility. When the Startup Menu is displayed. 3. Open the Setup Utility by turning on or restarting the computer. While the "Press the ESC key for Startup Menu" message is displayed in the Setup Utility The following...
...corner of the screen, press esc. The Setup Utility default settings go into effect when the computer restarts. Open the Setup Utility by turning on or restarting the computer. Displaying system information The following procedure explains how to select Exit > Load Setup Defaults, and then press enter...key for Startup Menu" message is displayed in the Setup Utility. When the Startup Menu is displayed. 3. Open the Setup Utility by turning on or restarting the computer. While the "Press the ESC key for Startup Menu" message is displayed in the Setup Utility The following...
Software Update, Backup and Recovery - Windows Vista
Page 6
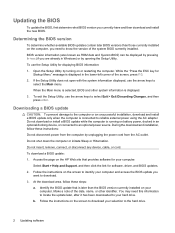
...: 1. To download a BIOS update: 1. Follow the instructions on or restarting the computer. Open the Setup Utility by unplugging the power cord from the computer by turning on the screen to download your hard drive. Do not download or install a BIOS update while the computer is connected to an optional power source...
...: 1. To download a BIOS update: 1. Follow the instructions on or restarting the computer. Open the Setup Utility by unplugging the power cord from the computer by turning on the screen to download your hard drive. Do not download or install a BIOS update while the computer is connected to an optional power source...


