
Compaq Reference Guide Deskpro 4000 and Deskpro 6000 Series of Personal Computers
Page 227
... next section, "Preparing the Computer for these designators are servicing has a Compaq hard drive, go to be entered manually for Installation." Computer Setup automatically detects and configures most Compaq components, including Compaq hard drives. Reference Guide G-1 The hard drive is inoperable until this is... the hard drive. If the machine you are user-defined types, also called soft-drive types. Whenever the nonvolatile memory (CMOS) has become invalid, such as after battery installation in "Recording Hard Drive Parameters" and "Preparing the Computer for Installation." ...
... next section, "Preparing the Computer for these designators are servicing has a Compaq hard drive, go to be entered manually for Installation." Computer Setup automatically detects and configures most Compaq components, including Compaq hard drives. Reference Guide G-1 The hard drive is inoperable until this is... the hard drive. If the machine you are user-defined types, also called soft-drive types. Whenever the nonvolatile memory (CMOS) has become invalid, such as after battery installation in "Recording Hard Drive Parameters" and "Preparing the Computer for Installation." ...

Compaq Reference Guide Deskpro 4000 and Deskpro 6000 Series of Personal Computers
Page 228
... is non-removable and is soldered in the following steps: 1. Unplug the computer. 4. WARNING: The system board contains a clock/CMOS lithium battery. The lithium battery may not be removed. Do not abuse or disassemble. Attach the battery to the computer chassis as ... is permanently installed on the system board. Refer to Chapter 8, "Using Compaq Utilities." 2. Remove the computer cover or side panel. If you have locked the Smart Cover Lock, use Computer Setup to Chapter 6, "Upgrading the Desktop Computer," or Chapter 7, "Upgrading the Minitower Computer." 5. A second battery...
... is non-removable and is soldered in the following steps: 1. Unplug the computer. 4. WARNING: The system board contains a clock/CMOS lithium battery. The lithium battery may not be removed. Do not abuse or disassemble. Attach the battery to the computer chassis as ... is permanently installed on the system board. Refer to Chapter 8, "Using Compaq Utilities." 2. Remove the computer cover or side panel. If you have locked the Smart Cover Lock, use Computer Setup to Chapter 6, "Upgrading the Desktop Computer," or Chapter 7, "Upgrading the Minitower Computer." 5. A second battery...

Deskpro Personal Computers Service Reference Guide
Page 51
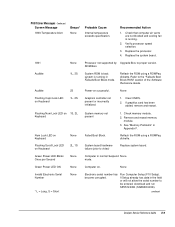
... Panel. Battery life is approximately 5 years. If the problem persists, replace the RTC battery. Replace the system board. 1. Remove expansion boards. 3. continued Deskpro Service Reference Guide D-1 Battery life is approximately five years. If an expansion card was recently added, remove it and see if the problem remains. 4. Clear...board. 1. Replace the system board. Recommended Action 1. Verify the correct ROM. 2. If the message disappears, there may need to be replaced. Run Computer Setup (F10 Setup). Check for proper placement of the CMOS jumper.
... Panel. Battery life is approximately 5 years. If the problem persists, replace the RTC battery. Replace the system board. 1. Remove expansion boards. 3. continued Deskpro Service Reference Guide D-1 Battery life is approximately five years. If an expansion card was recently added, remove it and see if the problem remains. 4. Clear...board. 1. Replace the system board. Recommended Action 1. Verify the correct ROM. 2. If the message disappears, there may need to be replaced. Run Computer Setup (F10 Setup). Check for proper placement of the CMOS jumper.

Deskpro Personal Computers Service Reference Guide
Page 53
...failure. Clear CMOS. 3. Reconnect keyboard with another device. Reset the IRQ. 403-Parallel Port 3 Address 2S Assignment Conflict IRQ address conflicts with computer turned off . 2. Remove any parallel expansion cards. 2. Reconfigure card resources and/or run Computer Setup (F10 Setup). 410-Audio ...the keyboard with another device. Ensure that none of the keys are depressed. 3. Replace keyboard. 4. Clear CMOS. 3. Reset the IRQ. 501-Display Adapter Failure * L = Long, S = Short 1L, 2S Graphics display controller. 1. Replace the graphics controller....
...failure. Clear CMOS. 3. Reconnect keyboard with another device. Reset the IRQ. 403-Parallel Port 3 Address 2S Assignment Conflict IRQ address conflicts with computer turned off . 2. Remove any parallel expansion cards. 2. Reconfigure card resources and/or run Computer Setup (F10 Setup). 410-Audio ...the keyboard with another device. Ensure that none of the keys are depressed. 3. Replace keyboard. 4. Clear CMOS. 3. Reset the IRQ. 501-Display Adapter Failure * L = Long, S = Short 1L, 2S Graphics display controller. 1. Replace the graphics controller....

Deskpro Personal Computers Service Reference Guide
Page 54
.... Disconnect any other diskette controller devices (tape drives). 3. Clear CMOS. 612-Secondary Floppy Port 2S Address Assignment Conflict 660-Display Cache is an issue. Remove expansion cards 3. Clear CMOS. 4. Run Computer Setup (F10 Setup) or Windows NT, Windows 95, or Windows 98 utilities. 2.... No action required. Run Computer Setup (F10 Setup). 2. Reinstall tape drive or press F1 and allow system to ...
.... Disconnect any other diskette controller devices (tape drives). 3. Clear CMOS. 612-Secondary Floppy Port 2S Address Assignment Conflict 660-Display Cache is an issue. Remove expansion cards 3. Clear CMOS. 4. Run Computer Setup (F10 Setup) or Windows NT, Windows 95, or Windows 98 utilities. 2.... No action required. Run Computer Setup (F10 Setup). 2. Reinstall tape drive or press F1 and allow system to ...

Deskpro Personal Computers Service Reference Guide
Page 55
... Comm port expansion cards. 2. Reconfigure card resources and/or run Computer Setup (F10 Setup).Run Computer Setup or Windows utilities. 1152-Serial Port 2 Address 2S Conflict Detected Both...or run Computer Setup (F10 Setup).Run Computer Setup or Windows utilities. 1201-System Audio Address 2S Conflict Detected Device IRQ address conflicts Reset the IRQ. Clear CMOS. 3. heatsink ... to COM1. 1. Clear CMOS. 3. Remove any Comm port expansion cards. 2. Clear CMOS. 3. Reconfigure card resources and/or run Computer Setup (F10 Setup).Run Computer Setup or Windows utilities. 1155-...
... Comm port expansion cards. 2. Reconfigure card resources and/or run Computer Setup (F10 Setup).Run Computer Setup or Windows utilities. 1152-Serial Port 2 Address 2S Conflict Detected Both...or run Computer Setup (F10 Setup).Run Computer Setup or Windows utilities. 1201-System Audio Address 2S Conflict Detected Device IRQ address conflicts Reset the IRQ. Clear CMOS. 3. heatsink ... to COM1. 1. Clear CMOS. 3. Remove any Comm port expansion cards. 2. Clear CMOS. 3. Reconfigure card resources and/or run Computer Setup (F10 Setup).Run Computer Setup or Windows utilities. 1155-...

Deskpro Personal Computers Service Reference Guide
Page 56
.... (Some hard drives have a firmware patch that will fix an erroneous error message.) Recommended Action 1. Apply firmware patch if applicable. 3. Clear CMOS. 3. Reconfigure card resources and/or run Computer Setup (F10 Setup). 1772-Secondary Disk Port 2S Address Assignment Conflict Internal and external hard drive controllers are both assigned to fail. (Some hard...
.... (Some hard drives have a firmware patch that will fix an erroneous error message.) Recommended Action 1. Apply firmware patch if applicable. 3. Clear CMOS. 3. Reconfigure card resources and/or run Computer Setup (F10 Setup). 1772-Secondary Disk Port 2S Address Assignment Conflict Internal and external hard drive controllers are both assigned to fail. (Some hard...

Deskpro Personal Computers Service Reference Guide
Page 57
... Replace the hard drive. 9. Clear CMOS. 3. Disconnect additional drives. 6. Replace the hard drive. 1. Clear CMOS. 3. Run hard drive diagnostics. 5. Replace the hard drive. 8. Check cable seating/jumper settings. 4. Clear CMOS. 3. Run Computer Setup (F10 Setup). 2. Disconnect additional drives. 6. POST.... 6. Run Computer Setup (F10 Setup). 2. Confirm drive is supported on this computer (Large drive ROM support.) 7. Run the Drive Protection System test if available. 7. Run the Drive Protection System test if available. 7. continued Deskpro Service Reference Guide D-7...
... Replace the hard drive. 9. Clear CMOS. 3. Disconnect additional drives. 6. Replace the hard drive. 1. Clear CMOS. 3. Run hard drive diagnostics. 5. Replace the hard drive. 8. Check cable seating/jumper settings. 4. Clear CMOS. 3. Run Computer Setup (F10 Setup). 2. Disconnect additional drives. 6. POST.... 6. Run Computer Setup (F10 Setup). 2. Confirm drive is supported on this computer (Large drive ROM support.) 7. Run the Drive Protection System test if available. 7. Run the Drive Protection System test if available. 7. continued Deskpro Service Reference Guide D-7...

Deskpro Personal Computers Service Reference Guide
Page 58
... Run the Drive Protection System test if available. 8. Run Computer Setup (F10 Setup). 2. Check cable seating /jumper settings. 4. Disconnect additional drives. 6. Check cable seating /jumper settings. 4. continued D-8 POST Error Messages Clear CMOS. 3. Replace the hard drive. 9. Clear CMOS. 3. Check cable seating /jumper settings. 4. Run hard drive... None or Disk Failure Hard drive circuitry error. * L = Long, S = Short Recommended Action 1. Run Computer Setup (F10 Setup). 2. Disconnect additional drives. 6. Clear CMOS. 3. Disconnect additional drives. 6.
... Run the Drive Protection System test if available. 8. Run Computer Setup (F10 Setup). 2. Check cable seating /jumper settings. 4. Disconnect additional drives. 6. Check cable seating /jumper settings. 4. continued D-8 POST Error Messages Clear CMOS. 3. Replace the hard drive. 9. Clear CMOS. 3. Check cable seating /jumper settings. 4. Run hard drive... None or Disk Failure Hard drive circuitry error. * L = Long, S = Short Recommended Action 1. Run Computer Setup (F10 Setup). 2. Disconnect additional drives. 6. Clear CMOS. 3. Disconnect additional drives. 6.
Deskpro Personal Computers Service Reference Guide
Page 59
system is running . 2. Audible 2S Power-on . Clear CMOS. 2. Run Computer Setup (F10 Setup). If Setup already has data in Failsafe Boot Block mode. ROM Bios. Refer to be entered, download and run SP5572.EXE (SNZERO.EXE). System ... Block ROM" section of the Software Reference Guide. Reflash the ROM using a ROMPaq diskette. Green Power LED ON None Computer on successful. continued Deskpro Service Reference Guide D-9 Verify processor speed selection. 3. Check that computer air vents are not blocked and cooling fan is bad; None Flashing Caps Lock...
system is running . 2. Audible 2S Power-on . Clear CMOS. 2. Run Computer Setup (F10 Setup). If Setup already has data in Failsafe Boot Block mode. ROM Bios. Refer to be entered, download and run SP5572.EXE (SNZERO.EXE). System ... Block ROM" section of the Software Reference Guide. Reflash the ROM using a ROMPaq diskette. Green Power LED ON None Computer on successful. continued Deskpro Service Reference Guide D-9 Verify processor speed selection. 3. Check that computer air vents are not blocked and cooling fan is bad; None Flashing Caps Lock...
Deskpro Personal Computers Service Reference Guide
Page 63
... and two long beeps. Computer powered off when the power button is blinking; Clear configuration memory (CMOS). A PCI or ISA card that the computer is available from Compaq. This invokes the hardware override for manually disabling the Smart Cover Lock, is properly connected to pause...and let the computer cool down . 2. Network driver is loaded and no network connection is flashing; Unlock the Smart Cover Lock using Computer Setup. 2. The Caps Lock LED is established. Possible Solution 1. First, reset the date and time under Control Panel. you may not be...
... and two long beeps. Computer powered off when the power button is blinking; Clear configuration memory (CMOS). A PCI or ISA card that the computer is available from Compaq. This invokes the hardware override for manually disabling the Smart Cover Lock, is properly connected to pause...and let the computer cool down . 2. Network driver is loaded and no network connection is flashing; Unlock the Smart Cover Lock using Computer Setup. 2. The Caps Lock LED is established. Possible Solution 1. First, reset the date and time under Control Panel. you may not be...


