
Instruction Manual
Page 7
... 10 Handling a Disc...10 Cleaning a Disc...10 LOCATION OF CONTROLS...11 Front View...11 Right View...12 Left View...12 Bottom View...12 Remote Control...13 CONNECTIONS...14 Audio & Video Connections 14 Headphone Connection...14 Power Connection...15 Connecting to the wall outlet 15 Using the car plug......15 Using the Built- in battery...15 getting started...16 Using the Remote Control...16 Power Supply...16 BASIC OPERATIONS...17 Basic Playback...17 Play/Pause/Stop...17 Next /Previous (Skip)...17 Forward/Reverse (Search)...17...
... 10 Handling a Disc...10 Cleaning a Disc...10 LOCATION OF CONTROLS...11 Front View...11 Right View...12 Left View...12 Bottom View...12 Remote Control...13 CONNECTIONS...14 Audio & Video Connections 14 Headphone Connection...14 Power Connection...15 Connecting to the wall outlet 15 Using the car plug......15 Using the Built- in battery...15 getting started...16 Using the Remote Control...16 Power Supply...16 BASIC OPERATIONS...17 Basic Playback...17 Play/Pause/Stop...17 Next /Previous (Skip)...17 Forward/Reverse (Search)...17...
Instruction Manual
Page 9
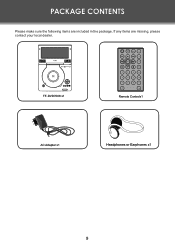
PACKAGE CONTENTS Please make sure the following items are missing, please contact your local dealer. TF-DVD7008 x1 Menu Title Remote Controlx1 AC Adapter x1 HHeadphones or Earphones x1 9 If any items are included in the package.
PACKAGE CONTENTS Please make sure the following items are missing, please contact your local dealer. TF-DVD7008 x1 Menu Title Remote Controlx1 AC Adapter x1 HHeadphones or Earphones x1 9 If any items are included in the package.

Instruction Manual
Page 11
... during video/audio playback. Setup To access the setup menu which various features of the player can be adjusted in. LOCATION OF CONTROLS 7″ TFT LCD Speaker Open Button Power on Indicator Remote Sensor Charging Indicator • Lights red when charging the battery. • Goes off ... to prestop the playback, press twice to display the LCD menu. Press up /down direction button to confirm. Power on Indicator Remote Sensor Enter Button Direction Buttons Next Button Previous Button Play/Pause Button Stop Button Setup Button LCD Mode Button Charging Indicator Front View Up...
... during video/audio playback. Setup To access the setup menu which various features of the player can be adjusted in. LOCATION OF CONTROLS 7″ TFT LCD Speaker Open Button Power on Indicator Remote Sensor Charging Indicator • Lights red when charging the battery. • Goes off ... to prestop the playback, press twice to display the LCD menu. Press up /down direction button to confirm. Power on Indicator Remote Sensor Enter Button Direction Buttons Next Button Previous Button Play/Pause Button Stop Button Setup Button LCD Mode Button Charging Indicator Front View Up...

Instruction Manual
Page 13
LOCATION OF CONTROLS Remote Control Display/Setup Power Direction Buttons Previous Enter Fast Reverse Play/Pause Numeric Buttons Menu Zoom Subtitle Next Repeat A-B Fast Forward Repeat All Menu Audio Angle LCD Mode Title Title 13
LOCATION OF CONTROLS Remote Control Display/Setup Power Direction Buttons Previous Enter Fast Reverse Play/Pause Numeric Buttons Menu Zoom Subtitle Next Repeat A-B Fast Forward Repeat All Menu Audio Angle LCD Mode Title Title 13

Instruction Manual
Page 16
... Power Connections section. 16 Push the compartment in to close. • Point the remote at the remote sensor of the photo frame at a distance of no longer working. • Do not spill water on the remote control. • Do not use for other equipment at an angle no greater than 15″ ...and at the same time. • Remove the batteries if the remote control will last for about one year under typical usage. • Replace the batteries if the remote is no more than 60 degrees. • Batteries will not be in the direction of time. . . . ...
... Power Connections section. 16 Push the compartment in to close. • Point the remote at the remote sensor of the photo frame at a distance of no longer working. • Do not spill water on the remote control. • Do not use for other equipment at an angle no greater than 15″ ...and at the same time. • Remove the batteries if the remote control will last for about one year under typical usage. • Replace the batteries if the remote is no more than 60 degrees. • Batteries will not be in the direction of time. . . . ...
Instruction Manual
Page 25
After 30 minutes, plug in the remote retain a charge and have been installed correctly. • Try replacing the remote's batteries. the restore function should reset the player. 25 TROUBLESHOOTING The remote control doesn't work. • Ensure that the Power Switch has been physically set to the ON position. • Ensure that the batteries in and power on the main unit. • Ensure that there are no obstacles between the remote and the player. • Point the remote at the remote sensor on the player -- The player has malfunctioned. • Unplug the player.
After 30 minutes, plug in the remote retain a charge and have been installed correctly. • Try replacing the remote's batteries. the restore function should reset the player. 25 TROUBLESHOOTING The remote control doesn't work. • Ensure that the Power Switch has been physically set to the ON position. • Ensure that the batteries in and power on the main unit. • Ensure that there are no obstacles between the remote and the player. • Point the remote at the remote sensor on the player -- The player has malfunctioned. • Unplug the player.


