Instruction Manual
Page 4
...equipped with the prod- Water and Moisture: Do not use this product from the type of power supply to your home, consult your product dealer or local power company. Power Sources: This product should still fail to fit, contact an electrician to insert the plug fully... receptacles, and at the point which they are provided for cleaning. 6. If you are unable to replace the obsolete outlet. Power-Cord Protection: Power supply cords should be moved with overload protection. Follow Instructions: All operating and usage instructions should be followed. 5. Use of the ...
...equipped with the prod- Water and Moisture: Do not use this product from the type of power supply to your home, consult your product dealer or local power company. Power Sources: This product should still fail to fit, contact an electrician to insert the plug fully... receptacles, and at the point which they are provided for cleaning. 6. If you are unable to replace the obsolete outlet. Power-Cord Protection: Power supply cords should be moved with overload protection. Follow Instructions: All operating and usage instructions should be followed. 5. Use of the ...
Instruction Manual
Page 5
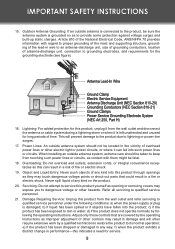
... been spilled or if objects have fallen into such power lines or circuits. Power Lines: An outside antenna is damaged; IMPORTANT SAFETY INSTRUCTIONS 15. This will often require extensive work by following conditions: a) when the power-supply or plug is connected to provide some protection against ...voltage surges and built-up static charges. e) if the product has been dropped or damaged in a risk of overhead power lines or other hazards. Outdoor Antenna Grounding...
... been spilled or if objects have fallen into such power lines or circuits. Power Lines: An outside antenna is damaged; IMPORTANT SAFETY INSTRUCTIONS 15. This will often require extensive work by following conditions: a) when the power-supply or plug is connected to provide some protection against ...voltage surges and built-up static charges. e) if the product has been dropped or damaged in a risk of overhead power lines or other hazards. Outdoor Antenna Grounding...

Instruction Manual
Page 7
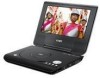
... started...16 Using the Remote Control...16 Power Supply...16 BASIC OPERATIONS...17 Basic Playback...17 Play/Pause/Stop...17 Next /Previous (Skip)...17 Forward/Reverse (Search)...17 Slow...17 Menu Navigation...17 Numeric Keypad...18 Adjusting the Volume...18 Disc Error Messages...18 Power Management...18 FUNCTION BUTTONS...19 Display / ...Front View...11 Right View...12 Left View...12 Bottom View...12 Remote Control...13 CONNECTIONS...14 Audio & Video Connections 14 Headphone Connection...14 Power Connection...15 Connecting to the wall outlet 15 Using the car plug...15 Using the Built-
... started...16 Using the Remote Control...16 Power Supply...16 BASIC OPERATIONS...17 Basic Playback...17 Play/Pause/Stop...17 Next /Previous (Skip)...17 Forward/Reverse (Search)...17 Slow...17 Menu Navigation...17 Numeric Keypad...18 Adjusting the Volume...18 Disc Error Messages...18 Power Management...18 FUNCTION BUTTONS...19 Display / ...Front View...11 Right View...12 Left View...12 Bottom View...12 Remote Control...13 CONNECTIONS...14 Audio & Video Connections 14 Headphone Connection...14 Power Connection...15 Connecting to the wall outlet 15 Using the car plug...15 Using the Built-
Instruction Manual
Page 12
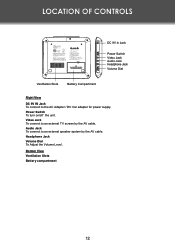
Bottom View Ventilation Slots Battery compartment 12 Power Switch To turn on/off the unit. Audio Jack To connect to the AC Adapter / DC Car adapter for power supply. Headphone Jack Volume Dial To Adjust the Volume Level. LOCATION OF CONTROLS DC 9V in Jack Power Switch Video Jack Audio Jack Headphone Jack Volume Dial Ventilation Slots Battery Compartment Right View DC 9V IN Jack To connect to an external speaker system by the AV cable. Video Jack To connect to an external TV screen by the AV cable.
Bottom View Ventilation Slots Battery compartment 12 Power Switch To turn on/off the unit. Audio Jack To connect to the AC Adapter / DC Car adapter for power supply. Headphone Jack Volume Dial To Adjust the Volume Level. LOCATION OF CONTROLS DC 9V in Jack Power Switch Video Jack Audio Jack Headphone Jack Volume Dial Ventilation Slots Battery Compartment Right View DC 9V IN Jack To connect to an external speaker system by the AV cable. Video Jack To connect to an external TV screen by the AV cable.
Instruction Manual
Page 17
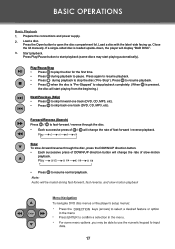
...Slow To slow-forward/reverse through the disc. • Each successive press of slow-motion playback. • Press to skip back one track (DVD, CD, MP3, etc). • Press to resume normal playback. 17 Play/Pause/Stop • Press to play the disc for the first... time. • Press during playback to stop playback completely. (When is loaded upside-down, the player will change the rate of / will display "BAD DISC". 3. BASIC OPERATIONS 1. Prepare the connections and power supply. 2. Load a disc with the label-side facing up. Forward/Reverse (Search) Press / to ...
...Slow To slow-forward/reverse through the disc. • Each successive press of slow-motion playback. • Press to skip back one track (DVD, CD, MP3, etc). • Press to resume normal playback. 17 Play/Pause/Stop • Press to play the disc for the first... time. • Press during playback to stop playback completely. (When is loaded upside-down, the player will change the rate of / will display "BAD DISC". 3. BASIC OPERATIONS 1. Prepare the connections and power supply. 2. Load a disc with the label-side facing up. Forward/Reverse (Search) Press / to ...


