
Instruction Manual
Page 3
...television reception, which the receiver is connected. •• Consult the dealer or an experienced radio/TV technician for Class B digital devices, pursuant to Part 15 of the equipment. Operation is required to comply with the instructions, may cause undesired operation. If... this copyright protection technology must accept any changes or modifications to provide reasonable protection against harmful interference in the manual. LCD Information The LCD panel ...
...television reception, which the receiver is connected. •• Consult the dealer or an experienced radio/TV technician for Class B digital devices, pursuant to Part 15 of the equipment. Operation is required to comply with the instructions, may cause undesired operation. If... this copyright protection technology must accept any changes or modifications to provide reasonable protection against harmful interference in the manual. LCD Information The LCD panel ...
Instruction Manual
Page 7
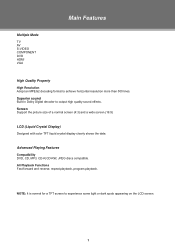
Multiple Mode TV AV S-VIDEO COMPONENT DVD HDMI VGA Main Features High Quality Property High Resolution Adopt an MPEG2 decoding format to experience some light or dark spots appearing on the LCD screen. 1 Screen Support the picture size of a normal screen (4:3) and a wide screen (16:9) LCD (Liquid Crystal Display) Designed with color TFT liquid...
Multiple Mode TV AV S-VIDEO COMPONENT DVD HDMI VGA Main Features High Quality Property High Resolution Adopt an MPEG2 decoding format to experience some light or dark spots appearing on the LCD screen. 1 Screen Support the picture size of a normal screen (4:3) and a wide screen (16:9) LCD (Liquid Crystal Display) Designed with color TFT liquid...
Instruction Manual
Page 9
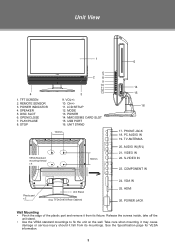
...to fix the unit on the wall. REMOTE SENSOR 3. CH+/11. MODE 13. PHONE JACK 18. TV ANTENNA 20. COMPONENT IN 24. See the Specification page for VESA information. 3 TFT SCREEN 2. SPEAKER 5. STOP ...6 2 7 8 9 10 11 12 3 13 9. AUDIO IN((R/L) 21. LCD SETUP 12. VIDEO IN 22. HDMI 26. POWER INDICATOR 4. DISC SLOT 6. USB PORT 16. POWER JACK... S-VIDEO IN 23. VGA IN 25. MMC/SD/MS CARD SLOT 15. PLAY/PAUSE 8. TFDVD1973 Rear Cabinet) 5 14 15 16 17. UNIT STAND 100mm < > > VESA Standard mounting thread x 4 < 100mm...
...to fix the unit on the wall. REMOTE SENSOR 3. CH+/11. MODE 13. PHONE JACK 18. TV ANTENNA 20. COMPONENT IN 24. See the Specification page for VESA information. 3 TFT SCREEN 2. SPEAKER 5. STOP ...6 2 7 8 9 10 11 12 3 13 9. AUDIO IN((R/L) 21. LCD SETUP 12. VIDEO IN 22. HDMI 26. POWER INDICATOR 4. DISC SLOT 6. USB PORT 16. POWER JACK... S-VIDEO IN 23. VGA IN 25. MMC/SD/MS CARD SLOT 15. PLAY/PAUSE 8. TFDVD1973 Rear Cabinet) 5 14 15 16 17. UNIT STAND 100mm < > > VESA Standard mounting thread x 4 < 100mm...
Instruction Manual
Page 10
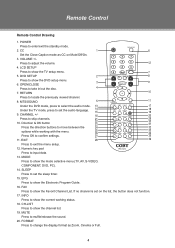
...Press to muffle/release the sound. 20. SLEEP Press to show the Electronic Program Guide. 16. INFO Press to set the sleep timer. 15. MUTE Press to input data. 13. POWER Press to change the display format as CC on the list, the button does not function...GOTO ZOOM REPEAT 34 27 35 11. CC 1 OPEN/CLOSE 6 Set the Close Caption mode as Zoom, Cinema or Full. 4 LCD SETUP Press to show the TV setup menu. 5. CH-LIST Press to show the channel list. 19. RETURN 10 Press to take in/out the disc. 4 7....
...Press to muffle/release the sound. 20. SLEEP Press to show the Electronic Program Guide. 16. INFO Press to set the sleep timer. 15. MUTE Press to input data. 13. POWER Press to change the display format as CC on the list, the button does not function...GOTO ZOOM REPEAT 34 27 35 11. CC 1 OPEN/CLOSE 6 Set the Close Caption mode as Zoom, Cinema or Full. 4 LCD SETUP Press to show the TV setup menu. 5. CH-LIST Press to show the channel list. 19. RETURN 10 Press to take in/out the disc. 4 7....

Instruction Manual
Page 15
For the initial use, you can be preset through the TV setup menu, please read this section carefully. •• Press LCD SETUP to display the setup menu, TV setup menu consists of PICTURE, AUDIO, TIME, SETUP, LOCK as well as CHANNEL. •• Press the left /right direction ...button to adjust. 333 Press LCD SETUP to skip channels. buttons to exit/back up menu. TV Function Preparations 111 Connect the cables.(Refer to the "Cable Connections" section for details. See the "Channel Menu" section...
For the initial use, you can be preset through the TV setup menu, please read this section carefully. •• Press LCD SETUP to display the setup menu, TV setup menu consists of PICTURE, AUDIO, TIME, SETUP, LOCK as well as CHANNEL. •• Press the left /right direction ...button to adjust. 333 Press LCD SETUP to skip channels. buttons to exit/back up menu. TV Function Preparations 111 Connect the cables.(Refer to the "Cable Connections" section for details. See the "Channel Menu" section...
Instruction Manual
Page 19
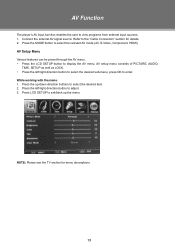
..., press OK to enter. AV Function The player's AV input function enables the user to exit/back up the menu. Warm NOTE: Please see the TV section for details 222 Press the MODE button to select the relevant AV mode (AV, S-Video, Component, HDMI) AV Setup Menu Various features can be... preset through the AV menu. •• Press the LCD SETUP button to the "Cable Connection" section for menu descriptions 13 Refer to display the AV menu. AV setup menu consists of PICTURE, AUDIO, TIME...
..., press OK to enter. AV Function The player's AV input function enables the user to exit/back up the menu. Warm NOTE: Please see the TV section for details 222 Press the MODE button to select the relevant AV mode (AV, S-Video, Component, HDMI) AV Setup Menu Various features can be... preset through the AV menu. •• Press the LCD SETUP button to the "Cable Connection" section for menu descriptions 13 Refer to display the AV menu. AV setup menu consists of PICTURE, AUDIO, TIME...
Instruction Manual
Page 20
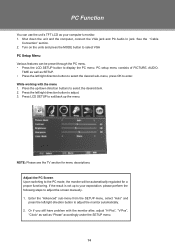
...can use the unit's TFT LCD as your expectation, please perform the following steps to adjust the screen manually . 111 Enter the "Advanced" sub-menu from the SETUP menu, select "Auto" and press the left/right direction button to enter. NOTE: Please see the TV section for a proper functioning.... While working with the monitor after, adjust "H-Pos", "V-Pos", "Clock" as well as SETUP. •• Press the left /right direction button to adjust. 333 Press LCD SETUP to exit/back up /down the unit ...
...can use the unit's TFT LCD as your expectation, please perform the following steps to adjust the screen manually . 111 Enter the "Advanced" sub-menu from the SETUP menu, select "Auto" and press the left/right direction button to enter. NOTE: Please see the TV section for a proper functioning.... While working with the monitor after, adjust "H-Pos", "V-Pos", "Clock" as well as SETUP. •• Press the left /right direction button to adjust. 333 Press LCD SETUP to exit/back up /down the unit ...


