
User Manual
Page 7
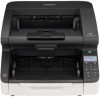
Setup Disc Contents Install the following software necessary for using the scanner from the supplied Setup Disc. ● CaptureOnTouch This is a dedicated scanning application for DR Series scanners. ● Scanner driver This is the scanner driver for this product. 7
Setup Disc Contents Install the following software necessary for using the scanner from the supplied Setup Disc. ● CaptureOnTouch This is a dedicated scanning application for DR Series scanners. ● Scanner driver This is the scanner driver for this product. 7
User Manual
Page 8
...Server 2012 R2 • Microsoft Windows Server 2016 This is the environment as of the computer and the environment. • The scanner drivers provided with the scanner do not necessarily operate on all USB interfaces, even if present as standard with the scanner. • If...speed may disrupt the display. • The Desktop Experience feature must satisfy the following system requirements. For details, consult your local authorized Canon dealer. • Scanning speeds are using should be the one originally included with your application software retailer. • In Windows 10 ...
...Server 2012 R2 • Microsoft Windows Server 2016 This is the environment as of the computer and the environment. • The scanner drivers provided with the scanner do not necessarily operate on all USB interfaces, even if present as standard with the scanner. • If...speed may disrupt the display. • The Desktop Experience feature must satisfy the following system requirements. For details, consult your local authorized Canon dealer. • Scanning speeds are using should be the one originally included with your application software retailer. • In Windows 10 ...

User Manual
Page 14
This completes setup. 14 IMPORTANT • After turning the scanner off, wait at least 10 seconds before turning it off. Turning Off the Power Press and hold the power switch to turn off automatically if it is not operated for safety. Hint The scanner's auto power off setting is enabled by default, and the scanner will not be using the scanner for an extended period, you should disconnect the power cord from the AC outlet for 4 hours. To override this setting, please see "About the Canon imageFORMULA Driver Setting Tool" on . • If you will turn it back on p. 96.
This completes setup. 14 IMPORTANT • After turning the scanner off, wait at least 10 seconds before turning it off. Turning Off the Power Press and hold the power switch to turn off automatically if it is not operated for safety. Hint The scanner's auto power off setting is enabled by default, and the scanner will not be using the scanner for an extended period, you should disconnect the power cord from the AC outlet for 4 hours. To override this setting, please see "About the Canon imageFORMULA Driver Setting Tool" on . • If you will turn it back on p. 96.

User Manual
Page 17
... a Function to the Function Key 58 User Mode Operations 60 About User Mode 60 User Mode Operating Procedure 60 Configuring Scanner Driver Settings 62 User Mode Functions 65 Separation Off 65 New File 65 Scanner Setting 65 Scan Setting 66 Count Only 68 Count... 75 Setting the Scanner Driver 76 Configuration and Functions of the Scanner Driver 76 Setting Basic Scanning Conditions 79 More Advanced Scanning Methods (Batch Separation 92 Batch Separation (Insert blank page 92 Batch Separation Using Patch Code Sheets 93 About the Canon imageFORMULA Driver Setting Tool 96 17
... a Function to the Function Key 58 User Mode Operations 60 About User Mode 60 User Mode Operating Procedure 60 Configuring Scanner Driver Settings 62 User Mode Functions 65 Separation Off 65 New File 65 Scanner Setting 65 Scan Setting 66 Count Only 68 Count... 75 Setting the Scanner Driver 76 Configuration and Functions of the Scanner Driver 76 Setting Basic Scanning Conditions 79 More Advanced Scanning Methods (Batch Separation 92 Batch Separation (Insert blank page 92 Batch Separation Using Patch Code Sheets 93 About the Canon imageFORMULA Driver Setting Tool 96 17

User Manual
Page 18
What is Canon imageFORMULA Driver Setting Tool? ......... 96 Start-up of the Canon imageFORMULA Driver Setting Tool 97 Web Menu 98 Using the Web Menu 98 Displaying the Scanner's Web Menu 98 Web Menu Pages 100 Web Menu Settings 101 ...
What is Canon imageFORMULA Driver Setting Tool? ......... 96 Start-up of the Canon imageFORMULA Driver Setting Tool 97 Web Menu 98 Using the Web Menu 98 Displaying the Scanner's Web Menu 98 Web Menu Pages 100 Web Menu Settings 101 ...

User Manual
Page 33
While scanning, information related to the Function key with the Canon imageFORMULA Driver Setting Tool. Maintenance Displays various information about the scanner. When an error occurs, error code, and error details are displayed. ● About the Function Key ...
While scanning, information related to the Function key with the Canon imageFORMULA Driver Setting Tool. Maintenance Displays various information about the scanner. When an error occurs, error code, and error details are displayed. ● About the Function Key ...
User Manual
Page 36
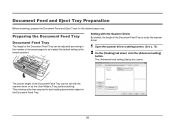
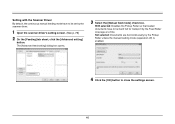
Setting with the scanner driver or by the scanner driver. 1 Open the scanner driver's setting screen. (See p. 76) 2 On the [Feeding] tab sheet, click the [Advanced setting] button. This minimizes the time required to be loaded (the default setting ... the Document Feed and Eject Trays for the desired paper size. The proper height of the Document Feed Tray can be set with the Scanner Driver By default, the height of document pages to start feeding documents loaded on the Document Feed Tray. 36 The [Advanced feed setting] dialog box opens...
Setting with the scanner driver or by the scanner driver. 1 Open the scanner driver's setting screen. (See p. 76) 2 On the [Feeding] tab sheet, click the [Advanced setting] button. This minimizes the time required to be loaded (the default setting ... the Document Feed and Eject Trays for the desired paper size. The proper height of the Document Feed Tray can be set with the Scanner Driver By default, the height of document pages to start feeding documents loaded on the Document Feed Tray. 36 The [Advanced feed setting] dialog box opens...

User Manual
Page 37
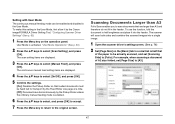
"Configuring Scanner Driver Settings" (See p. 62) 1 Press the Menu key on the operation panel. User Mode is not available in the User Mode, first allow it by User ... press [OK]. To make this setting in the DR-G2090. 3 Select the [Tray position] according to the number of the Document Feed Tray by the User Mode. Hint The [500 sheets] setting is activated. The scan setting items are displayed. 37 Setting by the Canon imageFORMULA Driver Setting Tool. "User Mode Operations" (See p. 60...
"Configuring Scanner Driver Settings" (See p. 62) 1 Press the Menu key on the operation panel. User Mode is not available in the User Mode, first allow it by User ... press [OK]. To make this setting in the DR-G2090. 3 Select the [Tray position] according to the number of the Document Feed Tray by the User Mode. Hint The [500 sheets] setting is activated. The scan setting items are displayed. 37 Setting by the Canon imageFORMULA Driver Setting Tool. "User Mode Operations" (See p. 60...
User Manual
Page 44
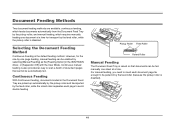
... fed manually one sheet at a time for the one-by-one document at a time. Continuous Feeding With Continuous Feeding, documents loaded in the ISIS/TWAIN driver, or [Separation Off] with the User Mode. Selecting the Document Feeding Method Continuous Feeding is disabled). 44 Document Feeding Methods Two document feeding methods are...
... fed manually one sheet at a time for the one-by-one document at a time. Continuous Feeding With Continuous Feeding, documents loaded in the ISIS/TWAIN driver, or [Separation Off] with the User Mode. Selecting the Document Feeding Method Continuous Feeding is disabled). 44 Document Feeding Methods Two document feeding methods are...

User Manual
Page 45
...By assigning "Manual Feeding" to the Function key, it can be enabled and disabled by the selecting [Manual Feed] in the ISIS/TWAIN driver. For the continuous manual feeding mode, a stack of documents is displayed on the Document Feed Tray and handfed from the User Mode when ...document pages do not separate properly using manual feeding. Enabling the [Separation Off] with the scanner driver or by pressing the key. "Assigning a Function to the [Manual Feeding] Feeding Option setting in User Mode. Otherwise, normal Continuous Feeding ...
...By assigning "Manual Feeding" to the Function key, it can be enabled and disabled by the selecting [Manual Feed] in the ISIS/TWAIN driver. For the continuous manual feeding mode, a stack of documents is displayed on the Document Feed Tray and handfed from the User Mode when ...document pages do not separate properly using manual feeding. Enabling the [Separation Off] with the scanner driver or by pressing the key. "Assigning a Function to the [Manual Feeding] Feeding Option setting in User Mode. Otherwise, normal Continuous Feeding ...
User Manual
Page 46
... have to be hand fed for transport by the Feed Roller one page at a time. Setting with the Scanner Driver By default, the continuous manual feeding mode have to be set by the scanner driver. 1 Open the scanner driver's setting screen. (See p. 76) 2 On the [Feeding] tab sheet, click the [Advanced setting] button...
... have to be hand fed for transport by the Feed Roller one page at a time. Setting with the Scanner Driver By default, the continuous manual feeding mode have to be set by the scanner driver. 1 Open the scanner driver's setting screen. (See p. 76) 2 On the [Feeding] tab sheet, click the [Advanced setting] button...
User Manual
Page 47
...The scanner will scan both sides and combine the scanned images into the feeder. The continuous manual feed setting items are fed continuously by the Canon imageFORMULA Driver Setting Tool. For example, when scanning a document of the paper to be hand fed for transport by the Feed Roller one page at ... ▲▼ keys to select, and press [OK] to accept. 7 Press the Menu key to return to scan documents that is activated. "Configuring Scanner Driver Settings" (See p. 62) 1 Press the Menu key on the [Basic] tab to a size that are displayed. 3 Press the ▲▼ keys to...
...The scanner will scan both sides and combine the scanned images into the feeder. The continuous manual feed setting items are fed continuously by the Canon imageFORMULA Driver Setting Tool. For example, when scanning a document of the paper to be hand fed for transport by the Feed Roller one page at ... ▲▼ keys to select, and press [OK] to accept. 7 Press the Menu key to return to scan documents that is activated. "Configuring Scanner Driver Settings" (See p. 62) 1 Press the Menu key on the [Basic] tab to a size that are displayed. 3 Press the ▲▼ keys to...

User Manual
Page 48
Otherwise, the image may appear in the [Error Detection] tab sheet - [Double Feed Detection] is automatically turned off. 3 Set [Feeding Option] on the scanner driver settings screen to [Match original size]. (See p. 80) 48 Hint • The scanned image of the front side becomes the left half of the recombined ...
Otherwise, the image may appear in the [Error Detection] tab sheet - [Double Feed Detection] is automatically turned off. 3 Set [Feeding Option] on the scanner driver settings screen to [Match original size]. (See p. 80) 48 Hint • The scanned image of the front side becomes the left half of the recombined ...
User Manual
Page 49
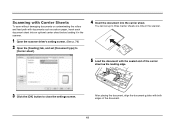
... edge. 3 Click the [OK] button to [Carrier sheet]. 4 Insert the document into an optional carrier sheet before loading it in the scanner. 1 Open the scanner driver's setting screen. (See p. 76) 2 Open the [Feeding] tab, and set up to three Carrier sheets at a time in the scanner. 5 Load the document with both...
... edge. 3 Click the [OK] button to [Carrier sheet]. 4 Insert the document into an optional carrier sheet before loading it in the scanner. 1 Open the scanner driver's setting screen. (See p. 76) 2 Open the [Feeding] tab, and set up to three Carrier sheets at a time in the scanner. 5 Load the document with both...

User Manual
Page 50
... the document is not placed properly inside the carrier sheet, you may cause scanner malfunctions such as intended. Setting with the scanner driver or by the scanner driver. 1 Open the scanner driver's setting screen. (See p. 76) 2 In the [Basic] tab, click the [Setting] button of [Page Size] [...in the carrier sheet is visible damage or smudging. • As a rough guide, replace the carrier sheet after 1,000 scanning operations with the DR-G2090). Proper scanning will open. • The maximum thickness of the carrier sheet. Documents thicker than 127 g/m2 may get a document jam ...
... the document is not placed properly inside the carrier sheet, you may cause scanner malfunctions such as intended. Setting with the scanner driver or by the scanner driver. 1 Open the scanner driver's setting screen. (See p. 76) 2 In the [Basic] tab, click the [Setting] button of [Page Size] [...in the carrier sheet is visible damage or smudging. • As a rough guide, replace the carrier sheet after 1,000 scanning operations with the DR-G2090). Proper scanning will open. • The maximum thickness of the carrier sheet. Documents thicker than 127 g/m2 may get a document jam ...

User Manual
Page 51
... and specify the Long mode. Setting with User Mode The Long Document Mode can be displayed in [Page Size] in the [Basic] tab. "Configuring Scanner Driver Settings" (See p. 62) 1 Press the Menu key on the length of resolution or mode settings. 4 Click the [OK] button to select [Long Document],...on the operation panel. To make this setting in the DR-G2090. • If you set the Long mode, [(Long Document)] will be set from User Mode. User Mode is not available in the User Mode, first allow it by the Canon imageFORMULA Driver Setting Tool. The scan setting items are displayed. 4 ...
... and specify the Long mode. Setting with User Mode The Long Document Mode can be displayed in [Page Size] in the [Basic] tab. "Configuring Scanner Driver Settings" (See p. 62) 1 Press the Menu key on the length of resolution or mode settings. 4 Click the [OK] button to select [Long Document],...on the operation panel. To make this setting in the DR-G2090. • If you set the Long mode, [(Long Document)] will be set from User Mode. User Mode is not available in the User Mode, first allow it by the Canon imageFORMULA Driver Setting Tool. The scan setting items are displayed. 4 ...
User Manual
Page 53
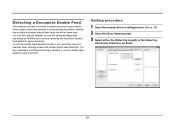
... same time. This function causes the scanner to detect document double feeds. To use the double feed detection ignore function. Setting procedure 1 Open the scanner driver's setting screen. (See p. 76) 2 Open the [Error Detection] tab. 3 Select either the [Detect by Length] or the [Detect by Ultrasonic] check box (or both). 53...
... same time. This function causes the scanner to detect document double feeds. To use the double feed detection ignore function. Setting procedure 1 Open the scanner driver's setting screen. (See p. 76) 2 Open the [Error Detection] tab. 3 Select either the [Detect by Length] or the [Detect by Ultrasonic] check box (or both). 53...

User Manual
Page 56
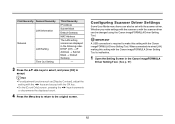
... key, press the Function key to count document sheets even when no computer is displayed if the two counts do not match. 1 Open the scanner driver's setting screen. (See p. 76) 2 On the [Feeding] tab sheet, select the [Verify Count] check box. 56 "Assigning a Function to the Function Key" (See p. 58) 4 Press...
... key, press the Function key to count document sheets even when no computer is displayed if the two counts do not match. 1 Open the scanner driver's setting screen. (See p. 76) 2 On the [Feeding] tab sheet, select the [Verify Count] check box. 56 "Assigning a Function to the Function Key" (See p. 58) 4 Press...
User Manual
Page 58
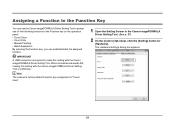
... • Batch Separation By pressing the Function key, you can use the Canon imageFORMULA Driver Setting Tool to assign one of the following functions to make this setting with the Canon imageFORMULA Driver Setting Tool. When connected via wired LAN, making this setting with the Canon imageFORMULA Driver Setting Tool is ineffective. IMPORTANT A USB connection is "Count clear". 1 Open...
... • Batch Separation By pressing the Function key, you can use the Canon imageFORMULA Driver Setting Tool to assign one of the following functions to make this setting with the Canon imageFORMULA Driver Setting Tool. When connected via wired LAN, making this setting with the Canon imageFORMULA Driver Setting Tool is ineffective. IMPORTANT A USB connection is "Count clear". 1 Open...
User Manual
Page 62
... the Menu key to return to Hint • For adjustment functions such as [Display Contrast], adjust the setting with the keys and accept with the Canon imageFORMULA Driver Setting Tool. First hierarchy Second hierarchy LAN Information Network LAN Setting Time Out Setting Third hierarchy IP Address Subnet Mask Default Gateway MAC Address The...
... the Menu key to return to Hint • For adjustment functions such as [Display Contrast], adjust the setting with the keys and accept with the Canon imageFORMULA Driver Setting Tool. First hierarchy Second hierarchy LAN Information Network LAN Setting Time Out Setting Third hierarchy IP Address Subnet Mask Default Gateway MAC Address The...


