
Service Manual
Page 195
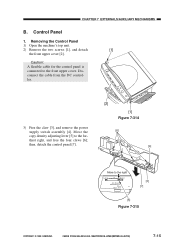
Caution: A flexible cable for the control panel is connected to the farthest right, and free the four claws [6]; CANON PC800s/900s REV.0 AUG. 1999 PRINTED IN JAPAN (IMPRIME AU JAPON) 7-15 Removing the Control Panel 1) Open the machine's top unit. 2) ...[2]. CHAPTER 7 EXTERNALS/AUXILIARY MECHANISMS B. Move the copy density adjusting lever [5] to the front upper cover. Disconnect the cable from the DC controller. 3) Free the claw [3], and remove the power supply switch assembly [4]. then, detach the control panel [7]. [2] [1] Figure 7-314 [6] [4] Move to the right Lighter Darker...
Caution: A flexible cable for the control panel is connected to the farthest right, and free the four claws [6]; CANON PC800s/900s REV.0 AUG. 1999 PRINTED IN JAPAN (IMPRIME AU JAPON) 7-15 Removing the Control Panel 1) Open the machine's top unit. 2) ...[2]. CHAPTER 7 EXTERNALS/AUXILIARY MECHANISMS B. Move the copy density adjusting lever [5] to the front upper cover. Disconnect the cable from the DC controller. 3) Free the claw [3], and remove the power supply switch assembly [4]. then, detach the control panel [7]. [2] [1] Figure 7-314 [6] [4] Move to the right Lighter Darker...

