
Service Manual
Page 2
ANY QUESTIONS REGARDING INFORMATION CONTAINED HEREIN SHOULD BE DIRECTED TO THE COPIER SERVICE DEPARTMENT OF THE SALES COMPANY. THIS DOCUMENTATION IS INTENDED FOR ALL SALES AREAS, AND MAY CONTAIN INFORMATION NOT APPLICABLE TO CERTAIN AREAS. Printed ... 1999 PRINTED IN JAPAN (IMPRIME AU JAPON) SPECIFICATIONS AND OTHER INFORMATION CONTAINED HEREIN MAY VARY SLIGHTLY FROM ACTUAL MACHINE VALUES OR THOSE FOUND IN ADVERTISING AND OTHER PRINTED MATTER. IMPORTANT THIS DOCUMENTATION IS PUBLISHED BY CANON INC., JAPAN, TO SERVE AS A SOURCE OF REFERENCE FOR WORK IN THE FIELD. COPYRIGHT © 1999...
ANY QUESTIONS REGARDING INFORMATION CONTAINED HEREIN SHOULD BE DIRECTED TO THE COPIER SERVICE DEPARTMENT OF THE SALES COMPANY. THIS DOCUMENTATION IS INTENDED FOR ALL SALES AREAS, AND MAY CONTAIN INFORMATION NOT APPLICABLE TO CERTAIN AREAS. Printed ... 1999 PRINTED IN JAPAN (IMPRIME AU JAPON) SPECIFICATIONS AND OTHER INFORMATION CONTAINED HEREIN MAY VARY SLIGHTLY FROM ACTUAL MACHINE VALUES OR THOSE FOUND IN ADVERTISING AND OTHER PRINTED MATTER. IMPORTANT THIS DOCUMENTATION IS PUBLISHED BY CANON INC., JAPAN, TO SERVE AS A SOURCE OF REFERENCE FOR WORK IN THE FIELD. COPYRIGHT © 1999...
Service Manual
Page 7
...2-3 D. Lens Drive System 3-3 D. Scanner Drive System ..........3-4 II. EXPOSURE SYSTEM 3-9 A. CANON PC800s/900s REV.0 AUG. 1999 PRINTED IN JAPAN (IMPRIME AU JAPON) v FEATURES 1-1 II. Copier 1-2 B. OPERATIONS 3-1 A. Scanner Drive Assembly .... 3-13 B. External View 1-10 B. ...ROUTINE MAINTENANCE BY THE USER 1-17 VI. Controlling the Scanning Lamp 3-9 III. DISASSEMBLY/ASSEMBLY ..... 3-12 A. Lens Drive Assembly ......... 3-31 C. USING THE MACHINE 1-15 ...
...2-3 D. Lens Drive System 3-3 D. Scanner Drive System ..........3-4 II. EXPOSURE SYSTEM 3-9 A. CANON PC800s/900s REV.0 AUG. 1999 PRINTED IN JAPAN (IMPRIME AU JAPON) v FEATURES 1-1 II. Copier 1-2 B. OPERATIONS 3-1 A. Scanner Drive Assembly .... 3-13 B. External View 1-10 B. ...ROUTINE MAINTENANCE BY THE USER 1-17 VI. Controlling the Scanning Lamp 3-9 III. DISASSEMBLY/ASSEMBLY ..... 3-12 A. Lens Drive Assembly ......... 3-31 C. USING THE MACHINE 1-15 ...
Service Manual
Page 11
IMAGE FORMATION 1-20 A. CANON PC800s/900s REV.0 AUG. 1999 PRINTED IN JAPAN (IMPRIME AU JAPON) Control Panel 1-15 V. Outline 1-20 COPYRIGHT © 1999 CANON INC. SPECIFICATIONS 1-2 A. USING THE MACHINE 1-15 A. NAMES OF PARTS 1-10 A. CHAPTER 1 GENERAL DESCRIPTION This chapter provides specifications of the machine, instructions on how to operate the machine, and an outline of copying process. ROUTINE MAINTENANCE BY THE USER 1-17 VI. External View 1-10 B. ADF 1-8 III. Cross Section 1-13 IV. Copier 1-2 B. I. FEATURES 1-1 II.
IMAGE FORMATION 1-20 A. CANON PC800s/900s REV.0 AUG. 1999 PRINTED IN JAPAN (IMPRIME AU JAPON) Control Panel 1-15 V. Outline 1-20 COPYRIGHT © 1999 CANON INC. SPECIFICATIONS 1-2 A. USING THE MACHINE 1-15 A. NAMES OF PARTS 1-10 A. CHAPTER 1 GENERAL DESCRIPTION This chapter provides specifications of the machine, instructions on how to operate the machine, and an outline of copying process. ROUTINE MAINTENANCE BY THE USER 1-17 VI. External View 1-10 B. ADF 1-8 III. Cross Section 1-13 IV. Copier 1-2 B. I. FEATURES 1-1 II.
Service Manual
Page 13
...The source of the ADF. All-in 1% increments. 2. Separate top unit • The machine's top unit may expect quality copy images at maximum (1/100 to make jam removal easy. 8. COPYRIGHT © 1999 CANON INC. CHAPTER 1 GENERAL DESCRIPTION I. The user may be as large as A4 (LGL) ...charging roller, developing assembly, and cleaning assembly are constructed as 550 sheets of ozone: 0.01 ppm or less on . 4. Personal Copier with the use of a roller charging method has resulted in a considerable reduction of paper (500-sheet cassette + multifeeder; multifeeder type). 7.
...The source of the ADF. All-in 1% increments. 2. Separate top unit • The machine's top unit may expect quality copy images at maximum (1/100 to make jam removal easy. 8. COPYRIGHT © 1999 CANON INC. CHAPTER 1 GENERAL DESCRIPTION I. The user may be as large as A4 (LGL) ...charging roller, developing assembly, and cleaning assembly are constructed as 550 sheets of ozone: 0.01 ppm or less on . 4. Personal Copier with the use of a roller charging method has resulted in a considerable reduction of paper (500-sheet cassette + multifeeder; multifeeder type). 7.
Service Manual
Page 227
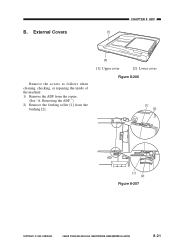
B. External Covers CHAPTER 8 ADF [1] Remove the covers as follows when cleaning, checking, or repairing the inside of the machine: 1) Remove the ADF from the bushing [2]. [2] [1] Upper cover [2] Lower cover Figure 8-206 [1] [2] [1] [2] Figure 8-207 COPYRIGHT © 1999 CANON INC. Removing the ADF.") 2) Remove the feeding roller [1] from the copier. (See "A. CANON PC800s/900s REV.0 AUG. 1999 PRINTED IN JAPAN (IMPRIME AU JAPON) 8-21
B. External Covers CHAPTER 8 ADF [1] Remove the covers as follows when cleaning, checking, or repairing the inside of the machine: 1) Remove the ADF from the bushing [2]. [2] [1] Upper cover [2] Lower cover Figure 8-206 [1] [2] [1] [2] Figure 8-207 COPYRIGHT © 1999 CANON INC. Removing the ADF.") 2) Remove the feeding roller [1] from the copier. (See "A. CANON PC800s/900s REV.0 AUG. 1999 PRINTED IN JAPAN (IMPRIME AU JAPON) 8-21

Service Manual
Page 244
CANON PC800s/900s REV.0 AUG. 1999 PRINTED IN JAPAN (IMPRIME AU JAPON) Shipping attachment [1] You will be storing the shipping attachment [1] inside the machine in copiers, can cause blank copies. UNPACKING AND INSTALLATION When a piece of metal is brought in from a cold place, leave it alone at ... packaging bag and all fixing tape. 3 Remove the shipping attachment [1] (goldcolored screw) from the left of water tend to install it. If the machine has been brought in from the shipping box, and check to make sure that none is known as "condensation" and, in step 9. 9-2 COPYRIGHT ...
CANON PC800s/900s REV.0 AUG. 1999 PRINTED IN JAPAN (IMPRIME AU JAPON) Shipping attachment [1] You will be storing the shipping attachment [1] inside the machine in copiers, can cause blank copies. UNPACKING AND INSTALLATION When a piece of metal is brought in from a cold place, leave it alone at ... packaging bag and all fixing tape. 3 Remove the shipping attachment [1] (goldcolored screw) from the left of water tend to install it. If the machine has been brought in from the shipping box, and check to make sure that none is known as "condensation" and, in step 9. 9-2 COPYRIGHT ...


