User Guide
Page 5
... wall outlet. Directions for purchasing the LK-62/LK-61/LK-60 or iP100 with battery may not be damaged permanently. z The operating temperature range of pages printed per charge is normal. The time required to direct sunlight - If the fully charged battery pack becomes exhausted quickly, please purchase a new kit. z Do not connect any other...
... wall outlet. Directions for purchasing the LK-62/LK-61/LK-60 or iP100 with battery may not be damaged permanently. z The operating temperature range of pages printed per charge is normal. The time required to direct sunlight - If the fully charged battery pack becomes exhausted quickly, please purchase a new kit. z Do not connect any other...
User Guide
Page 6
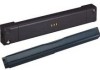
... is for mini260/mini320 and supplied with LK-62, LK-61 and LK-60. (1) Charge lamp The lamp stays on the battery pack until it to the Printer When using . Load the battery pack in the battery attachment with battery. If it becomes dirty, wipe it clean with battery contains a battery pack and a battery attachment. See below for iP100 series...
... is for mini260/mini320 and supplied with LK-62, LK-61 and LK-60. (1) Charge lamp The lamp stays on the battery pack until it to the Printer When using . Load the battery pack in the battery attachment with battery. If it becomes dirty, wipe it clean with battery contains a battery pack and a battery attachment. See below for iP100 series...

User Guide
Page 7
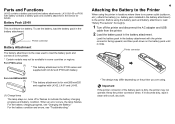
...battery pack with the battery connector of the printer. (2) Remove two battery connector covers. 4 Attach the battery to the printer by tightening two locking screws. Protrusion Battery connector Protrusion Printer connector (2) Secure the battery to the printer. Tighten the screws securely using . Note Store the two battery connector covers in the battery... attachment. Locking screw * The design may differ depending on the printer you are using a coin or a screwdriver. Battery connector cover mini260/mini320 (1) ...
...battery pack with the battery connector of the printer. (2) Remove two battery connector covers. 4 Attach the battery to the printer by tightening two locking screws. Protrusion Battery connector Protrusion Printer connector (2) Secure the battery to the printer. Tighten the screws securely using . Note Store the two battery connector covers in the battery... attachment. Locking screw * The design may differ depending on the printer you are using a coin or a screwdriver. Battery connector cover mini260/mini320 (1) ...

User Guide
Page 8
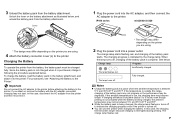
... design may differ depending on the printer you are using. mini260/mini320 (1) Pull out the carrying handle of time (6 months or longer), remove the battery from the printer. Note When the battery pack is not used for a long period of the printer. (2) Push the lock tab on the... on the printer you are using. (2) Pull the lock tab on the battery attachment as illustrated below to secure the battery to the printer. For how to remove the battery, see "Removing the Battery from the Printer." 6 Removing the Battery from the Printer 1 Turn off the printer and disconnect the AC adapter and...
... design may differ depending on the printer you are using. mini260/mini320 (1) Pull out the carrying handle of time (6 months or longer), remove the battery from the printer. Note When the battery pack is not used for a long period of the printer. (2) Push the lock tab on the... on the printer you are using. (2) Pull the lock tab on the battery attachment as illustrated below to secure the battery to the printer. For how to remove the battery, see "Removing the Battery from the Printer." 6 Removing the Battery from the Printer 1 Turn off the printer and disconnect the AC adapter and...
User Guide
Page 9
... reconnect it. * The design may differ depending on the battery attachment as illustrated below . The lamp turns off , charging of the battery pack is turned off. The charge lamp flashes red. 7 3 Unload the battery pack from the battery, the battery pack must be between 5°C and 35°C/41°... charging time becomes longer because charging is indicated by the charge lamp. z You can use the printer while charging the battery. Notes z Charge the battery pack at a place where the ambient temperature is being charged, the ambient temperature may be degraded. z While the...
... reconnect it. * The design may differ depending on the battery attachment as illustrated below . The lamp turns off , charging of the battery pack is turned off. The charge lamp flashes red. 7 3 Unload the battery pack from the battery, the battery pack must be between 5°C and 35°C/41°... charging time becomes longer because charging is indicated by the charge lamp. z You can use the printer while charging the battery. Notes z Charge the battery pack at a place where the ambient temperature is being charged, the ambient temperature may be degraded. z While the...

User Guide
Page 10
... lamp Charge level/Action Fully charged. Charge Lamp is required. Turn off the printer before connecting or disconnecting the AC adapter. Specifications (Battery Pack) Type Nominal voltage Nominal capacity Charge time External dimensions (Width x Depth x Height) Weight Lithium-ion DC11.1 V 2.3 Ah .... Charge remaining. If the same error occurs, contact your Canon service representative. Note The battery condition is indicated when the battery is used under the following situations: • The battery is operating from the printer. The lamp stays green. Troubleshooting...
... lamp Charge level/Action Fully charged. Charge Lamp is required. Turn off the printer before connecting or disconnecting the AC adapter. Specifications (Battery Pack) Type Nominal voltage Nominal capacity Charge time External dimensions (Width x Depth x Height) Weight Lithium-ion DC11.1 V 2.3 Ah .... Charge remaining. If the same error occurs, contact your Canon service representative. Note The battery condition is indicated when the battery is used under the following situations: • The battery is operating from the printer. The lamp stays green. Troubleshooting...