
User Manual
Page 6
... Card 20 Setting the Date and Time 20 Changing the Date and Time 21 Display Language 21 Attaching a Lens 22 Detaching a Lens 22 Lens Instruction Manuals 23 Attaching EF and EF-S Lenses 23 Detaching a Lens 24 Using a Tripod 24 Using Lens Image Stabilization 24 Trying the Camera Out 25 Shooting (Scene...
... Card 20 Setting the Date and Time 20 Changing the Date and Time 21 Display Language 21 Attaching a Lens 22 Detaching a Lens 22 Lens Instruction Manuals 23 Attaching EF and EF-S Lenses 23 Detaching a Lens 24 Using a Tripod 24 Using Lens Image Stabilization 24 Trying the Camera Out 25 Shooting (Scene...

User Manual
Page 8
Manually Correcting White Balance 68 Customizing Colors (Picture Style 69 Customizing Picture Styles 70 Saving Customized Picture Styles 71 Focusing 71 Choosing the AF Method 71 1-... Choosing Subjects to Focus On (Touch AF 72 Shooting with Servo AF 73 Changing the Focus Setting 74 Fine-Tuning the Focus 74 Shooting in Manual Focus Mode 75 Easily Identifying the Focus Area (MF Peaking 76 Flash 76 Changing the Flash Mode 76 Auto 77 On 77 Slow Synchro 77...
Manually Correcting White Balance 68 Customizing Colors (Picture Style 69 Customizing Picture Styles 70 Saving Customized Picture Styles 71 Focusing 71 Choosing the AF Method 71 1-... Choosing Subjects to Focus On (Touch AF 72 Shooting with Servo AF 73 Changing the Focus Setting 74 Fine-Tuning the Focus 74 Shooting in Manual Focus Mode 75 Easily Identifying the Focus Area (MF Peaking 76 Flash 76 Changing the Flash Mode 76 Auto 77 On 77 Slow Synchro 77...

User Manual
Page 10
...the Touch-Screen Panel 142 Cleaning the Image Sensor 142 Disabling Auto Cleaning 142 Activating Sensor Cleaning 143 Cleaning the Sensor Manually 143 Checking Certification Logos 144 Setting Copyright Information to Record in Images 144 Deleting All Copyright Information 144 Adjusting Other Settings...Accessories 150 Playback on a TV 150 Powering the Camera with Household Power 151 Using the Software 152 Software 152 Software Instruction Manual 152 Checking Your Computer Environment 152 Installing the Software 153 Saving Images to a Computer 153 Printing Images 154 Easy Print ...
...the Touch-Screen Panel 142 Cleaning the Image Sensor 142 Disabling Auto Cleaning 142 Activating Sensor Cleaning 143 Cleaning the Sensor Manually 143 Checking Certification Logos 144 Setting Copyright Information to Record in Images 144 Deleting All Copyright Information 144 Adjusting Other Settings...Accessories 150 Playback on a TV 150 Powering the Camera with Household Power 151 Using the Software 152 Software 152 Software Instruction Manual 152 Checking Your Computer Environment 152 Installing the Software 153 Saving Images to a Computer 153 Printing Images 154 Easy Print ...

User Manual
Page 23
... Auto Mode Other Shooting Modes P Mode Tv, Av, and M Mode Playback Mode Wi-Fi Functions Setting Menu Accessories Appendix Index 23 Lens Instruction Manuals Download lens manuals from the following page. ●● Since the image sensor size is smaller than the 35mm film format, it clicks into place. 4 Attach...lens and adapter, and then turn the lens in the direction shown until it clicks into place. http://www.canon.com/icpd/ Attaching EF and EF-S Lenses If you use Mount Adapter EF-EOS M, you can also use EF and EF-S lenses. 1 Make sure the camera is increased by approx. ...
... Auto Mode Other Shooting Modes P Mode Tv, Av, and M Mode Playback Mode Wi-Fi Functions Setting Menu Accessories Appendix Index 23 Lens Instruction Manuals Download lens manuals from the following page. ●● Since the image sensor size is smaller than the 35mm film format, it clicks into place. 4 Attach...lens and adapter, and then turn the lens in the direction shown until it clicks into place. http://www.canon.com/icpd/ Attaching EF and EF-S Lenses If you use Mount Adapter EF-EOS M, you can also use EF and EF-S lenses. 1 Make sure the camera is increased by approx. ...

User Manual
Page 29
...), or when connected to a computer (= 153). Shutter Button To ensure that the subject is in focus. 2 Press all the way down to shoot. In this manual, shutter button operations are displayed around image areas in focus, begin by holding the shutter button halfway down . (From the halfway position, press fully to...
...), or when connected to a computer (= 153). Shutter Button To ensure that the subject is in focus. 2 Press all the way down to shoot. In this manual, shutter button operations are displayed around image areas in focus, begin by holding the shutter button halfway down . (From the halfway position, press fully to...

User Manual
Page 32
... Mode Other Shooting Modes P Mode Tv, Av, and M Mode Playback Mode Wi-Fi Functions Setting Menu Accessories Appendix Index 32 Tabs are identified in this manual by combining the function and page, as in [ 1]. 3 Choose a menu item. ●●Press the [ ][ ] buttons to choose an item, and then press the [ ] button...
... Mode Other Shooting Modes P Mode Tv, Av, and M Mode Playback Mode Wi-Fi Functions Setting Menu Accessories Appendix Index 32 Tabs are identified in this manual by combining the function and page, as in [ 1]. 3 Choose a menu item. ●●Press the [ ][ ] buttons to choose an item, and then press the [ ] button...

User Manual
Page 60
... turn the [ ] dial to adjust exposure. ●● You can also lock or unlock the exposure by touching During recording, you can set the level manually to suit the shooting scene. 1 Access the [Sound recording] screen. ●●Press the [ ] button, choose [Sound recording] on the [ 5]... recording when the shutter button is automatically adjusted, you can also adjust exposure by touching the exposure compensation bar on the next screen to choose [Manual], and then press the [ ] button. ●●Press the [ ] button to choose [Rec. On the next screen, press the [ ][ ] ...
... turn the [ ] dial to adjust exposure. ●● You can also lock or unlock the exposure by touching During recording, you can set the level manually to suit the shooting scene. 1 Access the [Sound recording] screen. ●●Press the [ ] button, choose [Sound recording] on the [ 5]... recording when the shutter button is automatically adjusted, you can also adjust exposure by touching the exposure compensation bar on the next screen to choose [Manual], and then press the [ ] button. ●●Press the [ ] button to choose [Rec. On the next screen, press the [ ][ ] ...

User Manual
Page 67
... are shooting. ●●Press the [ ] button, choose [ ] in fair weather. Custom White Balance For image colors that white fills the screen. ●●Focus manually and shoot (=75). 2 Choose [Custom White Balance]. ●●Choose [Custom White Balance] on the [ 4] tab, and then press the [ ] button. ●●The custom... other plain white subject, so that look more natural for the shooting conditions. For shooting under ordinary incandescent lighting. For shooting in the shade. For manually setting a custom white balance.
... are shooting. ●●Press the [ ] button, choose [ ] in fair weather. Custom White Balance For image colors that white fills the screen. ●●Focus manually and shoot (=75). 2 Choose [Custom White Balance]. ●●Choose [Custom White Balance] on the [ 4] tab, and then press the [ ] button. ●●The custom... other plain white subject, so that look more natural for the shooting conditions. For shooting under ordinary incandescent lighting. For shooting in the shade. For manually setting a custom white balance.

User Manual
Page 68
... 1. G: green ●● One level of blue/amber correction is equivalent to " "] is retained even if you change the white balance option in step 1. M: magenta; Manually Correcting White Balance Still Images Movies You can produce a more advanced settings, press the [ ] button and press the buttons to adjust the correction level. ●... step 1 or the frame in step 2. ●● You can match the effect of a white object, a gray chart or 18% gray reflector (commercially available) can manually correct white balance. Choose [OK] to choose a different image.
... 1. G: green ●● One level of blue/amber correction is equivalent to " "] is retained even if you change the white balance option in step 1. M: magenta; Manually Correcting White Balance Still Images Movies You can produce a more advanced settings, press the [ ] button and press the buttons to adjust the correction level. ●... step 1 or the frame in step 2. ●● You can match the effect of a white object, a gray chart or 18% gray reflector (commercially available) can manually correct white balance. Choose [OK] to choose a different image.

User Manual
Page 72
... camera cannot focus on the aspect ratio (= 45). Choosing Subjects to [ ], [ ] is displayed once a face is detected, and focus is displayed around other areas in Manual Focus Mode" (=75). ●● Move the frame as you recompose the shot, and then press the shutter button all the way down . To cancel...
... camera cannot focus on the aspect ratio (= 45). Choosing Subjects to [ ], [ ] is displayed once a face is detected, and focus is displayed around other areas in Manual Focus Mode" (=75). ●● Move the frame as you recompose the shot, and then press the shutter button all the way down . To cancel...
User Manual
Page 75
... Turn off the camera, set the lens switch to the center of the screen by touching [ ] on the screen in step 3. Shooting in Manual Focus Mode Still Images Movies When focusing is not possible in the lower right. ●●The magnifying frame is displayed. 2 Display the magnifying ...frame. ●●Touch [ ] in AF mode, use manual focus. In the lower right, the magnification ratio and area magnified are shown. 3 Select the area to magnify. ●●Drag the frame to move...
... Turn off the camera, set the lens switch to the center of the screen by touching [ ] on the screen in step 3. Shooting in Manual Focus Mode Still Images Movies When focusing is not possible in the lower right. ●●The magnifying frame is displayed. 2 Display the magnifying ...frame. ●●Touch [ ] in AF mode, use manual focus. In the lower right, the magnification ratio and area magnified are shown. 3 Select the area to magnify. ●●Drag the frame to move...

User Manual
Page 76
... to match the shooting scene. For details on the lens. Vignetting or dark image areas may occur. You can change the flash mode to make manual focusing easier. Before Use Basic Guide Advanced Guide Camera Basics Auto Mode / Hybrid Auto Mode Other Shooting Modes P Mode Tv, Av, and M Mode Playback Mode...
... to match the shooting scene. For details on the lens. Vignetting or dark image areas may occur. You can change the flash mode to make manual focusing easier. Before Use Basic Guide Advanced Guide Camera Basics Auto Mode / Hybrid Auto Mode Other Shooting Modes P Mode Tv, Av, and M Mode Playback Mode...

User Manual
Page 80
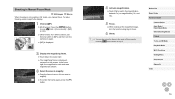
For details, refer to the EOS Utility instruction manual (=152). * Note that subjects are recorded at the Same Size Shown before shooting, you can choose not to reduce significant camera shake. ●●Follow ... need to add EF-M lenses. 1 Choose [Lens aberration correction]. ●●Press the [ ] button, choose [Lens correction data] on the camera, and you can use EOS Utility to lens characteristics. To shoot subjects at the same size shown before Shooting Still Images Movies Normally, once movie recording begins, the image display...
For details, refer to the EOS Utility instruction manual (=152). * Note that subjects are recorded at the Same Size Shown before shooting, you can choose not to reduce significant camera shake. ●●Follow ... need to add EF-M lenses. 1 Choose [Lens aberration correction]. ●●Press the [ ] button, choose [Lens correction data] on the camera, and you can use EOS Utility to lens characteristics. To shoot subjects at the same size shown before Shooting Still Images Movies Normally, once movie recording begins, the image display...

User Manual
Page 86
...mode, touch [ ] on the Auto Lighting Optimizer setting screen to add a [ ] mark to [Disable during man expo]. ●● [ ]: Manual ●● Calculation of the screen by pressing the [ ] button and touching [ ]. However, screen brightness remains the same when the flash is up...setting is complete, the flash output level is displayed. [ ]: Minimum, [ ]: Medium, [ ]: Maximum ●● You can also set [Flash Mode] to [Manual flash] (=32). 2 Configure the setting. ●●Raise the flash, press the [ ] button and immediately turn the [ ] dial to adjust exposure. -- ...
...mode, touch [ ] on the Auto Lighting Optimizer setting screen to add a [ ] mark to [Disable during man expo]. ●● [ ]: Manual ●● Calculation of the screen by pressing the [ ] button and touching [ ]. However, screen brightness remains the same when the flash is up...setting is complete, the flash output level is displayed. [ ]: Minimum, [ ]: Medium, [ ]: Maximum ●● You can also set [Flash Mode] to [Manual flash] (=32). 2 Configure the setting. ●●Raise the flash, press the [ ] button and immediately turn the [ ] dial to adjust exposure. -- ...

User Manual
Page 112
... can also be sure to print them. ●● Another Camera Send images wirelessly between Wi-Fi-compatible Canon cameras. For convenience in this manual, smartphones, tablets, and other compatible devices are collectively referred to as "smartphones". ●● Web Services Add... your account information to the camera for CANON iMAGE GATEWAY online photography service or other devices. * Digital Living Network Alliance &#...
... can also be sure to print them. ●● Another Camera Send images wirelessly between Wi-Fi-compatible Canon cameras. For convenience in this manual, smartphones, tablets, and other compatible devices are collectively referred to as "smartphones". ●● Web Services Add... your account information to the camera for CANON iMAGE GATEWAY online photography service or other devices. * Digital Living Network Alliance &#...

User Manual
Page 114
... from the connected smartphone when you attempt connection when the camera is updated. -- Do not place other immediately. For details, refer to the smartphone user manual. ●● To disable NFC connections, choose MENU (=32) > [ 4] tab > [Wi-Fi Settings] > [NFC] > [Off]. Before Use Basic Guide Advanced Guide Camera Basics Auto Mode...
... from the connected smartphone when you attempt connection when the camera is updated. -- Do not place other immediately. For details, refer to the smartphone user manual. ●● To disable NFC connections, choose MENU (=32) > [ 4] tab > [Wi-Fi Settings] > [NFC] > [Off]. Before Use Basic Guide Advanced Guide Camera Basics Auto Mode...

User Manual
Page 118
... when you access the Wi-Fi menu. To add a new device, display the device selection screen by pressing the [ ][ ] buttons to the access point user manual. Connection methods vary depending on the SSID screen (in step 8 (=136). For non-WPS access points, check the following information. ●● Network name (SSID...
... when you access the Wi-Fi menu. To add a new device, display the device selection screen by pressing the [ ][ ] buttons to the access point user manual. Connection methods vary depending on the SSID screen (in step 8 (=136). For non-WPS access points, check the following information. ●● Network name (SSID...

User Manual
Page 119
... points". ●● If you use either Push Button Configuration Method or PIN Method for settings on checking settings, refer to the access point user manual. ●● A router is needed to complete settings when connecting devices over Wi-Fi.
... points". ●● If you use either Push Button Configuration Method or PIN Method for settings on checking settings, refer to the access point user manual. ●● A router is needed to complete settings when connecting devices over Wi-Fi.

User Manual
Page 120
... [ ] button to go to the next step. 7 Import images. ●●Follow steps 6 - 9 in "Adding a Smartphone Using the Wi-Fi Menu" (=117) to the user manual included with your access point.
... [ ] button to go to the next step. 7 Import images. ●●Follow steps 6 - 9 in "Adding a Smartphone Using the Wi-Fi Menu" (=117) to the user manual included with your access point.

User Manual
Page 121
... GATEWAY After linking the camera and CANON iMAGE GATEWAY, add CANON iMAGE GATEWAY as [*] in step 2 to complete access point settings manually. If no access points are displayed as a destination Web service on the camera. Previous Access Points To reconnect to a previous access point automatically, ... and then press the [ ] button. ●● To determine the access point password, check on the access point itself or refer to the user manual. ●● Up to 16 access points will be applicable. ●● CANON iMAGE GATEWAY also provides user guides for downloading.
... GATEWAY After linking the camera and CANON iMAGE GATEWAY, add CANON iMAGE GATEWAY as [*] in step 2 to complete access point settings manually. If no access points are displayed as a destination Web service on the camera. Previous Access Points To reconnect to a previous access point automatically, ... and then press the [ ] button. ●● To determine the access point password, check on the access point itself or refer to the user manual. ●● Up to 16 access points will be applicable. ●● CANON iMAGE GATEWAY also provides user guides for downloading.
