
User Manual
Page 6
...Contents 4 Before Using the Scanner 5 To Ensure Safe Operation 5 Installation Location 5 Power ...6 Moving the Scanner 6 Notes on Normal Handling 7 Notes Concerning Disposal 8 Features of the DR-3080CII 9 Checking the Packing List 11 Removing the Protective Tape and Protective Sheet 12 Names and Functions of Parts 13 Installing the Scanner 15 Installation Requirements... Code Patterns 50 Clearing a Paper Jam 51 Regular Maintenance 54 Cleaning the Scanner 54 Cleaning the Scanning Glass and the Rollers 55 Troubleshooting 56 Specifications ...63 Index ...66 4 Table of Contents
...Contents 4 Before Using the Scanner 5 To Ensure Safe Operation 5 Installation Location 5 Power ...6 Moving the Scanner 6 Notes on Normal Handling 7 Notes Concerning Disposal 8 Features of the DR-3080CII 9 Checking the Packing List 11 Removing the Protective Tape and Protective Sheet 12 Names and Functions of Parts 13 Installing the Scanner 15 Installation Requirements... Code Patterns 50 Clearing a Paper Jam 51 Regular Maintenance 54 Cleaning the Scanner 54 Cleaning the Scanning Glass and the Rollers 55 Troubleshooting 56 Specifications ...63 Index ...66 4 Table of Contents
User Manual
Page 17
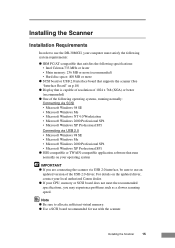
...XP Professional SP1 ● ISIS-compatible or TWAIN-compatible application software that runs normally on the updated driver, contact your local authorized Canon dealer. ● If your computer must satisfy the following system requirements: ● IBM PC/AT-compatible that satisfies the following operating...Windows 2000 Professional SP4 • Microsoft Windows XP Professional SP1 Connecting via USB 2.0 interface, be sure to use the DR-3080CII, your CPU, memory or SCSI board does not meet the recommended specifications, you may experience problems such as a slower scanning speed.
...XP Professional SP1 ● ISIS-compatible or TWAIN-compatible application software that runs normally on the updated driver, contact your local authorized Canon dealer. ● If your computer must satisfy the following system requirements: ● IBM PC/AT-compatible that satisfies the following operating...Windows 2000 Professional SP4 • Microsoft Windows XP Professional SP1 Connecting via USB 2.0 interface, be sure to use the DR-3080CII, your CPU, memory or SCSI board does not meet the recommended specifications, you may experience problems such as a slower scanning speed.

User Manual
Page 26
......)" check box. If the message "Digital Signature Not Found" appears, simply click Yes to the Found New Hardware Wizard" screen, select "Install from a list or specific location (Advanced)", and then click the Next button. 3. Select "Specify the location of the driver (Advanced)" and then click the Next button. 2. Next, type "D:\INF...
......)" check box. If the message "Digital Signature Not Found" appears, simply click Yes to the Found New Hardware Wizard" screen, select "Install from a list or specific location (Advanced)", and then click the Next button. 3. Select "Specify the location of the driver (Advanced)" and then click the Next button. 2. Next, type "D:\INF...

User Manual
Page 64
...the direction illustrated. The [Scanner Adjustment] dialog box is dirty may result in vertical lines appearing on scanned images. Attempting to calibrate the scanner. 62 Specifications Locate the adjustment sheet (shading paper) that calibrating the scanner will permanently delete any existing calibration configuration. Follow the instructions on p.55). Note that ... screen to calibrate the scanner while the scanning glass is displayed. Load it into the scanner with the arrow pointing in Windows, select [Programs] - [Canon DR-3080CII] then click [DR-3080CII Shading Tool].
...the direction illustrated. The [Scanner Adjustment] dialog box is dirty may result in vertical lines appearing on scanned images. Attempting to calibrate the scanner. 62 Specifications Locate the adjustment sheet (shading paper) that calibrating the scanner will permanently delete any existing calibration configuration. Follow the instructions on p.55). Note that ... screen to calibrate the scanner while the scanning glass is displayed. Load it into the scanner with the arrow pointing in Windows, select [Programs] - [Canon DR-3080CII] then click [DR-3080CII Shading Tool].

User Manual
Page 65
... color image scanner Scanning Document Specifications Width: 2.2" to 10.1" (55 mm to 257 mm) 2.8" to 10.1" (70 mm to 257 mm) with automatic size detection Length: 2.8" to 14.3" (70 mm to .../minute 80 images/minute 60 images/minute 50 images/minute 40 images/minute 20 pages/minute 10 pages/minute 40 images/minute 20 images/minute Specifications 63
... color image scanner Scanning Document Specifications Width: 2.2" to 10.1" (55 mm to 257 mm) 2.8" to 10.1" (70 mm to 257 mm) with automatic size detection Length: 2.8" to 14.3" (70 mm to .../minute 80 images/minute 60 images/minute 50 images/minute 40 images/minute 20 pages/minute 10 pages/minute 40 images/minute 20 images/minute Specifications 63

User Manual
Page 66
...a six-digit number and a letter on the back side of your PC and depending on your lacal authorised Canon dealer as they are subject to improve our products, the specifications described above can be stacked in automatic feeder 10 mm stack, maximum Interface SCSI-III / Hi-Speed USB2... above are supported by the application software. ● Some functions may not be used if they must actually perform the replacement. 64 Specifications Amount of paper that can be available, depending on the performance of a document that has been scanned. Due to our ongoing efforts to...
...a six-digit number and a letter on the back side of your PC and depending on your lacal authorised Canon dealer as they are subject to improve our products, the specifications described above can be stacked in automatic feeder 10 mm stack, maximum Interface SCSI-III / Hi-Speed USB2... above are supported by the application software. ● Some functions may not be used if they must actually perform the replacement. 64 Specifications Amount of paper that can be available, depending on the performance of a document that has been scanned. Due to our ongoing efforts to...

User Manual
Page 67
External Dimensions Units: inches (units in parentheses are millimeters) 13.5" (344 mm) 9.6" (244 mm) 6.5" (164 mm) 7.5" (191 mm) 21.9" (555 mm) When the paper feed tray and paper feed tray extension are open 13.4" (341 mm) When the auxiliary paper support plate is installed 10.9" (278 mm) Specifications 65
External Dimensions Units: inches (units in parentheses are millimeters) 13.5" (344 mm) 9.6" (244 mm) 6.5" (164 mm) 7.5" (191 mm) 21.9" (555 mm) When the paper feed tray and paper feed tray extension are open 13.4" (341 mm) When the auxiliary paper support plate is installed 10.9" (278 mm) Specifications 65