
DC100 Instruction Manual
Page 3
... safety instructions the word "product" 10. The CA-570 Compact refers to the Canon DVD Camcorder DC100 Power Adapter should be moved with care. company. Regarding other 13. Unplug this manual. portable communication devices or other power sources 2. Outdoor Antenna Grounding - grounding electrodes,... may cause the product and cartcombinationtooverturn. 3 Do not use this product near water or in this manual as they are not likely not recommended in this manual. 12. The 2-prong polarized plug will fit into the outlet, try reversing the plug. 5....
... safety instructions the word "product" 10. The CA-570 Compact refers to the Canon DVD Camcorder DC100 Power Adapter should be moved with care. company. Regarding other 13. Unplug this manual. portable communication devices or other power sources 2. Outdoor Antenna Grounding - grounding electrodes,... may cause the product and cartcombinationtooverturn. 3 Do not use this product near water or in this manual as they are not likely not recommended in this manual. 12. The 2-prong polarized plug will fit into the outlet, try reversing the plug. 5....
DC100 Instruction Manual
Page 8
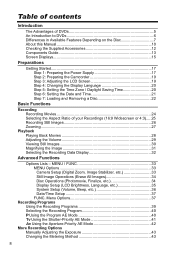
...Using the Program AE Mode 40 Using the Shutter-Priority AE Mode 41 Using the Aperture-Priority AE Mode 42 More Recording Options Manually Adjusting the Exposure 43 Changing the Metering Method 43 8 Table of contents Introduction The Advantages of DVDs 5 An Introduction to ...DVDs 6 Differences in Available Features Depending on the Disc 7 About this Manual 10 Checking the Supplied Accessories 12 Components Guide 13 Screen Displays 15 Preparations Getting Started 17 Step 1: Preparing the Power Supply 17 Step ...
...Using the Program AE Mode 40 Using the Shutter-Priority AE Mode 41 Using the Aperture-Priority AE Mode 42 More Recording Options Manually Adjusting the Exposure 43 Changing the Metering Method 43 8 Table of contents Introduction The Advantages of DVDs 5 An Introduction to ...DVDs 6 Differences in Available Features Depending on the Disc 7 About this Manual 10 Checking the Supplied Accessories 12 Components Guide 13 Screen Displays 15 Preparations Getting Started 17 Step 1: Preparing the Power Supply 17 Step ...
DC100 Instruction Manual
Page 9
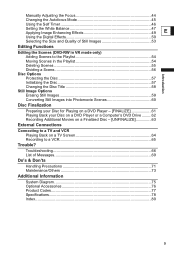
Manually Adjusting the Focus 44 Changing the Autofocus Mode 45 Using the Self Timer 46 Setting the White Balance 47 Applying Image Enhancing Effects 49 E Using ...
Manually Adjusting the Focus 44 Changing the Autofocus Mode 45 Using the Self Timer 46 Setting the White Balance 47 Applying Image Enhancing Effects 49 E Using ...
DC100 Instruction Manual
Page 10
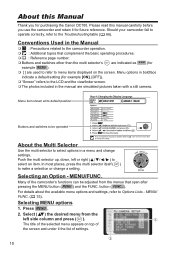
... switches other than the multi selector's are indicated as *** (for example MENU ). [ ] are simulated pictures taken with a still camera. About this manual carefully before you for purchasing the Canon DC100. Conventions Used in a menu and change a setting. MENU/FUNC. Many of settings. 10 In most places, press the multi selector itself ( ) to...
... switches other than the multi selector's are indicated as *** (for example MENU ). [ ] are simulated pictures taken with a still camera. About this manual carefully before you for purchasing the Canon DC100. Conventions Used in a menu and change a setting. MENU/FUNC. Many of settings. 10 In most places, press the multi selector itself ( ) to...
DC100 Instruction Manual
Page 13
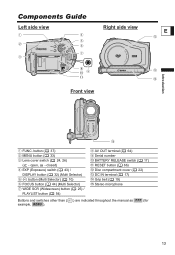
...) RESET button ( 66) Disc compartment cover ( 22) DC IN terminal ( 17) Grip belt ( 19) Stereo microphone Buttons and switches other than ( ) are indicated throughout the manual as *** (for example, MENU ). 13 button ( 37) MENU button ( 33) Lens cover switch ( 24, 26) ( -
...) RESET button ( 66) Disc compartment cover ( 22) DC IN terminal ( 17) Grip belt ( 19) Stereo microphone Buttons and switches other than ( ) are indicated throughout the manual as *** (for example, MENU ). 13 button ( 37) MENU button ( 33) Lens cover switch ( 24, 26) ( -
DC100 Instruction Manual
Page 14
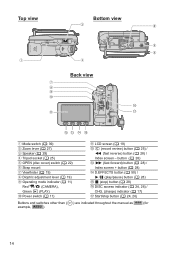
...) button ( 28) DISC access indicator ( 24, 26) / CHG. (charge) indicator ( 17) Start/stop button ( 24, 26) Buttons and switches other than ( ) are indicated throughout the manual as *** (for example, MENU ). 14
...) button ( 28) DISC access indicator ( 24, 26) / CHG. (charge) indicator ( 17) Start/stop button ( 24, 26) Buttons and switches other than ( ) are indicated throughout the manual as *** (for example, MENU ). 14
DC100 Instruction Manual
Page 15
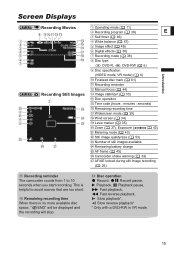
... ( 49) Digital effects ( 50) Recording mode ( 38) Disc type DVD-R, DVD-RW ( 6) Disc specification Introduction (VIDEO mode, VR mode) ( 6) Finalized disc mark ( 61) Recording reminder Manual focus ( 44) Image stabilizer ( 33) Disc operation Time code (hours : minutes : seconds) Remaining recording time Widescreen mode ( 25) Wind screen ( 34) Level marker ( 35) Zoom...
... ( 49) Digital effects ( 50) Recording mode ( 38) Disc type DVD-R, DVD-RW ( 6) Disc specification Introduction (VIDEO mode, VR mode) ( 6) Finalized disc mark ( 61) Recording reminder Manual focus ( 44) Image stabilizer ( 33) Disc operation Time code (hours : minutes : seconds) Remaining recording time Widescreen mode ( 25) Wind screen ( 34) Level marker ( 35) Zoom...

DC100 Instruction Manual
Page 25
.... ) the icon and press ( ) to return to the • While reviewing a scene immediately after recording it, you can select the aspect ratio of the TV manually. Less than 5.5 mm (0.2 inch). Otherwise, change the aspect ratio of your recording to match your Recordings (16:9 Widescreen or 4:3) You can have a wider view angle...
.... ) the icon and press ( ) to return to the • While reviewing a scene immediately after recording it, you can select the aspect ratio of the TV manually. Less than 5.5 mm (0.2 inch). Otherwise, change the aspect ratio of your recording to match your Recordings (16:9 Widescreen or 4:3) You can have a wider view angle...
DC100 Instruction Manual
Page 26
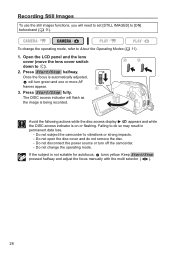
... will need to set [STILL IMAGES] to [ON] beforehand ( 11). Failing to vibrations or strong impacts. - Keep Start/Stop pressed halfway and adjust the focus manually with the multi selector ( ). 26 Press Start/Stop halfway. Do not change the operating mode, refer to ). 2. Do not disconnect the power source or turn...
... will need to set [STILL IMAGES] to [ON] beforehand ( 11). Failing to vibrations or strong impacts. - Keep Start/Stop pressed halfway and adjust the focus manually with the multi selector ( ). 26 Press Start/Stop halfway. Do not change the operating mode, refer to ). 2. Do not disconnect the power source or turn...

DC100 Instruction Manual
Page 40
... recording program while recording as the shutter speed slows down. To avoid camcorder shake, we recommend using a tripod. mode, while still enjoying the option to manually adjust some To change the operating mode, refer to About the Operating Modes ( 11). Check the image on cloudy days or in (T). - Mode switch: Select...
... recording program while recording as the shutter speed slows down. To avoid camcorder shake, we recommend using a tripod. mode, while still enjoying the option to manually adjust some To change the operating mode, refer to About the Operating Modes ( 11). Check the image on cloudy days or in (T). - Mode switch: Select...

DC100 Instruction Manual
Page 41
... condition. Press ( ). 3. Using the Shutter-Priority AE Mode E You can obtain a brighter image, but the image quality may be obtained, try the following actions. Manually adjust the exposure ( 43). Change the metering method ( 43). If the optimal exposure cannot be lower, and the autofocus may not work well. ...
... condition. Press ( ). 3. Using the Shutter-Priority AE Mode E You can obtain a brighter image, but the image quality may be obtained, try the following actions. Manually adjust the exposure ( 43). Change the metering method ( 43). If the optimal exposure cannot be lower, and the autofocus may not work well. ...

DC100 Instruction Manual
Page 43
... adjust the exposure to the subject in the center. [ SPOT] Meters the area within the spot AE point frame. Metering Method icon Desired option 43 Manually Adjusting the Exposure MoreRecordingOptions Adjust the exposure when a subject is underexposed (for example, when backlit subjects appear too dark in the image) or overexposed (for...
... adjust the exposure to the subject in the center. [ SPOT] Meters the area within the spot AE point frame. Metering Method icon Desired option 43 Manually Adjusting the Exposure MoreRecordingOptions Adjust the exposure when a subject is underexposed (for example, when backlit subjects appear too dark in the image) or overexposed (for...

DC100 Instruction Manual
Page 44
... Subjects with low contrast or without vertical lines Fast Moving Subjects Through dirty or wet windows Night Scenes To change the operating mode, refer to manual focusing mode. 44 Adjust the zoom. 2. Press FOCUS ( ). If you wish to autofocus. "MF" appears. 3. Adjust the zoom. 2. Pressing FOCUS ( ) ...selector ( ) during infinity focus, " " changes to "MF" and the camcorder returns to About the Operating Modes ( 11). In such case, focus manually. Manually Adjusting the Focus Autofocus may not work well on faraway subjects such as required until the image appears focused.
... Subjects with low contrast or without vertical lines Fast Moving Subjects Through dirty or wet windows Night Scenes To change the operating mode, refer to manual focusing mode. 44 Adjust the zoom. 2. Press FOCUS ( ). If you wish to autofocus. "MF" appears. 3. Adjust the zoom. 2. Pressing FOCUS ( ) ...selector ( ) during infinity focus, " " changes to "MF" and the camcorder returns to About the Operating Modes ( 11). In such case, focus manually. Manually Adjusting the Focus Autofocus may not work well on faraway subjects such as required until the image appears focused.

DC100 Instruction Manual
Page 51
... Operating Modes ( 11). Hold D.EFFECTS pressed down for the [ NIGHT] recording program). ( 37) D.EFFECT OFF Options [S.SPEED] Select how fast the images will be captured. [MANUAL]: One image will be added to activate the fader/effect. • To fade in the split screen: [4], [9], [16]. FUNC. ** Press ( )* * You can preview the effect...
... Operating Modes ( 11). Hold D.EFFECTS pressed down for the [ NIGHT] recording program). ( 37) D.EFFECT OFF Options [S.SPEED] Select how fast the images will be captured. [MANUAL]: One image will be added to activate the fader/effect. • To fade in the split screen: [4], [9], [16]. FUNC. ** Press ( )* * You can preview the effect...

DC100 Instruction Manual
Page 62
...the disc type display. Depending on your DVD device you may not be lower than that of Photomovie scenes will appear next to the instruction manual and help modules of your DVD playback software. • To view still images recorded on the disc, close first any DVD playback software ... * YES * During the disc finalization a progress bar is displayed. Select the scene you can play the disc. In order to the instruction manual of the finalization process depends on the scenes recorded and the remaining free space on the disc. Finalizing the Disc The length of your DVD...
...the disc type display. Depending on your DVD device you may not be lower than that of Photomovie scenes will appear next to the instruction manual and help modules of your DVD playback software. • To view still images recorded on the disc, close first any DVD playback software ... * YES * During the disc finalization a progress bar is displayed. Select the scene you can play the disc. In order to the instruction manual of the finalization process depends on the scenes recorded and the remaining free space on the disc. Finalizing the Disc The length of your DVD...

DC100 Instruction Manual
Page 64
... to the camcorder's AV terminal and the terminals on a TV Screen ConnectingtoaTVandVCR Selecting the Type of TV To change the aspect ratio of the TV manually. 64 On a VCR: Set the input selector to LINE (IN). We recommend powering the camcorder using the compact power adapter. TV sets compatible...
... to the camcorder's AV terminal and the terminals on a TV Screen ConnectingtoaTVandVCR Selecting the Type of TV To change the aspect ratio of the TV manually. 64 On a VCR: Set the input selector to LINE (IN). We recommend powering the camcorder using the compact power adapter. TV sets compatible...

DC100 Instruction Manual
Page 67
... match the beginning/end of the recording on the disc. 24 the disc access indicator does 26 not go off and let it cool - Focus manually. 44 Adjust the viewfinder with a soft lens-cleaning cloth. 73 Never use tissue paper to . 24 will not start of not a malfunction. Clean the lens...
... match the beginning/end of the recording on the disc. 24 the disc access indicator does 26 not go off and let it cool - Focus manually. 44 Adjust the viewfinder with a soft lens-cleaning cloth. 73 Never use tissue paper to . 24 will not start of not a malfunction. Clean the lens...

DC100 Instruction Manual
Page 69
...-compatible DVD players. The disc's recording surface may not be The disc is a brief stop between Depending on a disc in VR mode) to the instruction manual of your DVD device. Wait 73 until you attempted to VIDEO. Disc is running, but image will TV/VIDEO selector on until the camcorder dries...
...-compatible DVD players. The disc's recording surface may not be The disc is a brief stop between Depending on a disc in VR mode) to the instruction manual of your DVD device. Wait 73 until you attempted to VIDEO. Disc is running, but image will TV/VIDEO selector on until the camcorder dries...

DC100 Instruction Manual
Page 78
Specifications DC100 System Disc Recording System Television System Image Sensor Compatible Media Maximum Recording Time (1.4 GB single-sided 8 cm Mini DVD) LCD Screen Viewfinder Microphone Lens Lens ...]): 43.8-1,095 mm 16:9 (Image stabilizer [OFF]): 41.0-1,025 mm 4:3 recordings: 49.8-1,245 mm Still images 43.6-1,090 mm 10 elements in 8 groups TTL autofocus, manual focusing possible 1 m (3.3 ft.); 1 cm (0.39 in .) excluding protrusions 410 g (14.5 oz.) 78 Output only Video: 1 Vp-p/75 ohms unbalanced Audio: -10 dBV (47 kohm load...
Specifications DC100 System Disc Recording System Television System Image Sensor Compatible Media Maximum Recording Time (1.4 GB single-sided 8 cm Mini DVD) LCD Screen Viewfinder Microphone Lens Lens ...]): 43.8-1,095 mm 16:9 (Image stabilizer [OFF]): 41.0-1,025 mm 4:3 recordings: 49.8-1,245 mm Still images 43.6-1,090 mm 10 elements in 8 groups TTL autofocus, manual focusing possible 1 m (3.3 ft.); 1 cm (0.39 in .) excluding protrusions 410 g (14.5 oz.) 78 Output only Video: 1 Vp-p/75 ohms unbalanced Audio: -10 dBV (47 kohm load...

DC100 Instruction Manual
Page 83
...shall not exceed the purchase price of the product. This limited warranty does not cover the cabinet (exterior finish) of the Canon Service Facilities in the instruction manual; NOTICE TO CONSUMER If you plan to any of the DVD equipment, DVD discs, nor does it was purchased as ...otherwise required by Canon Canada Inc. ("Canon Canada") with this Canon product that do not conform to Canon specifications or that may arise, whether on ...
...shall not exceed the purchase price of the product. This limited warranty does not cover the cabinet (exterior finish) of the Canon Service Facilities in the instruction manual; NOTICE TO CONSUMER If you plan to any of the DVD equipment, DVD discs, nor does it was purchased as ...otherwise required by Canon Canada Inc. ("Canon Canada") with this Canon product that do not conform to Canon specifications or that may arise, whether on ...