

Owner's Manual - English
Page 2
... 42 How to Respond to a Dialog Box 43 Printing a Document 46 Printing with Standard Settings 47 Changing Items in Print Dialog Box 47 Changing Other Printer Options 48 Using Online Help 50 Beyond the Basics 51 Using Templates for Easy Publishing 51 Safeguarding a Document 55 Working with Dual Documents 55 Renaming...
... 42 How to Respond to a Dialog Box 43 Printing a Document 46 Printing with Standard Settings 47 Changing Items in Print Dialog Box 47 Changing Other Printer Options 48 Using Online Help 50 Beyond the Basics 51 Using Templates for Easy Publishing 51 Safeguarding a Document 55 Working with Dual Documents 55 Renaming...
Owner's Manual - English
Page 13
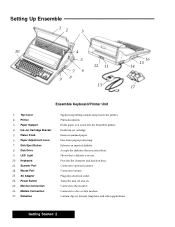
... paper positioning. Accepts the diskettes that a diskette is fed into electrical outlet. Connects to a fax or data modem. Printer 3. Platen Knob 6. Removes jammed paper. Setting Up Ensemble 12 3 10 4 5 76 98 12 11 13 16 15 14 17 Ensemble Keyboard.... Connects to mouse. Contain clip art, tutorial, templates, and other applications. Disk Drive 9. Holds ink-jet cartridge. Plugs into the Ensemble printer. Top Cover 2. Paper Adjustment Lever 7. Disk Eject Button 8. Keyboard 11. Scanner Port 12. Monitor Connection 16. Modem Connection 17. Holds paper...
... paper positioning. Accepts the diskettes that a diskette is fed into electrical outlet. Connects to a fax or data modem. Printer 3. Platen Knob 6. Removes jammed paper. Setting Up Ensemble 12 3 10 4 5 76 98 12 11 13 16 15 14 17 Ensemble Keyboard.... Connects to mouse. Contain clip art, tutorial, templates, and other applications. Disk Drive 9. Holds ink-jet cartridge. Plugs into the Ensemble printer. Top Cover 2. Paper Adjustment Lever 7. Disk Eject Button 8. Keyboard 11. Scanner Port 12. Monitor Connection 16. Modem Connection 17. Holds paper...
Owner's Manual - English
Page 14
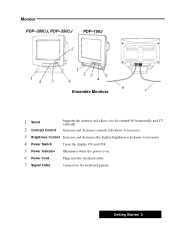
Getting Started 3 Monitor PDP-300CJ, PDP-350CJ PDP-100J 5 1 2 3 1 23 5 4 4 6 Ensemble Monitors 7 1 Stand 2 Contrast Control Supports the monitor and allows it to the keyboard/printer. Increases and decreases contrast (clockwise to increase). 3 Brightness Control Increases and decreases the display brightness (clockwise to increase). 4 Power Switch Turns the display ON and OFF. 5 Power Indicator Illuminates when the power is on. 6 Power Cord Plugs into the electrical outlet. 7 Signal Cable Connects to be rotated 90° horizontally and 17° vertically.
Getting Started 3 Monitor PDP-300CJ, PDP-350CJ PDP-100J 5 1 2 3 1 23 5 4 4 6 Ensemble Monitors 7 1 Stand 2 Contrast Control Supports the monitor and allows it to the keyboard/printer. Increases and decreases contrast (clockwise to increase). 3 Brightness Control Increases and decreases the display brightness (clockwise to increase). 4 Power Switch Turns the display ON and OFF. 5 Power Indicator Illuminates when the power is on. 6 Power Cord Plugs into the electrical outlet. 7 Signal Cable Connects to be rotated 90° horizontally and 17° vertically.

Owner's Manual - English
Page 15
Getting Started 4 "To put the system together: Before plugging the monitor or keyboard/printer into the locked position. For the PDP-100J monitor, slide the monitor stand toward the front of the monitor until the latch located at the ...
Getting Started 4 "To put the system together: Before plugging the monitor or keyboard/printer into the locked position. For the PDP-100J monitor, slide the monitor stand toward the front of the monitor until the latch located at the ...
Owner's Manual - English
Page 16
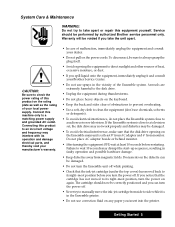
...is in the vicinity of obstructions to a matching power supply and grounded AC outlet. Warranty will be correctly positioned and you insert into the printer. S Use a soft, dry cloth to direct sunlight and other sources of heat, excessive moisture, or dust. Connecting this machine only to ...prevent overheating. S To avoid electrical interference, make sure that the disk drive opening on any paper you can be performed by authorized Brother service personnel only. Service should now be voided if you turn the Ensemble unit off . S Do not use chemicals, solvents or ...
...is in the vicinity of obstructions to a matching power supply and grounded AC outlet. Warranty will be correctly positioned and you insert into the printer. S Use a soft, dry cloth to direct sunlight and other sources of heat, excessive moisture, or dust. Connecting this machine only to ...prevent overheating. S To avoid electrical interference, make sure that the disk drive opening on any paper you can be performed by authorized Brother service personnel only. Service should now be voided if you turn the Ensemble unit off . S Do not use chemicals, solvents or ...
Owner's Manual - English
Page 17
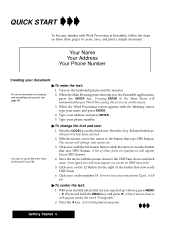
..., see page 28. "To center the text: 1. "To enter the text: 1. Your typed text will automatically open Word Processing, the first icon on the keyboard/printer and the monitor. 2. Click once with the blinking cursor, type your text has been selected. 2. Click once on screen in Ensemble, follow the steps on...
..., see page 28. "To center the text: 1. "To enter the text: 1. Your typed text will automatically open Word Processing, the first icon on the keyboard/printer and the monitor. 2. Click once with the blinking cursor, type your text has been selected. 2. Click once on screen in Ensemble, follow the steps on...

Owner's Manual - English
Page 19
... on the ruler on the top cover.) 3. For more information on printing, see page 46. Open the paper support on the back of the keyboard/printer, and place a sheet of the keyboard. A dialog box will move to the Main Menu. Press the PRINT key on the top row of this manual...
... on the ruler on the top cover.) 3. For more information on printing, see page 46. Open the paper support on the back of the keyboard/printer, and place a sheet of the keyboard. A dialog box will move to the Main Menu. Press the PRINT key on the top row of this manual...

Owner's Manual - English
Page 21
... unit. Getting Started 10 Flip open the paper support and slightly bend it is available for automatic feeding. The cut sheet feeder: 1. Turn the keyboard/printer unit around so that the back of it in the center. 3. Optional CF-710 Cut Sheet Feeder A CF-710 cut sheet feeder is facing you...
... unit. Getting Started 10 Flip open the paper support and slightly bend it is available for automatic feeding. The cut sheet feeder: 1. Turn the keyboard/printer unit around so that the back of it in the center. 3. Optional CF-710 Cut Sheet Feeder A CF-710 cut sheet feeder is facing you...

Owner's Manual - English
Page 29
...cleaning the print head, remove the ink-jet cartridge (see instructions on . 7. Gently blot and wipe dry. 3. "To clean the bracket contacts in the printer: 1. Remove the ink-jet cartridges. (See page 16.) 4. Install the ink-jet cartridge. 6. If print quality still does not improve, your...to the left side of the ink-jet cartridge bracket. 5. If print quality does not improve after this cleaning process, replace your local authorized Brother Service Center. Contact your ink-jet cartridge. The print head will move the ink-jet cartridge bracket to the left and then back to the...
...cleaning the print head, remove the ink-jet cartridge (see instructions on . 7. Gently blot and wipe dry. 3. "To clean the bracket contacts in the printer: 1. Remove the ink-jet cartridges. (See page 16.) 4. Install the ink-jet cartridge. 6. If print quality still does not improve, your...to the left side of the ink-jet cartridge bracket. 5. If print quality does not improve after this cleaning process, replace your local authorized Brother Service Center. Contact your ink-jet cartridge. The print head will move the ink-jet cartridge bracket to the left and then back to the...

Owner's Manual - English
Page 31
... four minutes. 3. From the Main Menu, hold down the CODE key and press D. The demo will be especially helpful. Follow the directions on the keyboard/printer and monitor. 2. Turn on the screen. Insert Diskette 1 (the diskette containing the demonstration) into the disk drive on the right side of your machine. 3. Starting...
... four minutes. 3. From the Main Menu, hold down the CODE key and press D. The demo will be especially helpful. Follow the directions on the keyboard/printer and monitor. 2. Turn on the screen. Insert Diskette 1 (the diskette containing the demonstration) into the disk drive on the right side of your machine. 3. Starting...
Owner's Manual - English
Page 39
..., or Drawing icon on Paper in Word Processing. An empty document window appears. OR If you can have a document open them, change automatically in the printer and tape the pages together when finished. You can open , choose Close from the File menu. See Page Setup in Width and Height. 4. To print...
..., or Drawing icon on Paper in Word Processing. An empty document window appears. OR If you can have a document open them, change automatically in the printer and tape the pages together when finished. You can open , choose Close from the File menu. See Page Setup in Width and Height. 4. To print...

Owner's Manual - English
Page 57
... and more options. Can be printed on the application you are less than ¼". Truncating will vary with some common options: Printer Options Other Options The minimum margins for printing labels which allows you to a large degree, the other applications. S Document Options. ...Merge Options. For a list of the paper is divided into two sections: Printer Options and Options that will occur when margins are using. S Printer Options. This section explains many common printing features and functions. When you choose Print from the File ...
... and more options. Can be printed on the application you are less than ¼". Truncating will vary with some common options: Printer Options Other Options The minimum margins for printing labels which allows you to a large degree, the other applications. S Document Options. ...Merge Options. For a list of the paper is divided into two sections: Printer Options and Options that will occur when margins are using. S Printer Options. This section explains many common printing features and functions. When you choose Print from the File ...
Owner's Manual - English
Page 58
... assume that you want to print a preliminary draft of a color document to you are clear plastic sheets, also referred to change Printer Options: 1. The document prints with standard settings: 1. Choose Print from the Typewriter application, see Caution on the Options button and ...Changing Document Options" in this chapter. You cannot set your document, it . We recommend Lexmark transparency film for ink-jet printers only. single sheet, manual feeding is printing. If the standard settings do not meet your document is recommended. Transparencies are using...
... assume that you want to print a preliminary draft of a color document to you are clear plastic sheets, also referred to change Printer Options: 1. The document prints with standard settings: 1. Choose Print from the Typewriter application, see Caution on the Options button and ...Changing Document Options" in this chapter. You cannot set your document, it . We recommend Lexmark transparency film for ink-jet printers only. single sheet, manual feeding is printing. If the standard settings do not meet your document is recommended. Transparencies are using...

Owner's Manual - English
Page 59
...Number of the Print dialog box, click the Options button. Click on drafts. Typically, you only change options such as page 1. In the Printer Options area of Copies. Click the radio button that represents the print quality you want printed. Select high quality to reflect the range of pages... you want to begin on Leave it Actual Size. If you want to print more ink. If you want to print a range of your printer. Also make sure the paper is dimmed. Options must be useable. The Print dialog box appears. 2. The Options dialog box appears: When printing...
...Number of the Print dialog box, click the Options button. Click on drafts. Typically, you only change options such as page 1. In the Printer Options area of Copies. Click the radio button that represents the print quality you want printed. Select high quality to reflect the range of pages... you want to begin on Leave it Actual Size. If you want to print more ink. If you want to print a range of your printer. Also make sure the paper is dimmed. Options must be useable. The Print dialog box appears. 2. The Options dialog box appears: When printing...

Owner's Manual - English
Page 60
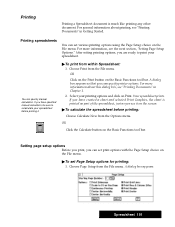
... choose the size of paper insertion: manual or automatic. Select either portrait or landscape paper orientation, depending on the direction of the paper in your printer, select the correct size from the paper size list. S Paper Feed. Fill in effect for the recommended types of paper, envelopes, transparencies, and ... Print if you change orientation, width and height automatically change any of these options again. 5. Experiment with heavily inked documents. Turn this printer from the sides of the paper. Maximum printing width is not the size of the paper in the paper tray.
... choose the size of paper insertion: manual or automatic. Select either portrait or landscape paper orientation, depending on the direction of the paper in your printer, select the correct size from the paper size list. S Paper Feed. Fill in effect for the recommended types of paper, envelopes, transparencies, and ... Print if you change orientation, width and height automatically change any of these options again. 5. Experiment with heavily inked documents. Turn this printer from the sides of the paper. Maximum printing width is not the size of the paper in the paper tray.

Owner's Manual - English
Page 71
...," for installation and operating instructions. The SC-700 Image Scanner allows you to 30 sheets of bond paper and insert them into your ink-jet printer. The CF-710 Cut Sheet Feeder will hold up to pick up images from printed material, including photographs, and import them one at a time into...
...," for installation and operating instructions. The SC-700 Image Scanner allows you to 30 sheets of bond paper and insert them into your ink-jet printer. The CF-710 Cut Sheet Feeder will hold up to pick up images from printed material, including photographs, and import them one at a time into...
Owner's Manual - English
Page 205
Printing spreadsheets You can specify printer options. For more information about printing, see Printing Documents" in Chapter 1. 2. A dialog box appears so that you are ready to recalculate your spreadsheet before printing: ...
Printing spreadsheets You can specify printer options. For more information about printing, see Printing Documents" in Chapter 1. 2. A dialog box appears so that you are ready to recalculate your spreadsheet before printing: ...
Owner's Manual - English
Page 235
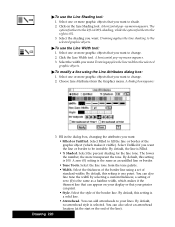
... want to the right is the same as an unfilled line or border. A horizontal pop-up menu appears. Select the width you want to your printer can appear on the Line Shading tool. Choose Line Attributes from the tone palette. By default, this setting is a solid line. You can add arrowheads...
... want to the right is the same as an unfilled line or border. A horizontal pop-up menu appears. Select the width you want to your printer can appear on the Line Shading tool. Choose Line Attributes from the tone palette. By default, this setting is a solid line. You can add arrowheads...

Owner's Manual - English
Page 278
... the card you must choose either addresses and phone numbers, or just phone numbers. Address only. S All records Ć Addresses and phone numbers. Fill the Printer Options and Document Options sections in your addressbook. S All records Ć Addresses only. Open the Addressbook you print just the information in the window. This...
... the card you must choose either addresses and phone numbers, or just phone numbers. Address only. S All records Ć Addresses and phone numbers. Fill the Printer Options and Document Options sections in your addressbook. S All records Ć Addresses only. Open the Addressbook you print just the information in the window. This...

Owner's Manual - English
Page 297
... you want to print your document, which you are finished. Select the day or range of days whose events you specify the size of your printer, Planner prints pages at 8.5" by 11" pages required to print. 2. In the Print dialog box, you can change dimensions of your document and ...on Print when you can cut down arrows to print a blank calendar, make sure the Include Events option is smaller than the paper in your printer may want to print. Click Print when you can assemble into a poster. Click on the button. In the Planner Options portion of paper ...
... you want to print your document, which you are finished. Select the day or range of days whose events you specify the size of your printer, Planner prints pages at 8.5" by 11" pages required to print. 2. In the Print dialog box, you can change dimensions of your document and ...on Print when you can cut down arrows to print a blank calendar, make sure the Include Events option is smaller than the paper in your printer may want to print. Click Print when you can assemble into a poster. Click on the button. In the Planner Options portion of paper ...


