User Manual
Page 6
TAB 8 TAB 7 TAB 6 TAB 5 TAB 4 TAB 3 TAB 2 English USING THE SETUP MODE 18 About the Setup mode 18 Setup menu 18 ADDING SOUND TO ANOTHER ROOM (V25 AND V35 SYSTEMS)* 19 Expanding your system 19 Expansion guidelines 19 CARE AND MAINTENANCE 20 Replacing the batteries 20 Cleaning 20 Viewing system information 20 Troubleshooting 21 Resetting the system 24 Pairing the remote with the console 24 Performing a system software update 24 Contacting customer service 24 Limited warranty 25 Technical information 25 *Not applicable to systems sold in Japan. vi
TAB 8 TAB 7 TAB 6 TAB 5 TAB 4 TAB 3 TAB 2 English USING THE SETUP MODE 18 About the Setup mode 18 Setup menu 18 ADDING SOUND TO ANOTHER ROOM (V25 AND V35 SYSTEMS)* 19 Expanding your system 19 Expansion guidelines 19 CARE AND MAINTENANCE 20 Replacing the batteries 20 Cleaning 20 Viewing system information 20 Troubleshooting 21 Resetting the system 24 Pairing the remote with the console 24 Performing a system software update 24 Contacting customer service 24 Limited warranty 25 Technical information 25 *Not applicable to systems sold in Japan. vi
User Manual
Page 11
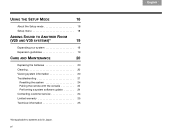
...Power light • Red System is on and ready to use in the main room or other rooms • Amber System off and charging iPod (V25 and V35 systems only) 2 Front A/V inputs Used for temporarily connecting an audio/video device such as a video camera. 5 Right (R) audio channel (... the volume controls. 4 Control buttons Turns system power on your TV Mutes/unmutes the system speakers Decreases system volume Increases system volume Setup Displays the Setup menu (press and release) or system information (press and hold) 5 Front USB input Used for temporarily connecting an HDMI device such...
...Power light • Red System is on and ready to use in the main room or other rooms • Amber System off and charging iPod (V25 and V35 systems only) 2 Front A/V inputs Used for temporarily connecting an audio/video device such as a video camera. 5 Right (R) audio channel (... the volume controls. 4 Control buttons Turns system power on your TV Mutes/unmutes the system speakers Decreases system volume Increases system volume Setup Displays the Setup menu (press and release) or system information (press and hold) 5 Front USB input Used for temporarily connecting an HDMI device such...

User Manual
Page 12
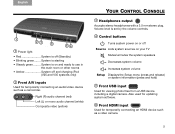
...on and ready to access the power controls for connected devices, automatic shutdown will shut down your TV. Setup Pressing the Setup button on the console also starts your system and puts the Setup menu on the control console. Pressing the remote SOURCE button also starts your system and puts the SOURCE menu...7 TAB 6 TAB 5 POWER ON/OFF CONTROLS Starting your TV screen. Shutting down automatically after a few seconds. However, if you programmed your remote during the initial setup, press the TV power button on the remote control to blinking green while the system starts up.
...on and ready to access the power controls for connected devices, automatic shutdown will shut down your TV. Setup Pressing the Setup button on the console also starts your system and puts the Setup menu on the control console. Pressing the remote SOURCE button also starts your system and puts the SOURCE menu...7 TAB 6 TAB 5 POWER ON/OFF CONTROLS Starting your TV screen. Shutting down automatically after a few seconds. However, if you programmed your remote during the initial setup, press the TV power button on the remote control to blinking green while the system starts up.

User Manual
Page 13
... the source you want. • You can also use the up ( ) or down ( ) navigation buttons to select a source. • If you named a device during the setup process, the assigned name appears in the following example: 2. Highlighted selection 7 Unnamed devices appear as generic inputs such as "Input 1 (HDMI)" and "Input 2 (HDMI)." •...
... the source you want. • You can also use the up ( ) or down ( ) navigation buttons to select a source. • If you named a device during the setup process, the assigned name appears in the following example: 2. Highlighted selection 7 Unnamed devices appear as generic inputs such as "Input 1 (HDMI)" and "Input 2 (HDMI)." •...
User Manual
Page 14
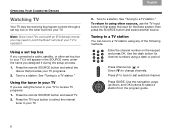
..., and OK buttons to a station. TAB 8 TAB 7 TAB 6 TAB 5 OPERATING YOUR CONNECTED DEVICES Watching TV Your TV may need to operate it during the setup process. 1. Tune to select a station from the program guide. 8 TAB 4 TAB 3 TAB 2 English 3. Enter the channel number on the keypad and press OK.... To return to first select the input for the Bose system, then press the SOURCE button and select another source. Press to tune to a station. Using the tuner in your TV If you connected a ...
..., and OK buttons to a station. TAB 8 TAB 7 TAB 6 TAB 5 OPERATING YOUR CONNECTED DEVICES Watching TV Your TV may need to operate it during the setup process. 1. Tune to select a station from the program guide. 8 TAB 4 TAB 3 TAB 2 English 3. Enter the channel number on the keypad and press OK.... To return to first select the input for the Bose system, then press the SOURCE button and select another source. Press to tune to a station. Using the tuner in your TV If you connected a ...

User Manual
Page 15
... forward Fast rewind or search reverse Quick skip or skip forward Quick replay or skip backward Shuffle mode Listening to a Bose link input device You can use your Bose link device before attempting to select it is connected. 9 It will not appear in the SOURCE list until it ....would typically be connected to the Bose link IN connector on the rear panel of the control console. To listen to the Bose link source, press the SOURCE button and select Bose link. English TAB 2 TAB 3 TAB 4 Playing audio/video devices During the interactive setup process you can use the following ...
... forward Fast rewind or search reverse Quick skip or skip forward Quick replay or skip backward Shuffle mode Listening to a Bose link input device You can use your Bose link device before attempting to select it is connected. 9 It will not appear in the SOURCE list until it ....would typically be connected to the Bose link IN connector on the rear panel of the control console. To listen to the Bose link source, press the SOURCE button and select Bose link. English TAB 2 TAB 3 TAB 4 Playing audio/video devices During the interactive setup process you can use the following ...
User Manual
Page 24
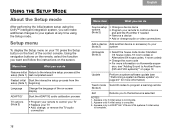
... make additional changes to Another Room (V25 and V35 systems)*" on page 19 Update Perform a system software update (see "Performing a system software update" on page 24" for more information on the screen. Appears only if initial setup is incomplete. 2. Appears only in LIFESTYLE® V25 and V35 systems if initial setup is complete. 18
... make additional changes to Another Room (V25 and V35 systems)*" on page 19 Update Perform a system software update (see "Performing a system software update" on page 24" for more information on the screen. Appears only if initial setup is incomplete. 2. Appears only in LIFESTYLE® V25 and V35 systems if initial setup is complete. 18
User Manual
Page 25
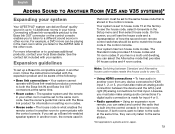
...set to the AM/FM radio in the Setup menu and then select house code. Note: Switching between the device and the left (L) and right (R) analog connections for input 4 or 5. • Radio operation - However, if both the Bose link IN and Bose link OUT connectors at the same time. ...• Room codes - English TAB 2 TAB 3 TAB 4 TAB 5 TAB 6 TAB 7 TAB 8 ADDING SOUND TO ANOTHER ROOM (V25 AND V35 SYSTEMS)* Expanding your system Your LIFESTYLE® system can only...
...set to the AM/FM radio in the Setup menu and then select house code. Note: Switching between the device and the left (L) and right (R) analog connections for input 4 or 5. • Radio operation - However, if both the Bose link IN and Bose link OUT connectors at the same time. ...• Room codes - English TAB 2 TAB 3 TAB 4 TAB 5 TAB 6 TAB 7 TAB 8 ADDING SOUND TO ANOTHER ROOM (V25 AND V35 SYSTEMS)* Expanding your system Your LIFESTYLE® system can only...
User Manual
Page 26
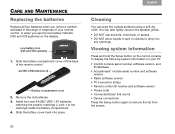
... • TV connection status • Remote control ID number and software version • House code • Connected Bose® link rooms • Device connections Press the Setup button again to drop into place. Install four new AA (IEC-LR6) 1.5V batteries, matching the polarity markings (+... and -) to display the following system information on your remote control, or when you see the low battery indicator (V25 and V35 systems...
... • TV connection status • Remote control ID number and software version • House code • Connected Bose® link rooms • Device connections Press the Setup button again to drop into place. Install four new AA (IEC-LR6) 1.5V batteries, matching the polarity markings (+... and -) to display the following system information on your remote control, or when you see the low battery indicator (V25 and V35 systems...
User Manual
Page 27
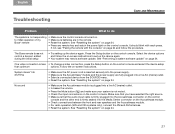
...module. • For radio operation (V25 and V35 systems only), connect the FM and AM antennas. • Reset the system. If not, see "Pairing the remote with each press. System doesn't do The system is not responding to initial operation of my Bose® remote • Make sure the...input cable is firmly plugged into the Acoustimass connector on the control console. It should blink with the console" on the control console. Press the Setup button on the control console and the other end is firmly seated into a live AC (mains) outlet. • Select a connected device from...
...module. • For radio operation (V25 and V35 systems only), connect the FM and AM antennas. • Reset the system. If not, see "Pairing the remote with each press. System doesn't do The system is not responding to initial operation of my Bose® remote • Make sure the...input cable is firmly plugged into the Acoustimass connector on the control console. It should blink with the console" on the control console. Press the Setup button on the control console and the other end is firmly seated into a live AC (mains) outlet. • Select a connected device from...
User Manual
Page 29
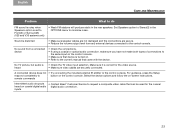
.... No TV picture, but audio is set to Front(3) or Surround(5) (V25 and V35 systems only) • Weak FM stations will produce static in the OPTIONS menu to... minimize noise. For guidance, press the Setup respond consistently to button on -screen instructions. English TAB 2 TAB 3 TAB 4 TAB 5 TAB... included external IR emitter to the control console. inputs 23 remote commands Intermittent audio dropouts • Contact Bose® Customer Service to request a composite video cable that can be used for the coaxial heard on...
.... No TV picture, but audio is set to Front(3) or Surround(5) (V25 and V35 systems only) • Weak FM stations will produce static in the OPTIONS menu to... minimize noise. For guidance, press the Setup respond consistently to button on -screen instructions. English TAB 2 TAB 3 TAB 4 TAB 5 TAB... included external IR emitter to the control console. inputs 23 remote commands Intermittent audio dropouts • Contact Bose® Customer Service to request a composite video cable that can be used for the coaxial heard on...
User Manual
Page 30
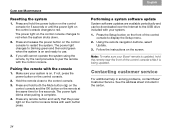
.... Press and release the power button on the control console for five seconds. Make sure your Bose® remote is updated, hold both the Mute button ( ) on the control console and ...control console blinks with the console 1. See the address sheet included in solving problems, contact Bose® Customer Service. Press and hold the remote near the front of the control console to ...the system 1. If you still cannot operate the system using the remote, try the next procedure to display the Setup menu. 2. Hold the remote close to red when the system shuts down. 2. The power light on ....
.... Press and release the power button on the control console for five seconds. Make sure your Bose® remote is updated, hold both the Mute button ( ) on the control console and ...control console blinks with the console 1. See the address sheet included in solving problems, contact Bose® Customer Service. Press and hold the remote near the front of the control console to ...the system 1. If you still cannot operate the system using the remote, try the next procedure to display the Setup menu. 2. Hold the remote close to red when the system shuts down. 2. The power light on ....
User Manual
Page 31
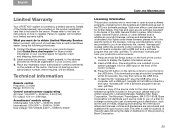
... software programs originating from your limited warranty rights. Press and hold the Setup button on the front of the control console. 3. To read this product, please mail your country/region) for further details. Bose Corporation will be refused. All of the limited warranty are provided to ...2. Cartons not bearing a return authorization number, where required, will distribute such source code to the terms of purchase from an authorized Bose dealer, using the following the date of distribution of the carton. To read the file "licenses.pdf," plug the USB drive into ...
... software programs originating from your limited warranty rights. Press and hold the Setup button on the front of the control console. 3. To read this product, please mail your country/region) for further details. Bose Corporation will be refused. All of the limited warranty are provided to ...2. Cartons not bearing a return authorization number, where required, will distribute such source code to the terms of purchase from an authorized Bose dealer, using the following the date of distribution of the carton. To read the file "licenses.pdf," plug the USB drive into ...
