English Owners Guide
Page 2
... dispose of Apple Inc. ENGLISH Please read and keep all safety and use the Bose S1 Pro system with a tripod/stand that is unstable. Do not block any use attachments/accessories specified by Bose Corporation could result in accordance with a minimum weight of 7.1 kg (15.7 lbs...Follow all warnings. 4. WARNINGS/CAUTIONS: This symbol on whether this work may present a risk of manufacture; The battery provided with the Bose S1 Pro Multi-position PA system only. Follow manufacturer's instructions. Frequency band of operation 2402 to Part 15 of fire or electrical shock, do...
... dispose of Apple Inc. ENGLISH Please read and keep all safety and use the Bose S1 Pro system with a tripod/stand that is unstable. Do not block any use attachments/accessories specified by Bose Corporation could result in accordance with a minimum weight of 7.1 kg (15.7 lbs...Follow all warnings. 4. WARNINGS/CAUTIONS: This symbol on whether this work may present a risk of manufacture; The battery provided with the Bose S1 Pro Multi-position PA system only. Follow manufacturer's instructions. Frequency band of operation 2402 to Part 15 of fire or electrical shock, do...

English Owners Guide
Page 3
Contents Overview 4 Product Overview...4 Features and Benefits...4 Package Contents...4 Optional Accessories...4 System Configurations...5 Elevated Surface...5 Tilt-Back...5 Monitor...5 Speaker Stand...5 Bose® Connect App 6 Features...6 System Setup 7 Connections and Controls...7 Connecting Power...8 Connecting Sources...8 Channel 1 & 2 Controls...8 Channel 3...Dual-Mono/Daisy-Chain ...15 Care & Maintenance 16 Replacing the Battery...16 Cleaning Your S1 Pro...17 Troubleshooting...17 S1 Pro Specifications...18 Owner's Guide • S1 Pro System English • 3
Contents Overview 4 Product Overview...4 Features and Benefits...4 Package Contents...4 Optional Accessories...4 System Configurations...5 Elevated Surface...5 Tilt-Back...5 Monitor...5 Speaker Stand...5 Bose® Connect App 6 Features...6 System Setup 7 Connections and Controls...7 Connecting Power...8 Connecting Sources...8 Channel 1 & 2 Controls...8 Channel 3...Dual-Mono/Daisy-Chain ...15 Care & Maintenance 16 Replacing the Battery...16 Cleaning Your S1 Pro...17 Troubleshooting...17 S1 Pro Specifications...18 Owner's Guide • S1 Pro System English • 3
English Owners Guide
Page 4
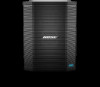
...primary music system. And with ToneMatch® processing for even more output. Versatility meets Simplicity: The S1 Pro comes with a full-featured, 3-channel mixer with the ultra-portable Bose S1 Pro Multi-position PA system. Sound great quickly with a 3-channel mixer, reverb, Bluetooth® streaming and... for your best. For additional information on a speaker stand, ensuring that you the best coverage option for purchasing the Bose® S1 Pro Multi-position PA system. Adaptable: Multiple positions give you can wirelessly stream Bluetooth® audio to a second system for...
...primary music system. And with ToneMatch® processing for even more output. Versatility meets Simplicity: The S1 Pro comes with a full-featured, 3-channel mixer with the ultra-portable Bose S1 Pro Multi-position PA system. Sound great quickly with a 3-channel mixer, reverb, Bluetooth® streaming and... for your best. For additional information on a speaker stand, ensuring that you the best coverage option for purchasing the Bose® S1 Pro Multi-position PA system. Adaptable: Multiple positions give you can wirelessly stream Bluetooth® audio to a second system for...

English Owners Guide
Page 5
... sit to avoid blocking sound from the audience. Owner's Guide • S1 Pro System English • 5 Monitor To use the S1 Pro as a personal floor monitor, place it on a surface. Use the examples below to match your application. Overview System Configurations The versatile Bose® S1 Pro system operates in front of and pointing toward the performer.
... sit to avoid blocking sound from the audience. Owner's Guide • S1 Pro System English • 5 Monitor To use the S1 Pro as a personal floor monitor, place it on a surface. Use the examples below to match your application. Overview System Configurations The versatile Bose® S1 Pro system operates in front of and pointing toward the performer.

English Owners Guide
Page 6
Compatible with most Apple and Android systems. Keep your speakers to a second system for even more output. System Setup Bose® Connect App Download the Bose® Connect app to access additional options and features like Stereo Mode, so that you can wirelessly stream audio to play in Party mode or Stereo mode. Configure your speaker up-to and switch between multiple mobile devices with the latest software. 6 • English S1 Pro System • Owner's Guide Features Easily connect to -date with a single swipe.
Compatible with most Apple and Android systems. Keep your speakers to a second system for even more output. System Setup Bose® Connect App Download the Bose® Connect app to access additional options and features like Stereo Mode, so that you can wirelessly stream audio to play in Party mode or Stereo mode. Configure your speaker up-to and switch between multiple mobile devices with the latest software. 6 • English S1 Pro System • Owner's Guide Features Easily connect to -date with a single swipe.
English Owners Guide
Page 7
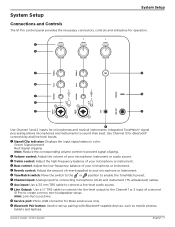
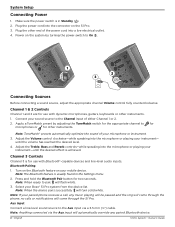
..., tablets and laptops. s Bluetooth Pair button: Used to connect a line-level audio source. System Setup System Setup Connections and Controls The S1 Pro control panel provides the necessary connectors, controls and indicators for operation. 1 2 3 q SIGNAL SIGNAL SIGNAL w e s r t a .... r Bass control: Adjust the low-frequency balance of your microphone or instrument. Owner's Guide • S1 Pro System English • 7 e Treble control: Adjust the high-frequency balance of your microphone, instrument or ...preset. u Channel input: Analog input for Bose service use only.
..., tablets and laptops. s Bluetooth Pair button: Used to connect a line-level audio source. System Setup System Setup Connections and Controls The S1 Pro control panel provides the necessary connectors, controls and indicators for operation. 1 2 3 q SIGNAL SIGNAL SIGNAL w e s r t a .... r Bass control: Adjust the low-frequency balance of your microphone or instrument. Owner's Guide • S1 Pro System English • 7 e Treble control: Adjust the high-frequency balance of your microphone, instrument or ...preset. u Channel input: Analog input for Bose service use only.
English Owners Guide
Page 8
... 1. Press and hold the Bluetooth Pair button for other instruments. Note: If your paired phone receives a call, any paired Bluetooth device. 8 • English S1 Pro System • Owner's Guide Plug the other instruments. 1. Note: When ready to the Channel input of either Channel 1 or 2. 2. Channel 1 & ... your mobile device. until the desired effect is for use with dynamic microphones, guitars, keyboards or other end of your Bose® S1 Pro system from the device list. Select your microphone or instrument. 3. Aux Input Connect a line-level sound source to for...
... 1. Press and hold the Bluetooth Pair button for other instruments. Note: If your paired phone receives a call, any paired Bluetooth device. 8 • English S1 Pro System • Owner's Guide Plug the other instruments. 1. Note: When ready to the Channel input of either Channel 1 or 2. 2. Channel 1 & ... your mobile device. until the desired effect is for use with dynamic microphones, guitars, keyboards or other end of your Bose® S1 Pro system from the device list. Select your microphone or instrument. 3. Aux Input Connect a line-level sound source to for...
English Owners Guide
Page 9
... with a minimum weight of 7.1 kg (15.7 lbs) and an overall size of the S1 Pro system may lead to maintain optimum tonal balance. WARNING: Do NOT use the Bose® S1 Pro system with your S1 Pro. System Setup Charging the Battery Anytime your S1 Pro is plugged into AC power and the system is not in injury. Battery...
... with a minimum weight of 7.1 kg (15.7 lbs) and an overall size of the S1 Pro system may lead to maintain optimum tonal balance. WARNING: Do NOT use the Bose® S1 Pro system with your S1 Pro. System Setup Charging the Battery Anytime your S1 Pro is plugged into AC power and the system is not in injury. Battery...
English Owners Guide
Page 10
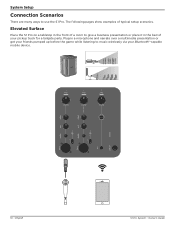
Plug in the bed of typical setup scenarios. The following pages show examples of your pickup truck for a tailgate party. Elevated Surface Place the S1 Pro on a tabletop in the front of a room to give a business presentation or place it in a microphone and narrate over a multimedia presentation or get your friends pumped up before the game while listening to use the S1 Pro. System Setup Connection Scenarios There are many ways to music wirelessly via your Bluetooth®-capable mobile device. 1 SIGNAL 2 SIGNAL 3 SIGNAL 10 • English S1 Pro System • Owner's Guide
Plug in the bed of typical setup scenarios. The following pages show examples of your pickup truck for a tailgate party. Elevated Surface Place the S1 Pro on a tabletop in the front of a room to give a business presentation or place it in a microphone and narrate over a multimedia presentation or get your friends pumped up before the game while listening to use the S1 Pro. System Setup Connection Scenarios There are many ways to music wirelessly via your Bluetooth®-capable mobile device. 1 SIGNAL 2 SIGNAL 3 SIGNAL 10 • English S1 Pro System • Owner's Guide
English Owners Guide
Page 11
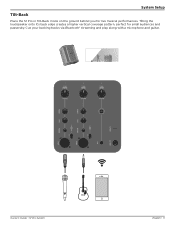
Cue your backing tracks via Bluetooth® streaming and play along with a microphone and guitar. 1 SIGNAL 2 SIGNAL 3 SIGNAL Owner's Guide • S1 Pro System English • 11 Tilting the loudspeaker onto it's back edge creates a higher vertical coverage pattern, perfect for live musical performances. System Setup Tilt-Back Place the S1 Pro in Tilt-Back mode on the ground behind you for small audiences and passersby.
Cue your backing tracks via Bluetooth® streaming and play along with a microphone and guitar. 1 SIGNAL 2 SIGNAL 3 SIGNAL Owner's Guide • S1 Pro System English • 11 Tilting the loudspeaker onto it's back edge creates a higher vertical coverage pattern, perfect for live musical performances. System Setup Tilt-Back Place the S1 Pro in Tilt-Back mode on the ground behind you for small audiences and passersby.

English Owners Guide
Page 12
Face it toward the performer to a main PA system, then dial in your equalization and reverb preferences for your performance. 1 SIGNAL 2 SIGNAL 3 SIGNAL 12 • English S1 Pro System • Owner's Guide System Setup Monitor Place the S1 Pro on its horizontal side edge to use as a personal monitor or send your mix to be used as a floor monitor.
Face it toward the performer to a main PA system, then dial in your equalization and reverb preferences for your performance. 1 SIGNAL 2 SIGNAL 3 SIGNAL 12 • English S1 Pro System • Owner's Guide System Setup Monitor Place the S1 Pro on its horizontal side edge to use as a personal monitor or send your mix to be used as a floor monitor.

English Owners Guide
Page 13
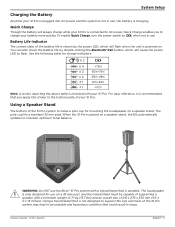
Connect a microphone and give a toast or sing a song while cuing music wirelessly via Bluetooth® streaming. 1 SIGNAL 2 SIGNAL 3 SIGNAL Owner's Guide • S1 Pro System English • 13 System Setup Speaker Stand Using a conventional speaker stand, you can use your S1 Pro as a PA system.
Connect a microphone and give a toast or sing a song while cuing music wirelessly via Bluetooth® streaming. 1 SIGNAL 2 SIGNAL 3 SIGNAL Owner's Guide • S1 Pro System English • 13 System Setup Speaker Stand Using a conventional speaker stand, you can use your S1 Pro as a PA system.

English Owners Guide
Page 14
System Setup General Purpose PA Use a mixer with two S1 Pro systems as a conventional PA, reverb and ToneMatch® should be turned off. 14 • English S1 Pro System • Owner's Guide Stereo Channel 1-4 1 SIGNAL 2 SIGNAL 3 SIGNAL 1 SIGNAL 2 SIGNAL 3 SIGNAL L Out R Out Note: When used as a conventional PA system. The wide and consistent coverage of the system ensures that the entire audience can easily hear the performance throughout the room.
System Setup General Purpose PA Use a mixer with two S1 Pro systems as a conventional PA, reverb and ToneMatch® should be turned off. 14 • English S1 Pro System • Owner's Guide Stereo Channel 1-4 1 SIGNAL 2 SIGNAL 3 SIGNAL 1 SIGNAL 2 SIGNAL 3 SIGNAL L Out R Out Note: When used as a conventional PA system. The wide and consistent coverage of the system ensures that the entire audience can easily hear the performance throughout the room.
English Owners Guide
Page 15
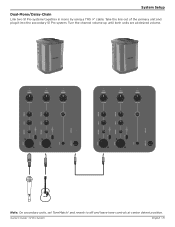
Turn the channel volume up until both units are at desired volume. 1 SIGNAL 2 SIGNAL 3 SIGNAL 1 SIGNAL 2 SIGNAL 3 SIGNAL Note: On secondary units, set ToneMatch® and reverb to off and leave tone controls at center detent position. Take the line out of the primary unit and plug it into the secondary S1 Pro system. Owner's Guide • S1 Pro System English • 15 System Setup Dual-Mono/Daisy-Chain Link two S1 Pro systems together in mono by using a TRS ¼" cable.
Turn the channel volume up until both units are at desired volume. 1 SIGNAL 2 SIGNAL 3 SIGNAL 1 SIGNAL 2 SIGNAL 3 SIGNAL Note: On secondary units, set ToneMatch® and reverb to off and leave tone controls at center detent position. Take the line out of the primary unit and plug it into the secondary S1 Pro system. Owner's Guide • S1 Pro System English • 15 System Setup Dual-Mono/Daisy-Chain Link two S1 Pro systems together in mono by using a TRS ¼" cable.
English Owners Guide
Page 16
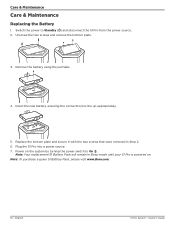
Unscrew the two screws and remove the bottom plate. 3. Plug the S1 Pro into a power source. 7. Note: Your replacement S1 Battery Pack will remain in Step 2. 6. Insert the new battery, ensuring the connector pins line up appropriately. 5. Switch the power to On (... powered on the system by turning the power switch to Standby ( ) and disconnect the S1 Pro from the power source. 2. Note: To purchase a spare S1 Battery Pack, please visit www.Bose.com. 16 • English S1 Pro System • Owner's Guide Power on . Remove the battery using the pull tabs. 4. Care & Maintenance Care...
Unscrew the two screws and remove the bottom plate. 3. Plug the S1 Pro into a power source. 7. Note: Your replacement S1 Battery Pack will remain in Step 2. 6. Insert the new battery, ensuring the connector pins line up appropriately. 5. Switch the power to On (... powered on the system by turning the power switch to Standby ( ) and disconnect the S1 Pro from the power source. 2. Note: To purchase a spare S1 Battery Pack, please visit www.Bose.com. 16 • English S1 Pro System • Owner's Guide Power on . Remove the battery using the pull tabs. 4. Care & Maintenance Care...
English Owners Guide
Page 17
...nothing plugged into a different amplifier to AC (mains) power. try re-pairing your questions there, please call Product and Technical Support at www.Bose.com/livesound. CAUTION: Do not use any openings. If flashing red, your source device. Clear the speaker memory or pair to the speaker... if your audio source volume cannot be adjusted, "input pads" are available from your source. Turn volume down on the S1 Pro. If your instrument into the S1 Pro, a slight hum or buzz is heard Instrument or audio source sounds distorted Microphone is correct. Pair the Bluetooth device and ...
...nothing plugged into a different amplifier to AC (mains) power. try re-pairing your questions there, please call Product and Technical Support at www.Bose.com/livesound. CAUTION: Do not use any openings. If flashing red, your source device. Clear the speaker memory or pair to the speaker... if your audio source volume cannot be adjusted, "input pads" are available from your source. Turn volume down on the S1 Pro. If your instrument into the S1 Pro, a slight hum or buzz is heard Instrument or audio source sounds distorted Microphone is correct. Pair the Bluetooth device and ...

English Owners Guide
Page 18
... the speaker while it is cool to the touch and replace battery. Leave your speaker in Quick Charge) Up to 11 hours 18 • English S1 Pro System • Owner's Guide Unplug your battery with black powder-coat 330 x 241 x 286 13 x 9.5 x 11.2 15.7 lbs (7.1 kg) Rechargeable lithium-ion battery 5 ...Weight Battery Type Charge Time Play Time Polypropylene plastic Textured plastic Steel with the power switch set to On instead of Quick Charge. S1 Pro Specifications Enclosure Enclosure Material Finish Grille Size Dimensions (H x W x D) - Set the power switch to a cooler location.
... the speaker while it is cool to the touch and replace battery. Leave your speaker in Quick Charge) Up to 11 hours 18 • English S1 Pro System • Owner's Guide Unplug your battery with black powder-coat 330 x 241 x 286 13 x 9.5 x 11.2 15.7 lbs (7.1 kg) Rechargeable lithium-ion battery 5 ...Weight Battery Type Charge Time Play Time Polypropylene plastic Textured plastic Steel with the power switch set to On instead of Quick Charge. S1 Pro Specifications Enclosure Enclosure Material Finish Grille Size Dimensions (H x W x D) - Set the power switch to a cooler location.

English Owners Guide
Page 19
©2018 Bose Corporation, All rights reserved. Framingham, MA 01701-9168 USA www.Bose.com All trademarks are the property of their respective owners AM807173 Rev. 01 April 2018
©2018 Bose Corporation, All rights reserved. Framingham, MA 01701-9168 USA www.Bose.com All trademarks are the property of their respective owners AM807173 Rev. 01 April 2018

Multilingual Owners Guide
Page 2
... a circuit different from that interference will not occur in injury. The battery provided with this product is for use a power inverter with the Bose S1 Pro Multi-position PA system only. Do NOT use on a 35 mm post, and the tripod/stand must be delivered to an appropriate collection facility... for use the Bose S1 Pro system with a minimum weight of 7.1 kg (15.7 lbs) and an overall size of supporting a speaker with a tripod/stand that is damaged, liquid...
... a circuit different from that interference will not occur in injury. The battery provided with this product is for use a power inverter with the Bose S1 Pro Multi-position PA system only. Do NOT use on a 35 mm post, and the tripod/stand must be delivered to an appropriate collection facility... for use the Bose S1 Pro system with a minimum weight of 7.1 kg (15.7 lbs) and an overall size of supporting a speaker with a tripod/stand that is damaged, liquid...

Multilingual Owners Guide
Page 3
Contents Overview 4 Product Overview...4 Features and Benefits...4 Package Contents...4 Optional Accessories...4 System Configurations...5 Elevated Surface...5 Tilt-Back...5 Monitor...5 Speaker Stand...5 Bose® Connect App 6 Features...6 System Setup 7 Connections and Controls...7 Connecting Power...8 Connecting Sources...8 Channel 1 & 2 Controls...8 Channel 3...Dual-Mono/Daisy-Chain ...15 Care & Maintenance 16 Replacing the Battery...16 Cleaning Your S1 Pro...17 Troubleshooting...17 S1 Pro Specifications...18 Owner's Guide • S1 Pro System English • 3
Contents Overview 4 Product Overview...4 Features and Benefits...4 Package Contents...4 Optional Accessories...4 System Configurations...5 Elevated Surface...5 Tilt-Back...5 Monitor...5 Speaker Stand...5 Bose® Connect App 6 Features...6 System Setup 7 Connections and Controls...7 Connecting Power...8 Connecting Sources...8 Channel 1 & 2 Controls...8 Channel 3...Dual-Mono/Daisy-Chain ...15 Care & Maintenance 16 Replacing the Battery...16 Cleaning Your S1 Pro...17 Troubleshooting...17 S1 Pro Specifications...18 Owner's Guide • S1 Pro System English • 3
