Owner's guide
Page 3
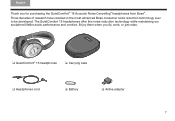
... comfort. Enjoy them when you for purchasing the QuietComfort® 15 Acoustic Noise Cancelling® headphones from Bose®. English TAB 2, 10 TAB 3, 11 TAB 4, 12 TAB 5, 13 TAB 6, 14 TAB 7, 15 TAB 8, 16 Thank you fly, work, or just relax. ❏ QuietComfort® 15 headphones ❏ Carrying case ❏ Headphones cord ❏ Battery ❏ Airline adapter 1
... comfort. Enjoy them when you for purchasing the QuietComfort® 15 Acoustic Noise Cancelling® headphones from Bose®. English TAB 2, 10 TAB 3, 11 TAB 4, 12 TAB 5, 13 TAB 6, 14 TAB 7, 15 TAB 8, 16 Thank you fly, work, or just relax. ❏ QuietComfort® 15 headphones ❏ Carrying case ❏ Headphones cord ❏ Battery ❏ Airline adapter 1
Owner's guide
Page 4
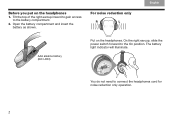
TAB 8, 16 TAB 7, 15 TAB 6, 14 TAB 5, 13 TAB 4, 12 TAB 3, 1E1nglish TAB 2, 10 English Before you put on the headphones. Open the battery compartment and insert the battery as shown. On the right earcup, slide the power switch forward to connect the headphones cord for noise reduction only operation. 2 The battery light indicator will illuminate. For noise reduction only R L AAA alkaline battery (IEC LR03) Put on the headphones 1. You do not need to the On position. Tilt the top of the right earcup inward to gain access to the battery compartment. 2.
TAB 8, 16 TAB 7, 15 TAB 6, 14 TAB 5, 13 TAB 4, 12 TAB 3, 1E1nglish TAB 2, 10 English Before you put on the headphones. Open the battery compartment and insert the battery as shown. On the right earcup, slide the power switch forward to connect the headphones cord for noise reduction only operation. 2 The battery light indicator will illuminate. For noise reduction only R L AAA alkaline battery (IEC LR03) Put on the headphones 1. You do not need to the On position. Tilt the top of the right earcup inward to gain access to the battery compartment. 2.
Owner's guide
Page 5
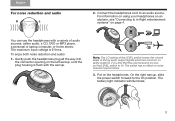
...Vrms. To enjoy both noise reduction and audio: 1. On the right earcup, slide the power switch forward to an audio source. Connect the headphones cord to the On position. The battery light indicator will illuminate. 3 Note: The LO setting of the LEVEL switch lowers the volume levels of audio ...CD, DVD or MP3 player, a personal or laptop computer, or home stereo. English TAB 2, 10 TAB 3, 11 TAB 4, 12 TAB 5, 13 TAB 6, 14 TAB 7, 15 TAB 8, 16 For noise reduction and audio R L 2. You can use the headphones with the earcup. For information on using your headphones on page 4.
...Vrms. To enjoy both noise reduction and audio: 1. On the right earcup, slide the power switch forward to an audio source. Connect the headphones cord to the On position. The battery light indicator will illuminate. 3 Note: The LO setting of the LEVEL switch lowers the volume levels of audio ...CD, DVD or MP3 player, a personal or laptop computer, or home stereo. English TAB 2, 10 TAB 3, 11 TAB 4, 12 TAB 5, 13 TAB 6, 14 TAB 7, 15 TAB 8, 16 For noise reduction and audio R L 2. You can use the headphones with the earcup. For information on using your headphones on page 4.
Owner's guide
Page 8
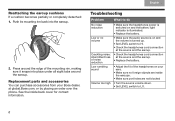
TAB 8, 16 TAB 7, 15 TAB 6, 14 TAB 5, 13 TAB 4, 12 TAB 3, 1E1nglish TAB 2, 10 English Reattaching the earcup cushions ...turned up. • Set LEVEL switch to HI. • Check the headphones cord connection at the source and the earcup. • Check the headphones cord connection at global.Bose.com, or by placing an order over the phone. Press around the earcup....rim back into place under all eight tabs around the edge of the headphones on and the volume is on your Bose dealer, at the source and the earcup. • Replace the battery. • Adjust the fit of the mounting...
TAB 8, 16 TAB 7, 15 TAB 6, 14 TAB 5, 13 TAB 4, 12 TAB 3, 1E1nglish TAB 2, 10 English Reattaching the earcup cushions ...turned up. • Set LEVEL switch to HI. • Check the headphones cord connection at the source and the earcup. • Check the headphones cord connection at global.Bose.com, or by placing an order over the phone. Press around the earcup....rim back into place under all eight tabs around the edge of the headphones on and the volume is on your Bose dealer, at the source and the earcup. • Replace the battery. • Adjust the fit of the mounting...
