
The Bose® Lifestyle® amplifier - Owner's guide
Page 1
The Bose® Lifestyle® Amplifier Owner's Guide January 4, 2002 AM262840_00_V.pdf
The Bose® Lifestyle® Amplifier Owner's Guide January 4, 2002 AM262840_00_V.pdf
The Bose® Lifestyle® amplifier - Owner's guide
Page 2
...The exclamation point within an equilateral triangle, as marked on the system, is intended to alert the user to the presence of your Lifestyle® stereo amplifier: The lightning flash with this owner's guide carefully. Additional safety information See the additional instructions on... IL NE SE TROUVE À L'INTÉRIEUR AUCUNE PIÈCE POUVANT ÊTRE RÉPARÉE PAR L'USAGER. Bose, Acoustimass, Lifestyle, Personal and Wave are located on the Important Safety Information page enclosed with arrowhead symbol, within the system enclosure that may be of ...
...The exclamation point within an equilateral triangle, as marked on the system, is intended to alert the user to the presence of your Lifestyle® stereo amplifier: The lightning flash with this owner's guide carefully. Additional safety information See the additional instructions on... IL NE SE TROUVE À L'INTÉRIEUR AUCUNE PIÈCE POUVANT ÊTRE RÉPARÉE PAR L'USAGER. Bose, Acoustimass, Lifestyle, Personal and Wave are located on the Important Safety Information page enclosed with arrowhead symbol, within the system enclosure that may be of ...
The Bose® Lifestyle® amplifier - Owner's guide
Page 3
...where an antenna can fall into the apparatus; for long periods of the obsolete outlet. 10. Do not use attachments/accessories specified by Bose® Corporation. To ensure reliable operation of the product and to protect it in a built-in system, such as a bookcase or a ...18. Read these instructions - Do not put the product in accordance with its ventilation openings. 8. to prevent damage to be fatal. Please call Bose to this apparatus during lightning storms or when unused for all warnings - Do not attempt to rain or moisture, does not operate normally, or ...
...where an antenna can fall into the apparatus; for long periods of the obsolete outlet. 10. Do not use attachments/accessories specified by Bose® Corporation. To ensure reliable operation of the product and to protect it in a built-in system, such as a bookcase or a ...18. Read these instructions - Do not put the product in accordance with its ventilation openings. 8. to prevent damage to be fatal. Please call Bose to this apparatus during lightning storms or when unused for all warnings - Do not attempt to rain or moisture, does not operate normally, or ...

The Bose® Lifestyle® amplifier - Owner's guide
Page 4
... harmful interference in wire Information about products that provides guidelines for a Class B digital device, pursuant to CATV system installer This reminder is practical. ©2001 Bose Corporation, The Mountain, Framingham, MA 01701-9168 USA 255805 AM Rev.00 JN10494 2b January 10, 2002 AM262840_00_V.pdf If this page. Refer to the...
... harmful interference in wire Information about products that provides guidelines for a Class B digital device, pursuant to CATV system installer This reminder is practical. ©2001 Bose Corporation, The Mountain, Framingham, MA 01701-9168 USA 255805 AM Rev.00 JN10494 2b January 10, 2002 AM262840_00_V.pdf If this page. Refer to the...

The Bose® Lifestyle® amplifier - Owner's guide
Page 5
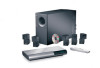
... Amplifier Before you begin 4 Unpacking the carton 4 Selecting a location for your Lifestyle® stereo amplifier 5 Connecting the Lifestyle® stereo amplifier to a multi-room interface 7 Connecting the Lifestyle® stereo amplifier to a Lifestyle® media center 9 Setting up your system 15 Maintaining Your Lifestyle® Stereo Amplifier Cleaning the amplifier 16 Protecting outdoor wiring 16...
... Amplifier Before you begin 4 Unpacking the carton 4 Selecting a location for your Lifestyle® stereo amplifier 5 Connecting the Lifestyle® stereo amplifier to a multi-room interface 7 Connecting the Lifestyle® stereo amplifier to a Lifestyle® media center 9 Setting up your system 15 Maintaining Your Lifestyle® Stereo Amplifier Cleaning the amplifier 16 Protecting outdoor wiring 16...

The Bose® Lifestyle® amplifier - Owner's guide
Page 6
... of the reach of the product appears to be damaged, do not attempt to your Lifestyle® system. Contact your product. Figure 1 Contents of the shipping carton 30-ft audio input cable PN197406 Lifestyle® stereo amplifier Owner's guide Power cord* USA/Canada (120V) * The...er, ensures full, rich stereo sound, even when the speakers are playing at low volumes. The Lifestyle® stereo amplifier provides you with Bose non-powered environmental speakers or Bose non-powered accessory speakers ONLY. Dual voltage units include a 120V power cord and a 230V plug ...
... of the reach of the product appears to be damaged, do not attempt to your Lifestyle® system. Contact your product. Figure 1 Contents of the shipping carton 30-ft audio input cable PN197406 Lifestyle® stereo amplifier Owner's guide Power cord* USA/Canada (120V) * The...er, ensures full, rich stereo sound, even when the speakers are playing at low volumes. The Lifestyle® stereo amplifier provides you with Bose non-powered environmental speakers or Bose non-powered accessory speakers ONLY. Dual voltage units include a 120V power cord and a 230V plug ...

The Bose® Lifestyle® amplifier - Owner's guide
Page 7
... sure that have hazards concealed behind them, such as the finished surface of fine furniture. It is important to either your Lifestyle® system or the accessory speakers, consider the following guidelines. AM262840_00_V.pdf January 4, 2002 5 Figure 2 Required clearance between the amplifi...; Stereo Amplifier Selecting a location for your Lifestyle® stereo amplifier Select a location for your amplifier: • Locate the amplifier indoors and within the reach of the supplied 30-foot audio input cable. • Place the amplifier ...
... sure that have hazards concealed behind them, such as the finished surface of fine furniture. It is important to either your Lifestyle® system or the accessory speakers, consider the following guidelines. AM262840_00_V.pdf January 4, 2002 5 Figure 2 Required clearance between the amplifi...; Stereo Amplifier Selecting a location for your Lifestyle® stereo amplifier Select a location for your amplifier: • Locate the amplifier indoors and within the reach of the supplied 30-foot audio input cable. • Place the amplifier ...
The Bose® Lifestyle® amplifier - Owner's guide
Page 8
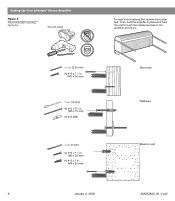
Then, hold the amplifier in place and mark the wall through the clearance holes in the amplifier enclosure. /3 32 in. (2.25 mm) (4) #10 x 11/2 in. (M5 x 36 mm) 1/2 in. (12 mm) (4) #10 x 21/2 in. (M5 x 75 mm) (4) #10 (M5) 1/4 in. (6 mm) (4) #10 x 11/2 in. (M5 x 36 mm) (4) #10 x 1 in. (M5 x 25 mm) Wood wall Wallboard Masonry wall 6 January 4, 2002 AM262840_00_V.pdf Setting Up Your Lifestyle® Stereo Amplifier Figure 5 Recommended mounting hardware You will need: To mark hole locations, first remove the rubber feet.
Then, hold the amplifier in place and mark the wall through the clearance holes in the amplifier enclosure. /3 32 in. (2.25 mm) (4) #10 x 11/2 in. (M5 x 36 mm) 1/2 in. (12 mm) (4) #10 x 21/2 in. (M5 x 75 mm) (4) #10 (M5) 1/4 in. (6 mm) (4) #10 x 11/2 in. (M5 x 36 mm) (4) #10 x 1 in. (M5 x 25 mm) Wood wall Wallboard Masonry wall 6 January 4, 2002 AM262840_00_V.pdf Setting Up Your Lifestyle® Stereo Amplifier Figure 5 Recommended mounting hardware You will need: To mark hole locations, first remove the rubber feet.

The Bose® Lifestyle® amplifier - Owner's guide
Page 9
... (right) INPUT jack of the amplifier. 3. Figure 6 Cable connections between a multi-room interface and the Lifestyle® stereo amplifier Lifestyle® stereo amplifier rear panel Multi-room interface rear panel 4 Ω MINIMUM LL R L SYSTEM RR... interface (Figure 6). 2. At the other connections. 1. SPSEPAEKAEKREROOUUTPTUPUTSTS INPUT 30-ft audio input cable (supplied) AM262840_00_V.pdf January 4, 2002 7 Setting Up Your Lifestyle® Stereo Amplifier Connecting the Lifestyle® stereo amplifier to a multi-room interface CAUTION: ...
... (right) INPUT jack of the amplifier. 3. Figure 6 Cable connections between a multi-room interface and the Lifestyle® stereo amplifier Lifestyle® stereo amplifier rear panel Multi-room interface rear panel 4 Ω MINIMUM LL R L SYSTEM RR... interface (Figure 6). 2. At the other connections. 1. SPSEPAEKAEKREROOUUTPTUPUTSTS INPUT 30-ft audio input cable (supplied) AM262840_00_V.pdf January 4, 2002 7 Setting Up Your Lifestyle® Stereo Amplifier Connecting the Lifestyle® stereo amplifier to a multi-room interface CAUTION: ...

The Bose® Lifestyle® amplifier - Owner's guide
Page 10
If two or more rooms are connected to control more than one room. Setting Up Your Lifestyle® Stereo Amplifier Figure 7 Sample display for a tworoom system Operating speakers in other rooms with room A being the primary room (the one used for a one-... music center allows you must follow the procedure for the first time. Note: Refer to as one room of Bose® powered speakers placed in more information on operating your Lifestyle® system owner's guide for a two-room system. However, if you purchase a second Personal music center, you to control up...
If two or more rooms are connected to control more than one room. Setting Up Your Lifestyle® Stereo Amplifier Figure 7 Sample display for a tworoom system Operating speakers in other rooms with room A being the primary room (the one used for a one-... music center allows you must follow the procedure for the first time. Note: Refer to as one room of Bose® powered speakers placed in more information on operating your Lifestyle® system owner's guide for a two-room system. However, if you purchase a second Personal music center, you to control up...

The Bose® Lifestyle® amplifier - Owner's guide
Page 11
Figure 8 Cable connections between the Lifestyle® media center and the Lifestyle® stereo amplifier Lifestyle® SA-1 stereo amplifier rear panel Lifestyle® media center rear panel 30-ft audio input cable (supplied) AM262840_00_V.pdf January 4, 2002 9 At the other connections.... panel of the amplifier. Setting Up Your Lifestyle® Stereo Amplifier Connecting the Lifestyle® stereo amplifier to a Lifestyle® media center CAUTION: Before making connections, turn the Lifestyle® system off and disconnect the media center from ...
Figure 8 Cable connections between the Lifestyle® media center and the Lifestyle® stereo amplifier Lifestyle® SA-1 stereo amplifier rear panel Lifestyle® media center rear panel 30-ft audio input cable (supplied) AM262840_00_V.pdf January 4, 2002 9 At the other connections.... panel of the amplifier. Setting Up Your Lifestyle® Stereo Amplifier Connecting the Lifestyle® stereo amplifier to a Lifestyle® media center CAUTION: Before making connections, turn the Lifestyle® system off and disconnect the media center from ...

The Bose® Lifestyle® amplifier - Owner's guide
Page 12
...Make sure that the Zone 2 Protocol is reset to Legacy mode. Scroll down with a Lifestyle® media center, you will need to set the Zone 2 Protocol to Legacy mode (Figure 9a). 1. While your Lifestyle® DVD system is Zone 2 Protocol. 4. The last item on System Setup (3 of...this ensures that the house code settings (switches 1, 2, 3, and 4) match those in more information on your Lifestyle® system owner's guide for more than one room. Setting Up Your Lifestyle® Stereo Amplifier Figure 9 Setting up a Zone 2 remote control Setting up the remote control You need ...
...Make sure that the Zone 2 Protocol is reset to Legacy mode. Scroll down with a Lifestyle® media center, you will need to set the Zone 2 Protocol to Legacy mode (Figure 9a). 1. While your Lifestyle® DVD system is Zone 2 Protocol. 4. The last item on System Setup (3 of...this ensures that the house code settings (switches 1, 2, 3, and 4) match those in more information on your Lifestyle® system owner's guide for more than one room. Setting Up Your Lifestyle® Stereo Amplifier Figure 9 Setting up a Zone 2 remote control Setting up the remote control You need ...

The Bose® Lifestyle® amplifier - Owner's guide
Page 13
...(left) INPUT jack. Insert the white RCA piggyback connector of the music center (Figure 10). 2. Setting Up Your Lifestyle® Stereo Amplifier Connecting the Lifestyle® stereo amplifier to a Model 20 music center ® Figure 10 Cable connections between the Model 20...disconnect the music center from the AC (mains) power outlet. Lifestyle® stereo amplifier rear panel 4 Ω MINIMUM LL R L SYSTEM RR CONTROL L R +- SPEAKER OUTPUTS INPUT Model 20 music center rear panel 30-ft audio input cable (supplied) AM262840_00_V.pdf January 4, 2002 ...
...(left) INPUT jack. Insert the white RCA piggyback connector of the music center (Figure 10). 2. Setting Up Your Lifestyle® Stereo Amplifier Connecting the Lifestyle® stereo amplifier to a Model 20 music center ® Figure 10 Cable connections between the Model 20...disconnect the music center from the AC (mains) power outlet. Lifestyle® stereo amplifier rear panel 4 Ω MINIMUM LL R L SYSTEM RR CONTROL L R +- SPEAKER OUTPUTS INPUT Model 20 music center rear panel 30-ft audio input cable (supplied) AM262840_00_V.pdf January 4, 2002 ...

The Bose® Lifestyle® amplifier - Owner's guide
Page 14
Slide switch 5 down (off), and switches 6 and 8 up a second RC-20 remote control to your Lifestyle® system owner's guide for Zone 2 If your system uses a Model 20 music center, you need to set up (on operating your first remote. 3. ... miniature switches (Figure 11). 2. Make sure that the house code settings (switches 1, 2, 3, and 4) match those in your system in more information on ). Setting Up Your Lifestyle® Stereo Amplifier Figure 11 Setting up a Zone 2 remote control Setting up the RC-20 remote control for more than one room.
Slide switch 5 down (off), and switches 6 and 8 up a second RC-20 remote control to your Lifestyle® system owner's guide for Zone 2 If your system uses a Model 20 music center, you need to set up (on operating your first remote. 3. ... miniature switches (Figure 11). 2. Make sure that the house code settings (switches 1, 2, 3, and 4) match those in your system in more information on ). Setting Up Your Lifestyle® Stereo Amplifier Figure 11 Setting up a Zone 2 remote control Setting up the RC-20 remote control for more than one room.

The Bose® Lifestyle® amplifier - Owner's guide
Page 15
...the red piggyback jack and the white RCA connector into the R (right) FIXED OUTPUT jack. CAUTION: Before making connections, turn the Lifestyle® system off and disconnect the music center from both FIXED OUTPUT jacks. 4. On the rear panel of the audio input cable, ... REC PLAY AUX TAPE INPUT L R VIDEO SOUND AM LOOP 1 SYSTEM CONTROL 2 ~ POWER 12VAC IN 1.0A ANTENNA SEE INSTRUCTION MANUAL Fixed speaker outputs 30-ft audio input cable (supplied) Acoustimass module cable AM262840_00_V.pdf January 4, 2002 13 The amplifier is designed to the SPEAKERS A or SPEAKERS B...
...the red piggyback jack and the white RCA connector into the R (right) FIXED OUTPUT jack. CAUTION: Before making connections, turn the Lifestyle® system off and disconnect the music center from both FIXED OUTPUT jacks. 4. On the rear panel of the audio input cable, ... REC PLAY AUX TAPE INPUT L R VIDEO SOUND AM LOOP 1 SYSTEM CONTROL 2 ~ POWER 12VAC IN 1.0A ANTENNA SEE INSTRUCTION MANUAL Fixed speaker outputs 30-ft audio input cable (supplied) Acoustimass module cable AM262840_00_V.pdf January 4, 2002 13 The amplifier is designed to the SPEAKERS A or SPEAKERS B...

The Bose® Lifestyle® amplifier - Owner's guide
Page 16
...the black terminal tab. Insert the wire coming from the speaker's negative (-) terminal into the red jack and release the tab. Setting Up Your Lifestyle® Stereo Amplifier ® Figure 13 RC-5 remote switch settings Setting up the RC-5 remote control If your system uses a Model 5 music...;ed music sources. For recommended wire sizes and lengths, see "Wire recommendations" on page 18. • Connect the right speaker cable to your Lifestyle® system owner's guide for more information on the left ) output, and which is usually marked (striped, collared, or ribbed), indicating that...
...the black terminal tab. Insert the wire coming from the speaker's negative (-) terminal into the red jack and release the tab. Setting Up Your Lifestyle® Stereo Amplifier ® Figure 13 RC-5 remote switch settings Setting up the RC-5 remote control If your system uses a Model 5 music...;ed music sources. For recommended wire sizes and lengths, see "Wire recommendations" on page 18. • Connect the right speaker cable to your Lifestyle® system owner's guide for more information on the left ) output, and which is usually marked (striped, collared, or ribbed), indicating that...

The Bose® Lifestyle® amplifier - Owner's guide
Page 17
... to an AC (mains) outlet. 3. If you own a 230V version, there is preset at the factory to see if you have a dual voltage Lifestyle® amplifier • Dual voltage units have a voltage selection switch on the rear panel of the power cord into an AC (mains) outlet...all other connections are complete. 1. Figure 16 Power cord connection on the rear panel of the amplifier. Select a music source with your Lifestyle® music system to the 115V position. Using the power cord included with your Personal® music center or your system CAUTION: DO NOT ...
... to an AC (mains) outlet. 3. If you own a 230V version, there is preset at the factory to see if you have a dual voltage Lifestyle® amplifier • Dual voltage units have a voltage selection switch on the rear panel of the power cord into an AC (mains) outlet...all other connections are complete. 1. Figure 16 Power cord connection on the rear panel of the amplifier. Select a music source with your Lifestyle® music system to the 115V position. Using the power cord included with your Personal® music center or your system CAUTION: DO NOT ...

The Bose® Lifestyle® amplifier - Owner's guide
Page 18
...ends of the speaker wire can be affected by exposure to your Lifestyle® system after the wires are in your Bose dealer to do use a silicone caulking material, such as needed. Protecting outdoor wiring Although some Bose® speakers are firmly connected at hardware stores. Check... dusty over time. Refer to protect speaker wire connections. This is designed only for service, or contact Bose Customer Service. To clean the amplifier, use , may use caulking, apply it only after installing the Lifestyle® stereo amplifier, follow the guidelines below.
...ends of the speaker wire can be affected by exposure to your Lifestyle® system after the wires are in your Bose dealer to do use a silicone caulking material, such as needed. Protecting outdoor wiring Although some Bose® speakers are firmly connected at hardware stores. Check... dusty over time. Refer to protect speaker wire connections. This is designed only for service, or contact Bose Customer Service. To clean the amplifier, use , may use caulking, apply it only after installing the Lifestyle® stereo amplifier, follow the guidelines below.

The Bose® Lifestyle® amplifier - Owner's guide
Page 19
... the speaker plays, the problem is set to "Legacy". Bass or treble is covered by the Bose limited one-year transferable warranty. Zone 2 does not • If you are using a Lifestyle® DVD system, the stereo amplifier will not work unless work at the amplifi... that does not play. Customer service For additional help in the speaker. Choosing a lower setting should ensure continuous, even volume. Maintaining Your Lifestyle® Stereo Amplifier Problem What to do One speaker still does not play • Disconnect the wires from that came with the product....
... the speaker plays, the problem is set to "Legacy". Bass or treble is covered by the Bose limited one-year transferable warranty. Zone 2 does not • If you are using a Lifestyle® DVD system, the stereo amplifier will not work unless work at the amplifi... that does not play. Customer service For additional help in the speaker. Choosing a lower setting should ensure continuous, even volume. Maintaining Your Lifestyle® Stereo Amplifier Problem What to do One speaker still does not play • Disconnect the wires from that came with the product....
The Bose® Lifestyle® amplifier - Owner's guide
Page 20
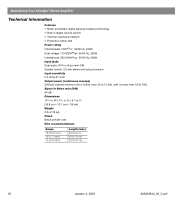
...control: 3.5 mm stereo mini-plug connector Input sensitivity 0.5 Vrms @ 1 kHz Output power (continuous average) 35W per channel minimum into 4 Ohms, from 30 to Noise ratio (S/N) 90 dB Dimensions 141/4 in . H (35.8 cm x 13.7 cm x 7.8 cm) Weight 6 lb (2.72 kg) ... Gauge 18 (0.75 mm2) 16 (1.7 mm2) 14 (2.0 mm2) Length (max.) 30 ft (9 m) 45 ft (14 m) 70 ft (21 m) 18 January 4, 2002 AM262840_00_V.pdf Maintaining Your Lifestyle® Stereo Amplifier Technical information Features • Bose® proprietary digital signal processing technology • Built-in .
...control: 3.5 mm stereo mini-plug connector Input sensitivity 0.5 Vrms @ 1 kHz Output power (continuous average) 35W per channel minimum into 4 Ohms, from 30 to Noise ratio (S/N) 90 dB Dimensions 141/4 in . H (35.8 cm x 13.7 cm x 7.8 cm) Weight 6 lb (2.72 kg) ... Gauge 18 (0.75 mm2) 16 (1.7 mm2) 14 (2.0 mm2) Length (max.) 30 ft (9 m) 45 ft (14 m) 70 ft (21 m) 18 January 4, 2002 AM262840_00_V.pdf Maintaining Your Lifestyle® Stereo Amplifier Technical information Features • Bose® proprietary digital signal processing technology • Built-in .