
Owner's guide
Page 5
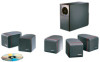
...• Do not detach the removable cables connected to avoid injury. Repack everything in the carton: • Acoustimass module • Module end cover • 5 cube speakers • 20' (6 m) speaker input cable • 20' (6 m) front speaker output cable • 50' (15 m) rear speaker output cable • 8 protective rubber feet &#...to the Acoustimass module. • If the speakers or the Acoustimass module appear damaged, do not use . Note: Now is a good idea to record the serial number of these speakers out of the reach of this guide and on your authorized Bose® ...
...• Do not detach the removable cables connected to avoid injury. Repack everything in the carton: • Acoustimass module • Module end cover • 5 cube speakers • 20' (6 m) speaker input cable • 20' (6 m) front speaker output cable • 50' (15 m) rear speaker output cable • 8 protective rubber feet &#...to the Acoustimass module. • If the speakers or the Acoustimass module appear damaged, do not use . Note: Now is a good idea to record the serial number of these speakers out of the reach of this guide and on your authorized Bose® ...
Owner's guide
Page 6
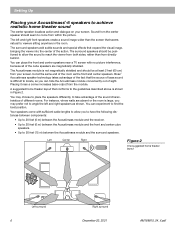
... cable lengths to allow the sound to reach the viewer from both sides, rather than the screen that expand the visual image, bringing the viewer into the center of the cube speakers are absent or the room is shown in the room. You can hide the Acoustimass ... shielded and should be positioned to allow you may choose to place the speakers differently, to take advantage of the sound characteristics of the room as shown. Your speakers come from directly behind. Bose® Acoustimass speaker technology takes advantage of the fact that conforms to the guidelines described above...
... cable lengths to allow the sound to reach the viewer from both sides, rather than the screen that expand the visual image, bringing the viewer into the center of the cube speakers are absent or the room is shown in the room. You can hide the Acoustimass ... shielded and should be positioned to allow you may choose to place the speakers differently, to take advantage of the sound characteristics of the room as shown. Your speakers come from directly behind. Bose® Acoustimass speaker technology takes advantage of the fact that conforms to the guidelines described above...
Owner's guide
Page 7
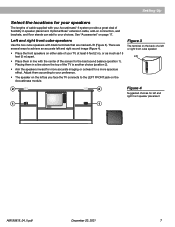
... best sound balance (position 1). Figure 3 The terminal on page 17. Optional Bose® extension cable, add-on the left and right front speaker placement 1 1 AM189815_04_V.pdf December 20, 2001 7 Setting Up Select the locations for your speakers The lengths of cable supplied with your Acoustimass®-6 system provide a great deal of flexibility in a line above the...
... best sound balance (position 1). Figure 3 The terminal on page 17. Optional Bose® extension cable, add-on the left and right front speaker placement 1 1 AM189815_04_V.pdf December 20, 2001 7 Setting Up Select the locations for your speakers The lengths of cable supplied with your Acoustimass®-6 system provide a great deal of flexibility in a line above the...
Owner's guide
Page 9
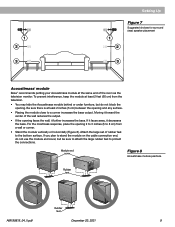
... wall reduces the output. • If the opening and any surface. • Placing the module close to stand the module on the cable connection end, do not block the opening. If you plan to a corner increases the bass output. To prevent interference, keep the module... bottom surface. If it faces away, it decreases the bass. 1 2 3 Setting Up 1 2 Figure 7 Suggested choices for surround (rear) speaker placement 3 Acoustimass® module Bose® recommends putting your Acoustimass module at least 2 inches (5 cm) between the opening faces the wall, it further increases the bass.
... wall reduces the output. • If the opening and any surface. • Placing the module close to stand the module on the cable connection end, do not block the opening. If you plan to a corner increases the bass output. To prevent interference, keep the module... bottom surface. If it faces away, it decreases the bass. 1 2 3 Setting Up 1 2 Figure 7 Suggested choices for surround (rear) speaker placement 3 Acoustimass® module Bose® recommends putting your Acoustimass module at least 2 inches (5 cm) between the opening faces the wall, it further increases the bass.
Owner's guide
Page 10
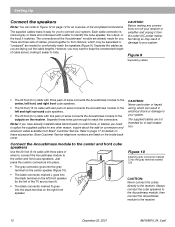
... to the receiver. 10 December 20, 2001 AM189815_04_V.pdf Bose Customer Service telephone numbers are already made for you are laying out the cable lengths. Always connect the cube speakers to the Acoustimass module, then connect the Acoustimass module to the receiver. Separate the cables as you . Connect the Acoustimass module to the center and front cube...
... to the receiver. 10 December 20, 2001 AM189815_04_V.pdf Bose Customer Service telephone numbers are already made for you are laying out the cable lengths. Always connect the cube speakers to the Acoustimass module, then connect the Acoustimass module to the receiver. Separate the cables as you . Connect the Acoustimass module to the center and front cube...
Owner's guide
Page 11
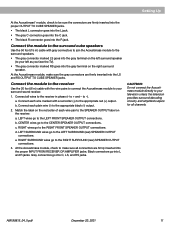
.... AM189815_04_V.pdf December 20, 2001 11 Connect the module to the receiver Use the 20 foot (6 m) cable with five wire pairs to connect the Acoustimass module to your television unless the television provides surround decoding circuitry and amplified outputs for all connectors are firmly ...cable with a red collar (+) to your left as you face the TV). • The gray connector marked RS goes into the R jack. LEFT SURROUND wires go into the LS and RS OUTPUT TO CUBE SPEAKER jacks. Connect each wire marked with gray connectors to join the Acoustimass module to the surround speakers...
.... AM189815_04_V.pdf December 20, 2001 11 Connect the module to the receiver Use the 20 foot (6 m) cable with five wire pairs to connect the Acoustimass module to your television unless the television provides surround decoding circuitry and amplified outputs for all connectors are firmly ...cable with a red collar (+) to your left as you face the TV). • The gray connector marked RS goes into the R jack. LEFT SURROUND wires go into the LS and RS OUTPUT TO CUBE SPEAKER jacks. Connect each wire marked with gray connectors to join the Acoustimass module to the surround speakers...

Owner's guide
Page 13
Enjoy your Acoustimass-6 speaker system. Setting Up Attach the module end cover, if needed The module end cover is complete. Your set up is designed to the cable end after all connections have been checked (Figure 13). Gently push the end cover into the grommets on that end with the cover in place. ...Figure 13 The module end cover fits over the cables AM189815_04_V.pdf December 20, 2001 13 However, because the cover has a beveled surface, you plan to use the cover, attach it to hide the...
Enjoy your Acoustimass-6 speaker system. Setting Up Attach the module end cover, if needed The module end cover is complete. Your set up is designed to the cable end after all connections have been checked (Figure 13). Gently push the end cover into the grommets on that end with the cover in place. ...Figure 13 The module end cover fits over the cables AM189815_04_V.pdf December 20, 2001 13 However, because the cover has a beveled surface, you plan to use the cover, attach it to hide the...
Owner's guide
Page 15
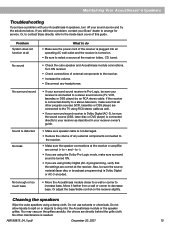
...If you still have a problem with your Acoustimass-6 speakers, turn off your sound source and try the solutions below. to -). • If you are using RCA stereo cable as described in your receiver owner's guide. • Make sure speaker cable is Dolby Digital or AC-3 encoded. Do... not allow liquids to spill on or objects to drop into an operating AC wall outlet and the receiver is needed. Maintaining Your Acoustimass®-6 Speakers Troubleshooting If you have a problem, contact your Bose® dealer ...
...If you still have a problem with your Acoustimass-6 speakers, turn off your sound source and try the solutions below. to -). • If you are using RCA stereo cable as described in your receiver owner's guide. • Make sure speaker cable is Dolby Digital or AC-3 encoded. Do... not allow liquids to spill on or objects to drop into an operating AC wall outlet and the receiver is needed. Maintaining Your Acoustimass®-6 Speakers Troubleshooting If you have a problem, contact your Bose® dealer ...
Owner's guide
Page 17
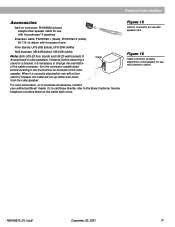
... properly attached to change the orientation of the cube speaker. Cable For more information, or to the Bose Customer Service telephone numbers listed on the back of the cable connector. Product Information Accessories Add-on connector: PN189830 (shown) Adapts other speaker cable for use with Acoustimass®-6 speakers Extension cable: PN187092-1 (black), PN187092-2 (white) 50' (15 m) ribbon with bracket...
... properly attached to change the orientation of the cube speaker. Cable For more information, or to the Bose Customer Service telephone numbers listed on the back of the cable connector. Product Information Accessories Add-on connector: PN189830 (shown) Adapts other speaker cable for use with Acoustimass®-6 speakers Extension cable: PN187092-1 (black), PN187092-2 (white) 50' (15 m) ribbon with bracket...

