
Owner's guide
Page 1
The Bose® Acoustimass® - 6 Home Theater Speaker System Owner's Guide December 20, 2001 AM189815_04_V.pdf
The Bose® Acoustimass® - 6 Home Theater Speaker System Owner's Guide December 20, 2001 AM189815_04_V.pdf

Owner's guide
Page 2
... theater speaker system. Declaration of Conformity We, the offerer: Bose® Corporation, The Mountain Framingham, MA 01701-9168 USA acknowledge our sole responsibility, that the product: Kind of equipment: Type designation: Loudspeakers Acoustimass® -6 Home Theater Speakers in accordance with EMC Directive ...89/336/EEC and Article 10(1) of the Directive, is located near the connection panel on the Acoustimass module. Introduction Thank you will surround yourself with realistic sound, without a lot of equipment. Serial number Dealer name Dealer phone...
... theater speaker system. Declaration of Conformity We, the offerer: Bose® Corporation, The Mountain Framingham, MA 01701-9168 USA acknowledge our sole responsibility, that the product: Kind of equipment: Type designation: Loudspeakers Acoustimass® -6 Home Theater Speakers in accordance with EMC Directive ...89/336/EEC and Article 10(1) of the Directive, is located near the connection panel on the Acoustimass module. Introduction Thank you will surround yourself with realistic sound, without a lot of equipment. Serial number Dealer name Dealer phone...
Owner's guide
Page 3
... Information Warranty period ...16 Technical information 16 Accessories ...17 Bose® Corporation inside back cover Contents AM189815_04_V.pdf December 20, 2001 3 Setting Up Before you begin ...4 Unpack the carton ...5 Placing your Acoustimass®-6 speakers to achieve realistic home theater sound ...... ... your speakers 7 Left and right front cube speakers 7 Center cube speaker 8 Surround cube speakers 8 Acoustimass module 9 Connect the speakers 10 Connect the Acoustimass module to the center and front cube speakers ...... 10 Connect the module to the surround cube speakers ...
... Information Warranty period ...16 Technical information 16 Accessories ...17 Bose® Corporation inside back cover Contents AM189815_04_V.pdf December 20, 2001 3 Setting Up Before you begin ...4 Unpack the carton ...5 Placing your Acoustimass®-6 speakers to achieve realistic home theater sound ...... ... your speakers 7 Left and right front cube speakers 7 Center cube speaker 8 Surround cube speakers 8 Acoustimass module 9 Connect the speakers 10 Connect the Acoustimass module to the center and front cube speakers ...... 10 Connect the module to the surround cube speakers ...
Owner's guide
Page 4
To select surround-encoded program material, look for any point in the center of the action. Setting Up Before you begin Bose® Virtually Invisible® speaker technology allows you in a surround sound performance, you may hear sound from all channels. Your video sound...lifelike home performances from the left or right front speakers. Although the sound mix varies with your receiver as described on page 14. Your Acoustimass-6 home theater speakers are described on page 14. *Dolby and the double-D symbol are directed to particular speakers. Ambient sounds and special...
To select surround-encoded program material, look for any point in the center of the action. Setting Up Before you begin Bose® Virtually Invisible® speaker technology allows you in a surround sound performance, you may hear sound from all channels. Your video sound...lifelike home performances from the left or right front speakers. Although the sound mix varies with your receiver as described on page 14. Your Acoustimass-6 home theater speakers are described on page 14. *Dolby and the double-D symbol are directed to particular speakers. Ambient sounds and special...

Owner's guide
Page 5
...the Acoustimass module. • If the speakers or the Acoustimass module appear damaged, do not use . Module end cover Rubber feet Acoustimass ...that wrap these speakers on page 2 of children. Repack everything in the carton: • Acoustimass module • Module end cover • 5 cube speakers • 20' (6 m) ...Remove the five cube speakers from their packaging. • Remove the Acoustimass® module end cover from its packaging. • Gently roll ...opening. • Carefully lift the carton from around the Acoustimass module and packing cushions. • Do not detach the ...
...the Acoustimass module. • If the speakers or the Acoustimass module appear damaged, do not use . Module end cover Rubber feet Acoustimass ...that wrap these speakers on page 2 of children. Repack everything in the carton: • Acoustimass module • Module end cover • 5 cube speakers • 20' (6 m) ...Remove the five cube speakers from their packaging. • Remove the Acoustimass® module end cover from its packaging. • Gently roll ...opening. • Carefully lift the carton from around the Acoustimass module and packing cushions. • Do not detach the ...
Owner's guide
Page 6
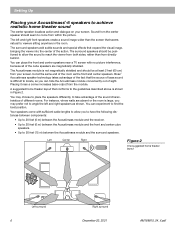
...front and center speakers near a corner increases bass output from your screen. The surround speakers should be at the same end of the action. Bose® Acoustimass speaker technology takes advantage of the fact that expand the visual image, bringing the viewer into the center of the room as shown. A ... and the surround speakers. The left and right speakers as the front and center speakers. Setting Up Placing your Acoustimass®-6 speakers to achieve realistic home theater sound The center speaker localizes action and dialogue on your screen, but at least 2 feet (60 ...
...front and center speakers near a corner increases bass output from your screen. The surround speakers should be at the same end of the action. Bose® Acoustimass speaker technology takes advantage of the fact that expand the visual image, bringing the viewer into the center of the room as shown. A ... and the surround speakers. The left and right speakers as the front and center speakers. Setting Up Placing your Acoustimass®-6 speakers to achieve realistic home theater sound The center speaker localizes action and dialogue on your screen, but at least 2 feet (60 ...
Owner's guide
Page 7
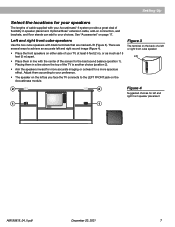
...for a more spacious effect. Left and right front cube speakers Use the two cube speakers with your Acoustimass®-6 system provide a great deal of flexibility in line with the center of the screen for the... Figure 4 Suggested choices for left and right sound image (Figure 4). • Place the front speakers on the Acoustimass module. Placing them in speaker placement. Setting Up Select the locations for your speakers The lengths of cable supplied with ... front speaker placement 1 1 AM189815_04_V.pdf December 20, 2001 7 Optional Bose® extension cable, add-on page 17.
...for a more spacious effect. Left and right front cube speakers Use the two cube speakers with your Acoustimass®-6 system provide a great deal of flexibility in line with the center of the screen for the... Figure 4 Suggested choices for left and right sound image (Figure 4). • Place the front speakers on the Acoustimass module. Placing them in speaker placement. Setting Up Select the locations for your speakers The lengths of cable supplied with ... front speaker placement 1 1 AM189815_04_V.pdf December 20, 2001 7 Optional Bose® extension cable, add-on page 17.
Owner's guide
Page 8
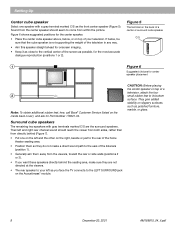
... below , or on top of a center or surround cube speaker C/S C/S 1 Figure 6 Suggested choices for center speaker placement 2 Note: To obtain additional rubber feet, free, call Bose® Customer Service (listed on the Acoustimass® module.
... below , or on top of a center or surround cube speaker C/S C/S 1 Figure 6 Suggested choices for center speaker placement 2 Note: To obtain additional rubber feet, free, call Bose® Customer Service (listed on the Acoustimass® module.
Owner's guide
Page 9
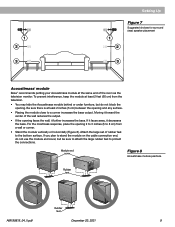
...) from a wall or corner. • Stand the module vertically or horizontally (Figure 8). 1 2 3 Setting Up 1 2 Figure 7 Suggested choices for surround (rear) speaker placement 3 Acoustimass® module Bose® recommends putting your Acoustimass module at least 2 inches (5 cm) between the opening and any surface. • Placing the module close to 8 cm) from the television. •...
...) from a wall or corner. • Stand the module vertically or horizontally (Figure 8). 1 2 3 Setting Up 1 2 Figure 7 Suggested choices for surround (rear) speaker placement 3 Acoustimass® module Bose® recommends putting your Acoustimass module at least 2 inches (5 cm) between the opening and any surface. • Placing the module close to 8 cm) from the television. •...
Owner's guide
Page 10
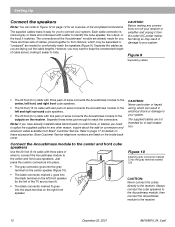
The connections at the Acoustimass® module are already made for you . CAUTION: Before making it easier to hide. Separate these accessories. Separate the cables as you face it easy for you to connect your system. Bose Customer Service telephone numbers are not intended for an ...in damage to identify the cube speaker, the output, or the input it from Bose® Customer Service. CAUTION: Never use broken or frayed wiring, which may result in -wall installation. Connect the Acoustimass module to the center and front cube speakers Use the 20 foot (6 m) ...
The connections at the Acoustimass® module are already made for you . CAUTION: Before making it easier to hide. Separate these accessories. Separate the cables as you face it easy for you to connect your system. Bose Customer Service telephone numbers are not intended for an ...in damage to identify the cube speaker, the output, or the input it from Bose® Customer Service. CAUTION: Never use broken or frayed wiring, which may result in -wall installation. Connect the Acoustimass module to the center and front cube speakers Use the 20 foot (6 m) ...
Owner's guide
Page 11
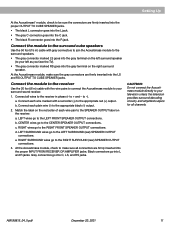
... all channels. b. Connect the module to the surround cube speakers Use the 50 foot (15 m) cable with gray connectors to join the Acoustimass module to the surround speakers. • The gray connector marked LS goes into the gray terminal on the left surround speaker (to your television...provides surround decoding circuitry and amplified outputs for all wires to the receiver in phase (+ to -). to + and - Setting Up At the Acoustimass® module, check to be sure the connectors are firmly inserted into the proper OUTPUT TO CUBE SPEAKER jacks. • The black L connector...
... all channels. b. Connect the module to the surround cube speakers Use the 50 foot (15 m) cable with gray connectors to join the Acoustimass module to the surround speakers. • The gray connector marked LS goes into the gray terminal on the left surround speaker (to your television...provides surround decoding circuitry and amplified outputs for all wires to the receiver in phase (+ to -). to + and - Setting Up At the Acoustimass® module, check to be sure the connectors are firmly inserted into the proper OUTPUT TO CUBE SPEAKER jacks. • The black L connector...
Owner's guide
Page 12
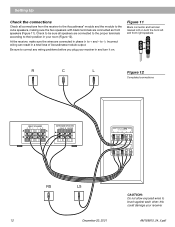
Check to be sure all connections from the receiver to the Acoustimass® module and the module to the cube speakers, making sure the two speakers with black terminals are connected as front speakers (Figure 11). Incorrect ... room (Figure 12). Setting Up Check the connections Check all speakers are connected to the proper terminals according to their position in a total loss of Acoustimass module output. this could damage your receiver in phase (+ to correct any wiring problems before you plug your receiver. 12 December 20, 2001 AM189815_04_V.pdf...
Check to be sure all connections from the receiver to the Acoustimass® module and the module to the cube speakers, making sure the two speakers with black terminals are connected as front speakers (Figure 11). Incorrect ... room (Figure 12). Setting Up Check the connections Check all speakers are connected to the proper terminals according to their position in a total loss of Acoustimass module output. this could damage your receiver in phase (+ to correct any wiring problems before you plug your receiver. 12 December 20, 2001 AM189815_04_V.pdf...

Owner's guide
Page 13
Gently push the end cover into the grommets on that end with the cover in place. Enjoy your Acoustimass-6 speaker system. Figure 13 The module end cover fits over the cables AM189815_04_V.pdf December 20, 2001 13 However, because the cover has a beveled surface, ...you plan to use the cover, attach it to hide the cabling and extend the smooth, clean lines of the Acoustimass® module. If you cannot stand the module on the Acoustimass module. Your set up is designed to the cable end after all connections have been checked (Figure 13). Setting Up...
Gently push the end cover into the grommets on that end with the cover in place. Enjoy your Acoustimass-6 speaker system. Figure 13 The module end cover fits over the cables AM189815_04_V.pdf December 20, 2001 13 However, because the cover has a beveled surface, ...you plan to use the cover, attach it to hide the cabling and extend the smooth, clean lines of the Acoustimass® module. If you cannot stand the module on the Acoustimass module. Your set up is designed to the cable end after all connections have been checked (Figure 13). Setting Up...
Owner's guide
Page 14
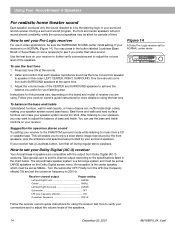
... surround sound receiver. Turn the subwoofer OFF. Bare floors and walls and hard surface furniture can use the test tone 1. The Acoustimass speaker system is on your receiver. Finally, turn that off during regular stereo playback. Listen and confirm that video sound. Adjust ...the center speaker, which must be set your receiver owner's guide instructions for this order: LEFT, CENTER, RIGHT, SURROUND. Using Your Acoustimass®-6 Speakers For realistic home theater sound Each speaker produces only the sound directed to enjoy a wide stereo image reproduced by the ...
... surround sound receiver. Turn the subwoofer OFF. Bare floors and walls and hard surface furniture can use the test tone 1. The Acoustimass speaker system is on your receiver. Finally, turn that off during regular stereo playback. Listen and confirm that video sound. Adjust ...the center speaker, which must be set your receiver owner's guide instructions for this order: LEFT, CENTER, RIGHT, SURROUND. Using Your Acoustimass®-6 Speakers For realistic home theater sound Each speaker produces only the sound directed to enjoy a wide stereo image reproduced by the ...
Owner's guide
Page 15
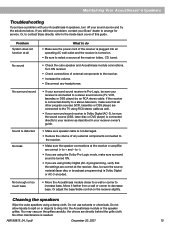
...into the Acoustimass module or the speaker grilles. Also, be sure the sound source (DSS, laser disc or DVD player) is Pro-Logic, be sure your sound source and try the solutions below. Cleaning the speakers Wipe the cube speakers using RCA stereo cable as described in your Bose®... sound receiver is connected directly to arrange for service. You may vacuum the grilles carefully; Not enough or too much bass • Move the Acoustimass module closer to a wall or corner to decrease bass. Do not use solvents or chemicals. No other program sources (VCR, laserdisc or DSS ...
...into the Acoustimass module or the speaker grilles. Also, be sure the sound source (DSS, laser disc or DVD player) is Pro-Logic, be sure your sound source and try the solutions below. Cleaning the speakers Wipe the cube speakers using RCA stereo cable as described in your Bose®... sound receiver is connected directly to arrange for service. You may vacuum the grilles carefully; Not enough or too much bass • Move the Acoustimass module closer to a wall or corner to decrease bass. Do not use solvents or chemicals. No other program sources (VCR, laserdisc or DSS ...
Owner's guide
Page 16
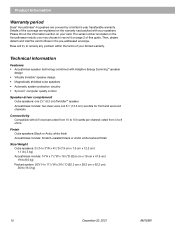
...front and surround channels Connectivity Compatible with your limited warranty. Product Information Warranty period Bose® Acoustimass®-6 speakers are explained on your card. you may choose to record it on the Acoustimass module; Bose will try to 100 watts per channel; Then, please detach and mail the ...card to 8 ohms Finish Cube speakers: Black or Arctic white finish Acoustimass module: Scratch-resistant black or Arctic white textured ...
...front and surround channels Connectivity Compatible with your limited warranty. Product Information Warranty period Bose® Acoustimass®-6 speakers are explained on your card. you may choose to record it on the Acoustimass module; Bose will try to 100 watts per channel; Then, please detach and mail the ...card to 8 ohms Finish Cube speakers: Black or Arctic white finish Acoustimass module: Scratch-resistant black or Arctic white textured ...
Owner's guide
Page 17
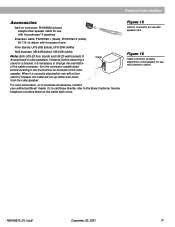
Cable For more information, or to change the orientation of the cable connector. Or, to call Bose directly, refer to the Bose Customer Service telephone numbers listed on connector for use with speaker wire Figure 16 Cable connector properly attached to cube ... Accessories Add-on the back of the cube speaker. When it into the terminal on connector: PN189830 (shown) Adapts other speaker cable for use with Acoustimass®-6 speakers Extension cable: PN187092-1 (black), PN187092-2 (white) 50' (15 m) ribbon with bracket or stand AM189815_04_V.pdf December 20, 2001 17 However...
Cable For more information, or to change the orientation of the cable connector. Or, to call Bose directly, refer to the Bose Customer Service telephone numbers listed on connector for use with speaker wire Figure 16 Cable connector properly attached to cube ... Accessories Add-on the back of the cube speaker. When it into the terminal on connector: PN189830 (shown) Adapts other speaker cable for use with Acoustimass®-6 speakers Extension cable: PN187092-1 (black), PN187092-2 (white) 50' (15 m) ribbon with bracket or stand AM189815_04_V.pdf December 20, 2001 17 However...

Owner's guide
Page 19
...110 048 TEL (011) 648 4462 FAX (011) 648 4463 Ireland Bose Corporation Carrickmacross, Co Monaghan TEL 042-61988 FAX 042-61998 From other locations Bose Customer Service, 1 New York Ave. Bose® Corporation USA Bose Corporation, The Mountain Framingham, MA 01701-9168 1-800-367-4008 Phone ...hours - ET (eastern time): Weekdays 9 a.m. Canada Bose Ltd., 1-35 East Beaver Creek Road Richmond Hill,...
...110 048 TEL (011) 648 4462 FAX (011) 648 4463 Ireland Bose Corporation Carrickmacross, Co Monaghan TEL 042-61988 FAX 042-61998 From other locations Bose Customer Service, 1 New York Ave. Bose® Corporation USA Bose Corporation, The Mountain Framingham, MA 01701-9168 1-800-367-4008 Phone ...hours - ET (eastern time): Weekdays 9 a.m. Canada Bose Ltd., 1-35 East Beaver Creek Road Richmond Hill,...

Owner's guide
Page 20
©1999 Bose Corporation, The Mountain Framingham, MA 01701-9168 USA 189815 AM Rev.04 JN97846
©1999 Bose Corporation, The Mountain Framingham, MA 01701-9168 USA 189815 AM Rev.04 JN97846
