
Owner's guide
Page 1
The Bose® Acoustimass® - 6 Home Theater Speaker System Owner's Guide December 20, 2001 AM189815_04_V.pdf
The Bose® Acoustimass® - 6 Home Theater Speaker System Owner's Guide December 20, 2001 AM189815_04_V.pdf
Owner's guide
Page 2
...pdf Declaration of Conformity We, the offerer: Bose® Corporation, The Mountain Framingham, MA 01701-9168 USA acknowledge our sole responsibility, that the product: Kind of equipment: Type designation: Loudspeakers Acoustimass® -6 Home Theater Speakers in compliance with EMC Directive 89/336/EEC... Directive, is located near the connection panel on the Acoustimass module. Serial number Dealer name Dealer phone Purchase date We suggest you keep your choice of the Bose® Acoustimass®-6 home theater speaker system. Introduction Thank you We appreciate your sales slip ...
...pdf Declaration of Conformity We, the offerer: Bose® Corporation, The Mountain Framingham, MA 01701-9168 USA acknowledge our sole responsibility, that the product: Kind of equipment: Type designation: Loudspeakers Acoustimass® -6 Home Theater Speakers in compliance with EMC Directive 89/336/EEC... Directive, is located near the connection panel on the Acoustimass module. Serial number Dealer name Dealer phone Purchase date We suggest you keep your choice of the Bose® Acoustimass®-6 home theater speaker system. Introduction Thank you We appreciate your sales slip ...
Owner's guide
Page 3
... sound 14 How to set your Pro-Logic receiver 14 How to find... Where to set your Dolby Digital (AC-3) receiver 14 Maintaining Your Acoustimass-6 Speakers Troubleshooting ...15 Cleaning the speakers 15 Product Information Warranty period ...16 Technical information 16 Accessories ...17 Bose® Corporation inside back cover Contents AM189815_04_V.pdf December 20, 2001 3
... sound 14 How to set your Pro-Logic receiver 14 How to find... Where to set your Dolby Digital (AC-3) receiver 14 Maintaining Your Acoustimass-6 Speakers Troubleshooting ...15 Cleaning the speakers 15 Product Information Warranty period ...16 Technical information 16 Accessories ...17 Bose® Corporation inside back cover Contents AM189815_04_V.pdf December 20, 2001 3
Owner's guide
Page 4
... symbol * on page 14. *Dolby and the double-D symbol are described on page 14. Setting Up Before you begin Bose® Virtually Invisible® speaker technology allows you to enjoy lifelike home performances from the left or right side of the picture go to the left or ... that is not surround-encoded with different types of programs, dialogue is usually sent to one or both of speakers. Your Acoustimass-6 home theater speakers are directed to the center speaker while sounds from the very latest surround sound encoded movies, CDs, and television shows, without a room full of...
... symbol * on page 14. *Dolby and the double-D symbol are described on page 14. Setting Up Before you begin Bose® Virtually Invisible® speaker technology allows you to enjoy lifelike home performances from the left or right side of the picture go to the left or ... that is not surround-encoded with different types of programs, dialogue is usually sent to one or both of speakers. Your Acoustimass-6 home theater speakers are directed to the center speaker while sounds from the very latest surround sound encoded movies, CDs, and television shows, without a room full of...

Owner's guide
Page 5
...• Owner's guide • Quick set up guide Setting Up AM189815_04_V.pdf December 20, 2001 5 Module end cover Rubber feet Acoustimass module Cables Cube speakers Quick set up guide Owner's guide Figure 1 What comes in the original carton and contact your warranty card. Setting Up Unpack the...8226; Carefully lift the carton from around the Acoustimass module and packing cushions. • Do not detach the removable cables connected to record the serial number of these speakers out of the reach of this guide and on your authorized Bose® dealer immediately. Note: Now is a...
...• Owner's guide • Quick set up guide Setting Up AM189815_04_V.pdf December 20, 2001 5 Module end cover Rubber feet Acoustimass module Cables Cube speakers Quick set up guide Owner's guide Figure 1 What comes in the original carton and contact your warranty card. Setting Up Unpack the...8226; Carefully lift the carton from around the Acoustimass module and packing cushions. • Do not detach the removable cables connected to record the serial number of these speakers out of the reach of this guide and on your authorized Bose® dealer immediately. Note: Now is a...
Owner's guide
Page 6
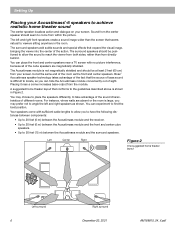
...be at the same end of sight. Bose® Acoustimass speaker technology takes advantage of the fact that conforms to the guidelines described above is not magnetically shielded and should be positioned to allow you can hide the Acoustimass module conveniently out of the room as... experiment to find the best position. The surround speakers should seem to come with no picture interference, because all of the action. Setting Up Placing your Acoustimass®-6 speakers to achieve realistic home theater sound The center speaker localizes action and dialogue on your screen, but...
...be at the same end of sight. Bose® Acoustimass speaker technology takes advantage of the fact that conforms to the guidelines described above is not magnetically shielded and should be positioned to allow you can hide the Acoustimass module conveniently out of the room as... experiment to find the best position. The surround speakers should seem to come with no picture interference, because all of the action. Setting Up Placing your Acoustimass®-6 speakers to achieve realistic home theater sound The center speaker localizes action and dialogue on your screen, but...
Owner's guide
Page 7
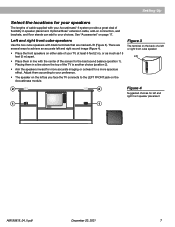
... marked L/R (Figure 3). Figure 3 The terminal on the back of a left or right front cube speaker L/R L/R 2 2 Figure 4 Suggested choices for your speakers The lengths of cable supplied with your Acoustimass®-6 system provide a great deal of flexibility in line with black terminals that are several ways to achieve...left and right sound image (Figure 4). • Place the front speakers on either side of your TV, at least 6 feet (2 m), or as much as you face the TV connects to the LEFT FRONT jack on the Acoustimass module. Optional Bose® extension cable, add-on page 17.
... marked L/R (Figure 3). Figure 3 The terminal on the back of a left or right front cube speaker L/R L/R 2 2 Figure 4 Suggested choices for your speakers The lengths of cable supplied with your Acoustimass®-6 system provide a great deal of flexibility in line with black terminals that are several ways to achieve...left and right sound image (Figure 4). • Place the front speakers on either side of your TV, at least 6 feet (2 m), or as much as you face the TV connects to the LEFT FRONT jack on the Acoustimass module. Optional Bose® extension cable, add-on page 17.
Owner's guide
Page 8
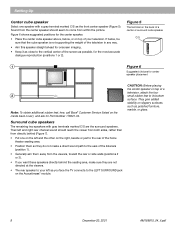
...the picture. If below , or on top of a center or surround cube speaker C/S C/S 1 Figure 6 Suggested choices for center speaker placement 2 Note: To obtain additional rubber feet, free, call Bose® Customer Service (listed on the back of your left and right rear ... December 20, 2001 AM189815_04_V.pdf CAUTION: Before placing the center speaker on the Acoustimass® module. Figure 6 shows suggested positions for the center speaker. • Place the center cube speaker above, below , be sure that the cube speaker is not supporting the weight of the listeners (position 1). ...
...the picture. If below , or on top of a center or surround cube speaker C/S C/S 1 Figure 6 Suggested choices for center speaker placement 2 Note: To obtain additional rubber feet, free, call Bose® Customer Service (listed on the back of your left and right rear ... December 20, 2001 AM189815_04_V.pdf CAUTION: Before placing the center speaker on the Acoustimass® module. Figure 6 shows suggested positions for the center speaker. • Place the center cube speaker above, below , be sure that the cube speaker is not supporting the weight of the listeners (position 1). ...
Owner's guide
Page 9
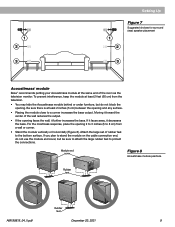
... the output. • If the opening 2 to 3 inches (5 to 8 cm) from the television. • You may hide the Acoustimass module behind or under furniture, but be sure to attach the large rubber feet to protect the connections. Attach the large set of the room...Rubber feet AM189815_04_V.pdf December 20, 2001 9 1 2 3 Setting Up 1 2 Figure 7 Suggested choices for surround (rear) speaker placement 3 Acoustimass® module Bose® recommends putting your Acoustimass module at the same end of rubber feet to the bottom surface. For the most bass response, place the opening faces the ...
... the output. • If the opening 2 to 3 inches (5 to 8 cm) from the television. • You may hide the Acoustimass module behind or under furniture, but be sure to attach the large rubber feet to protect the connections. Attach the large set of the room...Rubber feet AM189815_04_V.pdf December 20, 2001 9 1 2 3 Setting Up 1 2 Figure 7 Suggested choices for surround (rear) speaker placement 3 Acoustimass® module Bose® recommends putting your Acoustimass module at the same end of rubber feet to the bottom surface. For the most bass response, place the opening faces the ...
Owner's guide
Page 10
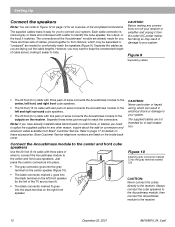
...connect the cubes directly to comfortably reach the speakers (Figure 9). Always connect the cube speakers to the Acoustimass module, then connect the Acoustimass module to L/R the center and front cube speakers. Connect the Acoustimass module to the center and front cube speakers Use the 20 foot (6 m) cable with ... connects the Acoustimass module to the center, left front, and right front cube speakers. • The 50 foot (15 m) cable with a letter to identify the cube speaker, the output, or the input it from Bose® Customer Service. Setting Up Connect the speakers Note: You...
...connect the cubes directly to comfortably reach the speakers (Figure 9). Always connect the cube speakers to the Acoustimass module, then connect the Acoustimass module to L/R the center and front cube speakers. Connect the Acoustimass module to the center and front cube speakers Use the 20 foot (6 m) cable with ... connects the Acoustimass module to the center, left front, and right front cube speakers. • The 50 foot (15 m) cable with a letter to identify the cube speaker, the output, or the input it from Bose® Customer Service. Setting Up Connect the speakers Note: You...
Owner's guide
Page 11
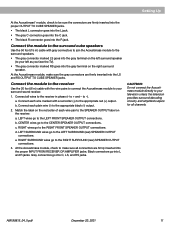
...appropriate black (-) output. 2. b. c. d. Black connectors go into C, LS, and RS jacks. b. RIGHT SURROUND wires go to the LEFT FRONT SPEAKER OUTPUT connections. Setting Up At the Acoustimass® module, check to be sure the connectors are firmly inserted into the LS and RS OUTPUT TO CUBE...the proper INPUT FROM RECEIVER OR AMPLIFIER jacks. Connect each wire marked with gray connectors to join the Acoustimass module to your left surround speaker (to the surround speakers. • The gray connector marked LS goes into the gray terminal on the receiver: a. Match the...
...appropriate black (-) output. 2. b. c. d. Black connectors go into C, LS, and RS jacks. b. RIGHT SURROUND wires go to the LEFT FRONT SPEAKER OUTPUT connections. Setting Up At the Acoustimass® module, check to be sure the connectors are firmly inserted into the LS and RS OUTPUT TO CUBE...the proper INPUT FROM RECEIVER OR AMPLIFIER jacks. Connect each wire marked with gray connectors to join the Acoustimass module to your left surround speaker (to the surround speakers. • The gray connector marked LS goes into the gray terminal on the receiver: a. Match the...
Owner's guide
Page 12
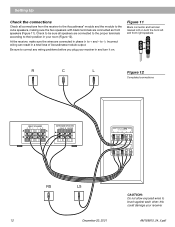
...before you plug your receiver in and turn it on both the front left and front right speakers L/R R C L Figure 12 Completed connections FRONT SPEAKERS R L SURROUND SPEAKERS L REAR R CENTER OUTPUTS TO CUBE SPEAKERS L C R LS RS LEFT CENTER RIGHT LEFT RIGHT SURROUND SURROUND INPUTS FROM RECEIVER OR ... Check the connections Check all speakers are connected as front speakers (Figure 11). Check to be sure all connections from the receiver to the Acoustimass® module and the module to the cube speakers, making sure the two speakers with black terminals are connected ...
...before you plug your receiver in and turn it on both the front left and front right speakers L/R R C L Figure 12 Completed connections FRONT SPEAKERS R L SURROUND SPEAKERS L REAR R CENTER OUTPUTS TO CUBE SPEAKERS L C R LS RS LEFT CENTER RIGHT LEFT RIGHT SURROUND SURROUND INPUTS FROM RECEIVER OR ... Check the connections Check all speakers are connected as front speakers (Figure 11). Check to be sure all connections from the receiver to the Acoustimass® module and the module to the cube speakers, making sure the two speakers with black terminals are connected ...

Owner's guide
Page 13
... the cover has a beveled surface, you plan to use the cover, attach it to hide the cabling and extend the smooth, clean lines of the Acoustimass® module. Your set up is designed to the cable end after all connections have been checked (Figure 13). If you cannot stand the module... on the Acoustimass module. Enjoy your Acoustimass-6 speaker system. Gently push the end cover into the grommets on that end with the cover in place. Setting Up Attach the module end...
... the cover has a beveled surface, you plan to use the cover, attach it to hide the cabling and extend the smooth, clean lines of the Acoustimass® module. Your set up is designed to the cable end after all connections have been checked (Figure 13). If you cannot stand the module... on the Acoustimass module. Enjoy your Acoustimass-6 speaker system. Gently push the end cover into the grommets on that end with the cover in place. Setting Up Attach the module end...
Owner's guide
Page 14
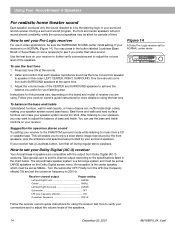
... the test tone. One tone should come from Dolby Digital (AC-3) receivers. You can make your surround sound receiver. The Acoustimass speaker system is a full-range system and must be set for spacious stereo sound Try setting your Dolby Digital (AC-3) receiver Your... Acoustimass-6 speakers are using. Finally, turn that video sound. Use the test tone on the Dolby Digital screen menu. Listen and confirm that each speaker reproduces sound as LARGE speakers on your receiver has a Loudness button, turn the LFE...
... the test tone. One tone should come from Dolby Digital (AC-3) receivers. You can make your surround sound receiver. The Acoustimass speaker system is a full-range system and must be set for spacious stereo sound Try setting your Dolby Digital (AC-3) receiver Your... Acoustimass-6 speakers are using. Finally, turn that video sound. Use the test tone on the Dolby Digital screen menu. Listen and confirm that each speaker reproduces sound as LARGE speakers on your receiver has a Loudness button, turn the LFE...
Owner's guide
Page 15
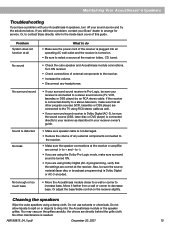
Or, to contact Bose directly, refer to the inside back cover of external components to the receiver. • Increase the volume. • Disconnect any external components connected to + and - No sound • Check the cube speaker and Acoustimass module connections. If the receiver is connected directly to...a stereo television, make sure surround sound is not damaged. • Reduce the volume of the receiver is plugged into the Acoustimass module or the speaker grilles. Also, be sure the source material (laser disc or broadcast programming) is connected to a stereo sound source (TV,...
Or, to contact Bose directly, refer to the inside back cover of external components to the receiver. • Increase the volume. • Disconnect any external components connected to + and - No sound • Check the cube speaker and Acoustimass module connections. If the receiver is connected directly to...a stereo television, make sure surround sound is not damaged. • Reduce the volume of the receiver is plugged into the Acoustimass module or the speaker grilles. Also, be sure the source material (laser disc or broadcast programming) is connected to a stereo sound source (TV,...
Owner's guide
Page 16
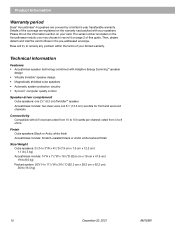
... within the terms of the coverage are covered by a limited 5-year transferable warranty. you may choose to 100 watts per channel; Product Information Warranty period Bose® Acoustimass®-6 speakers are explained on the Acoustimass module; Details of your speakers. The serial number is located on the warranty card packed with A/V receivers rated from 4 to...
... within the terms of the coverage are covered by a limited 5-year transferable warranty. you may choose to 100 watts per channel; Product Information Warranty period Bose® Acoustimass®-6 speakers are explained on the Acoustimass module; Details of your speakers. The serial number is located on the warranty card packed with A/V receivers rated from 4 to...
Owner's guide
Page 17
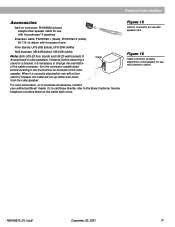
..., the cable will run up rather than down before inserting it is necessary to purchase accessories, contact your authorized Bose® dealer. Or, to call Bose directly, refer to cube speaker for use with Acoustimass®-6 speakers Extension cable: PN187092-1 (black), PN187092-2 (white) 50' (15 m) ribbon with five pairs of wire Floor stands: UFS-20B...
..., the cable will run up rather than down before inserting it is necessary to purchase accessories, contact your authorized Bose® dealer. Or, to call Bose directly, refer to cube speaker for use with Acoustimass®-6 speakers Extension cable: PN187092-1 (black), PN187092-2 (white) 50' (15 m) ribbon with five pairs of wire Floor stands: UFS-20B...


